Language: English
Microsoft 365 Copilot reaches ActivityInfo through a custom federated connector. Your IT department sets up the connector once for your organization, and each member then signs in with their own ActivityInfo account.
Before you begin
- You need the Global Administrator or AI Administrator role in the Microsoft 365 admin center.
- You need access to the Teams Developer Portal.
- You need a way to send an HTTP request, such as
curlor Postman, for the registration step.
Step 1: Register Copilot with ActivityInfo
Register your connector with ActivityInfo to get a client ID. You can only do this through the API. The request needs no authentication.
Copilot sends users back to a callback URL after they sign in to ActivityInfo. That URL is the same for every Copilot connector, so you can use it as it appears below.
curl -X POST https://www.activityinfo.org/oauth/register \
  -H "Content-Type: application/json" \
  -d '{
        "client_name": "My Organization Copilot",
        "redirect_uris": ["https://teams.microsoft.com/api/platform/v1.0/oAuthRedirect"]
      }'
ActivityInfo replies with a client_id:
{
  "grant_types": [
    "authorization_code",
    "refresh_token"
  ],
  "redirect_uris": [
    "https:\/\/teams.microsoft.com\/api\/platform\/v1.0\/oAuthRedirect"
  ],
  "client_id_issued_at": 1788520644,
  "client_name": "My Organization Copilot",
  "token_endpoint_auth_method": "none",
  "client_id": "ec8xxxxxxxxxxxxxxxxx",
  "response_types": [
    "code"
  ]
}
Keep the client_id for the next step. Register once for your organization, not once per user. For more about this step, see Registering an OAuth application.
Step 2: Register the OAuth app in the Teams Developer Portal
- Sign in to the Teams Developer Portal.
- Select “Tools” > “OAuth Client Registration”.
- Select “+ New OAuth connection”.
- Enter the connection details:
| Field | Value |
|---|---|
| Registration name | ActivityInfo |
| Base URL | https://www.activityinfo.org/mcp |
| Restrict usage by organization | “My organization only” |
| Restrict usage by Teams app | “Any Teams app” |
| Client ID | The client_id from Step 1 |
| Client secret | Ignored by ActivityInfo, enter any placeholder, such as not-used |
| Authorization endpoint | https://www.activityinfo.org/oauth/authorize |
| Token endpoint | https://www.activityinfo.org/oauth/token |
| Refresh endpoint | https://www.activityinfo.org/oauth/token |
| Scope | activityinfo.read |
| Enable Proof Key for Code Exchange (PKCE) | Enabled |
| Client password authentication method | “Request body parameters” |
- Select “Save”.
Include activityinfo.read only. Copilot connectors are read-only: Copilot offers a user just the ActivityInfo tools that read data, and leaves out the tools that add records, change records or alter a form's design.
After you save the registration, the portal shows an “OAuth client registration ID”. Keep this ID for the next step.
Step 3: Create the connector
- Sign in to the Microsoft 365 admin center.
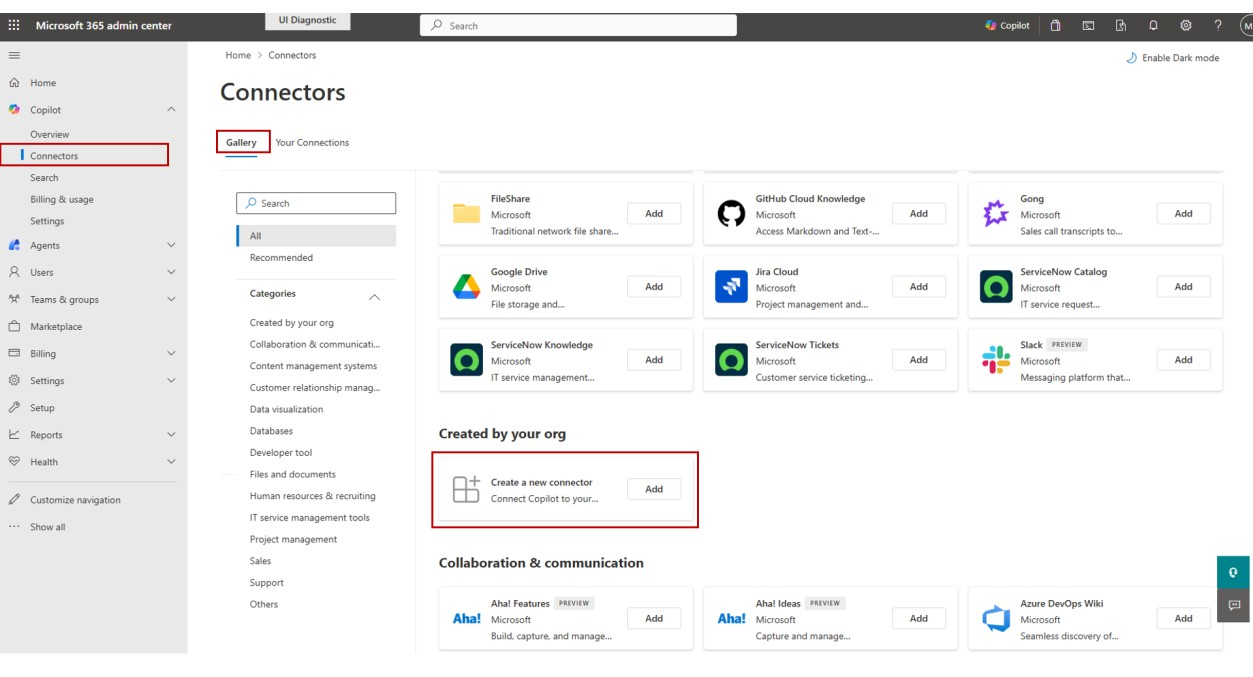
- In the left pane, select “Copilot” > “Connectors”.
- Select the “Gallery” tab.
- Under “Created by your org”, find the “Create a new connector” tile and select “Add”.
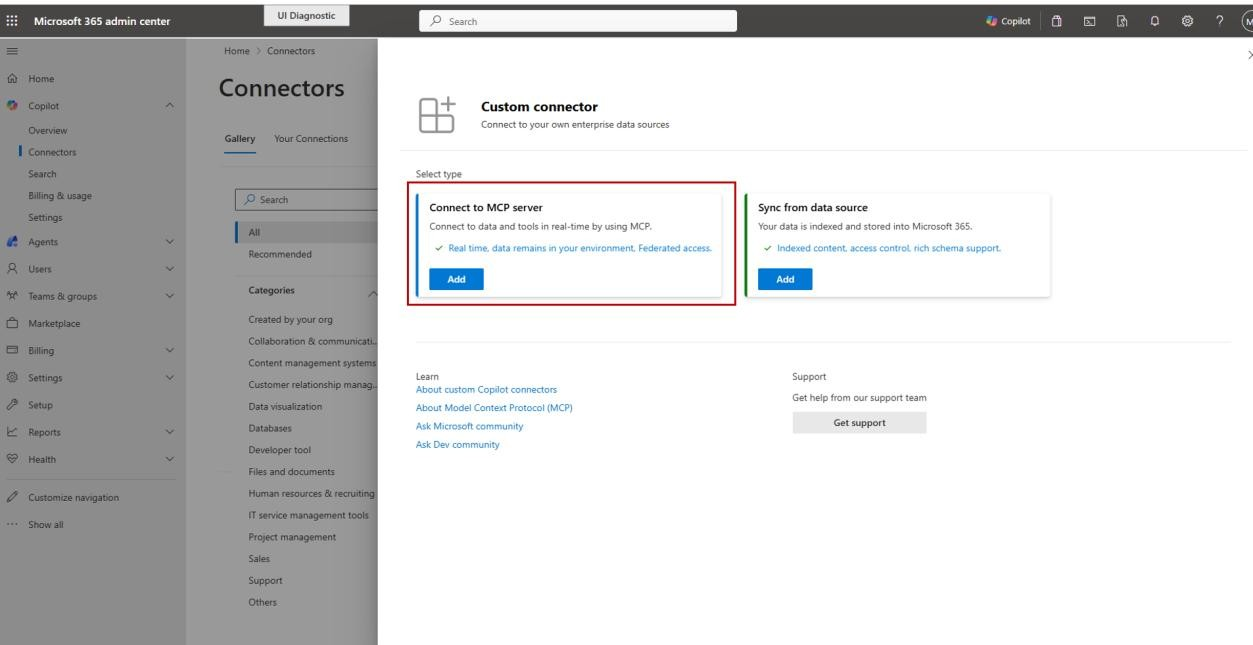
- On the “Custom connector” page, under “Connect to MCP server”, select “Add”.
- Enter the following information about your connector:
| Field | Value |
|---|---|
| Display Name | ActivityInfo |
| Base URL | https://www.activityinfo.org/mcp |
| Developer name | ActivityInfo |
| Website URL | https://www.activityinfo.org |
| Privacy Policy URL | https://www.activityinfo.org/about/privacy-notice.html |
| Terms of use URL | https://www.activityinfo.org/about/terms.html |
| Authentication type | OAuth 2.0 |
| Reference ID | The OAuth client registration ID from Step 2 |
- Select “Save”.
Step 4: Roll out the connector
A new connector appears in the “Your Connections” list. Enable it, and either add test users under “Staged rollout” or select “Deploy to all users”.
Changes to a connector take up to 15 minutes to take effect. Wait for that period to pass before you test.
Confirm the connection
Each member signs in to ActivityInfo with their own account the first time they use the connector, and approves it on the “Authorize application” screen. They see only what their own role in ActivityInfo allows.
Ask:
List my ActivityInfo databases.
Troubleshooting
| What you see | Cause |
|---|---|
Every tool call returns a 404 error |
The OAuth client registration is bound to a single Teams app ID. Change “Restrict usage by Teams app” to “Any Teams app” |
| Copilot asks users to sign in again after an hour | The refresh endpoint is blank. Set it to https://www.activityinfo.org/oauth/token |
PKCE with code_challenge_method=S256 is required |
PKCE is not switched on for the registration. Switch it on |
redirect_uri does not match a registered URI |
The redirect URI in Step 1 is not exactly https://teams.microsoft.com/api/platform/v1.0/oAuthRedirect. ActivityInfo compares the whole URL exactly. Register again with the exact value |
invalid_client: unknown client_id |
The client ID is mistyped, or the registration was removed because no user had ever approved it. Register again |
| “The MCP server is not enabled for database …” | Nobody has enabled the setting for that database. See Enabling the MCP server for a database |
| Copilot reports that it has no tool for adding or changing a record | Expected. Copilot connectors are read-only and Copilot offers only the ActivityInfo tools that read data. This is not something you can change in the connector |