Measure beneficiary outreach for income generation training activities
In this guide, we will create a simple database to measure the number of beneficiaries we reached with our income generation training activities. We will disaggregate this number based on gender (male, female, other) and refugee status (refugee, non refugee).
The database will consist of two forms which will link to each other. One form will list all our training activities. The other form will link to it and will be used to help us collect information about each training activity. The same form will include a subform which will collect the participants’ information along with their gender and refugee status.
Optionally, we will invite colleagues to the database and we will assign them roles.
After adding or importing data to these forms we will create a simple Pivot table to show the amount of beneficiaries we reached with each training session and we will see how we can disaggregate this data further to get the total of beneficiaries reached by gender, refugee status, location and other dimensions.
Useful documentation articles:
- The article on importing records to a subform will help us prepare our data sufficiently.
- The article on inviting a user to a Blank database will show how to invite our colleagues quickly.
- The article on designing a Pivot Table will help us create the Pivot Table.
In our example, we will add a database using the Blank database template.
If you are interested in a more thorough walkthrough on building a complete data collection system for Monitoring and Evaluation activities, please consider taking the online, free self-paced course "Mastering the basics of information management with ActivityInfo".
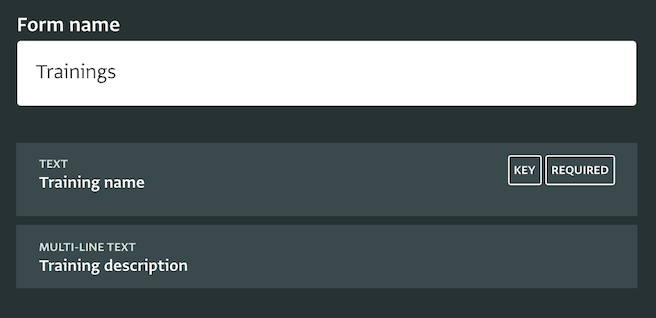
Step 1: Design the “Trainings” form
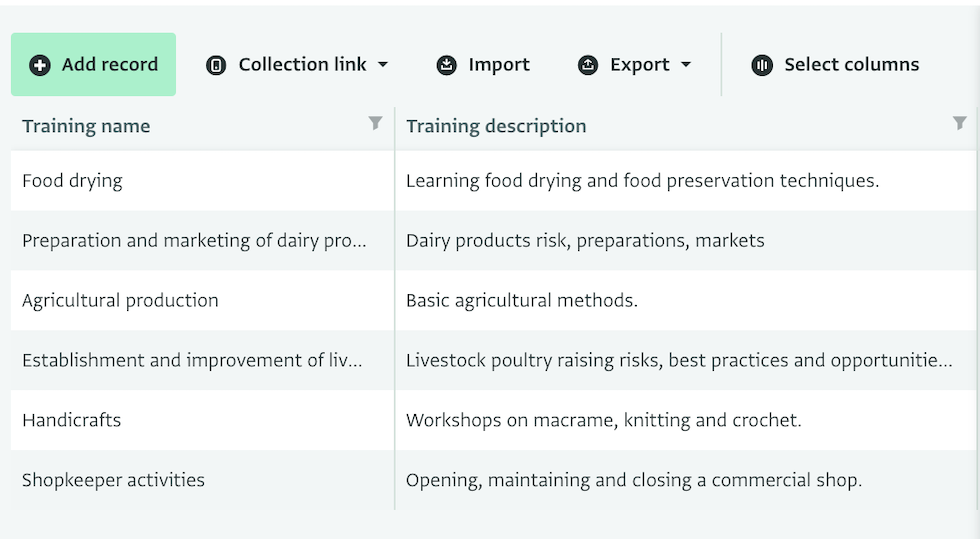
The “Trainings” form will be a reference form. We will use a Text field to collect the name of the training and a Multi-line Text field to collect a short description for each training. We will make the Text field a Key field to make it easier to reference it in our second form. Once we save the form, we can add as Records each training along with a short description. You can add more fields to this form to match your own requirements.
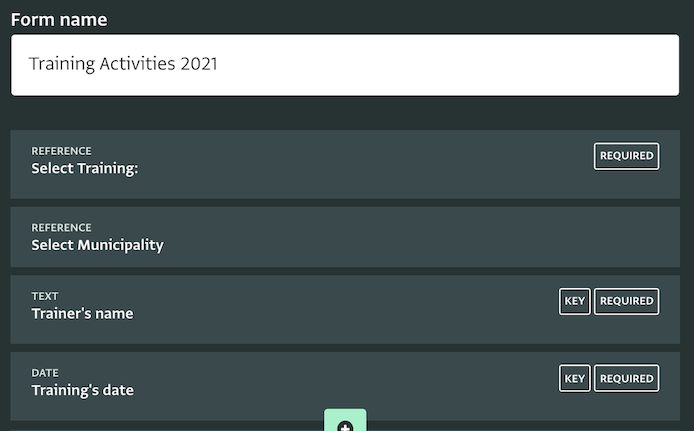
Step 2: Add the “Training activities 2021” form and its subform
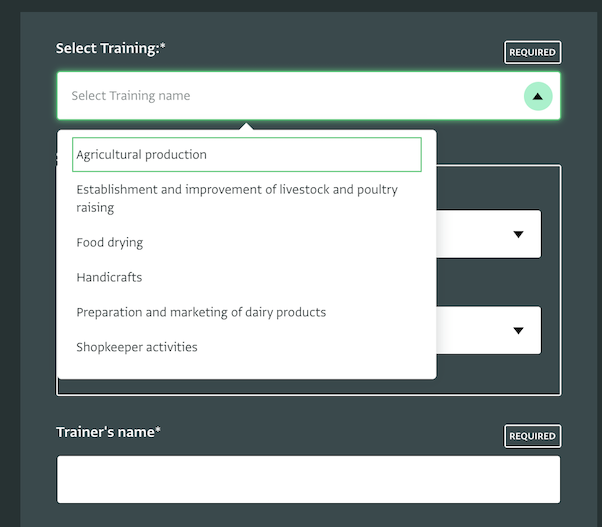
Next, we will add the “Training activities 2021” form. This will consist of a Parent form and a subform. First of all, we will add a Reference field to link to the “Trainings” form. This will allow us to choose a Training from a list.
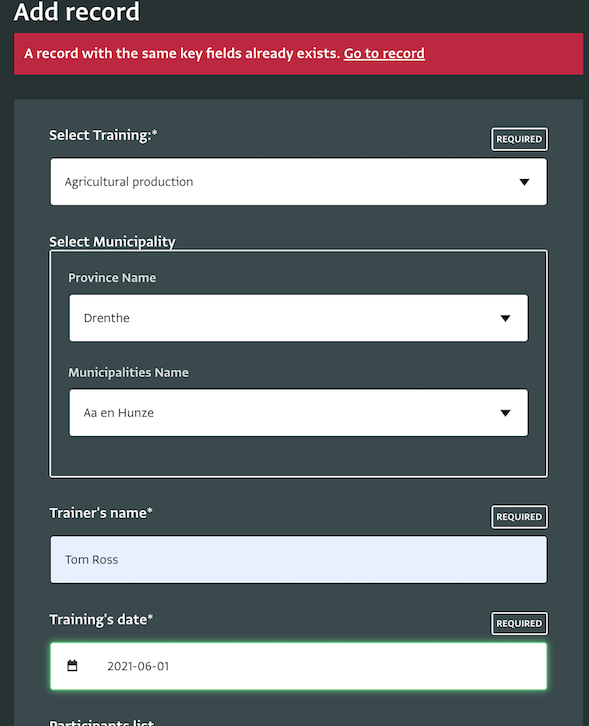
Then, we will use another reference field to reference the geographic database of ActivityInfo. This will make it easier for us to know the location where each training took place. It will also allow us to display the training on Maps.
Next, we will add a Text field to collect the name of the Trainer and a Date field to collect the date that the training took place. We will make both fields Key fields to ensure we avoid duplicates.
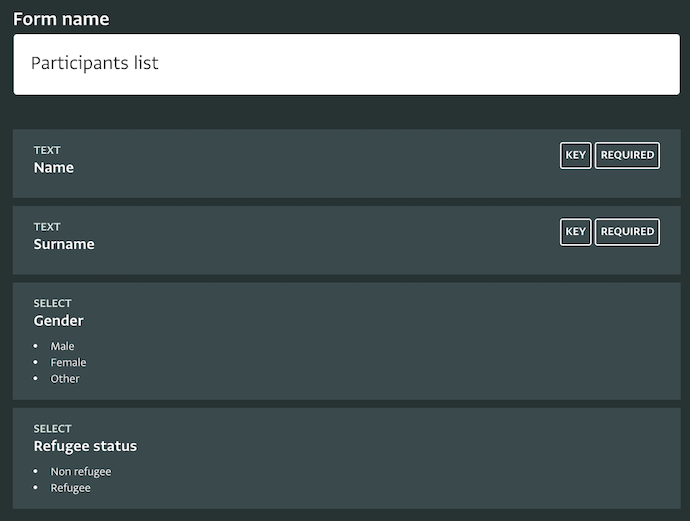
As a final step we will add a subform to the form. The subform will use two Text fields –which can optionally be made keys to avoid duplicates– to collect the name and surname of the participant of the training. Then, we will use two Single Selection fields for our disaggregations. The first Single Selection field will ask for the Gender of the participant and the Second for the refugee status. As options, we can add the relevant answers from which we want to be able to choose.
Step 3: Invite colleagues
Next, we will navigate to the User Management section of the Database Design settings page and we will add colleagues to the database we created. We will use their email address and we will assign to them the Role and resources that match better the access we want to give to them to the Database. If the existing Roles don’t fit our needs we can always edit them or create new ones.
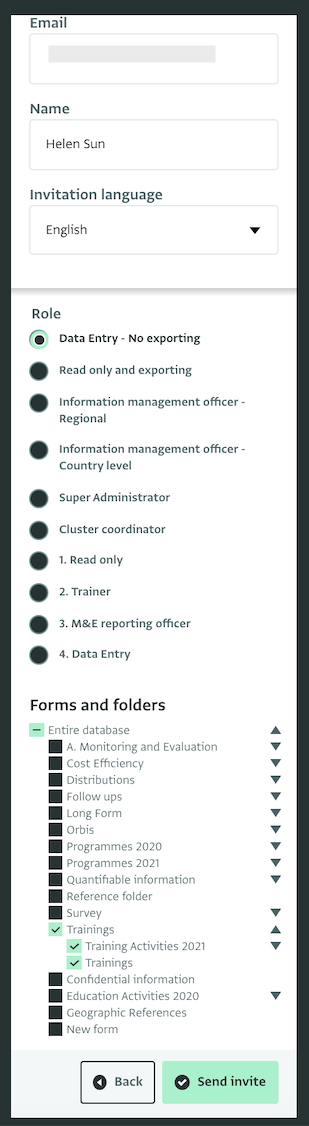
In our example, we have many more folders and forms in the Database and we have also added many additional Roles to match the needs of our team.
Step 4: Add or import data
After saving the forms and inviting our team, we can start adding records. First, we need to add all our training sessions to the “Trainings” form. We can either add them as separate records or –if the list is too long– we can import them from a spreadsheet.
Then, we can navigate to the “Training activities 2021” and add some Records manually. First, we can select the Training from the list which will now show the Trainings we added to the “Trainings” form.
Then, we can select the Municipality and District and finally we can add the name of the trainer and the date of the training. Because the last two have been made key fields, if we try to add another Record with the same information we won’t be allowed to save that record.
Next, we will work with the participants list of that training which can be found in the subform. We can add each participant manually as a record. Or if we have a long list of participants, we can import them from a spreadsheet using the importer. To import the list of participants we need to follow the steps of importing records to subforms and we need to make sure that we use the Key fields of the Parent form in the spreadsheet to point to which Record we want this list to be added.
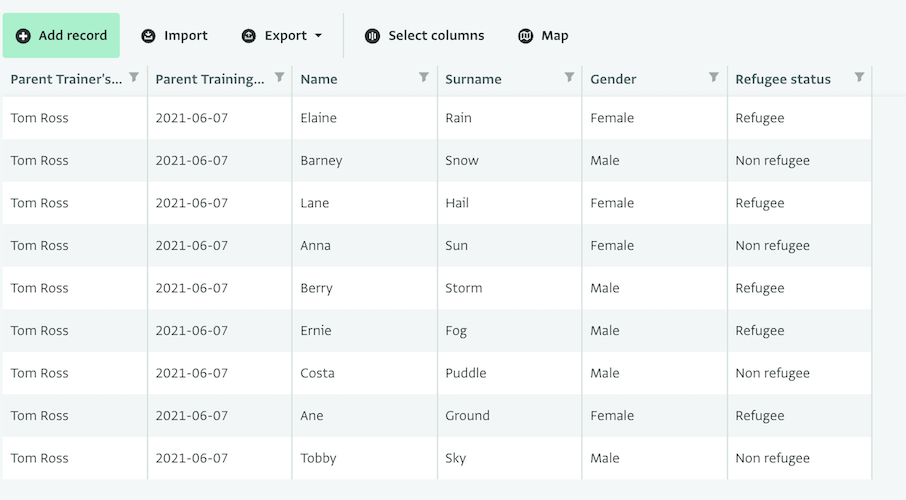
Parent Trainer's name |
Parent Training's date |
Name |
Surname |
Gender |
Refugee status |
|---|---|---|---|---|---|
Tom Ross |
2021-06-07 |
Elaine |
Rain |
Female |
Refugee |
Tom Ross |
2021-06-07 |
Barney |
Snow |
Male |
Non refugee |
Tom Ross |
2021-06-07 |
Lane |
Hail |
Female |
Refugee |
Tom Ross |
2021-06-07 |
Anna |
Sun |
Female |
Non refugee |
Tom Ross |
2021-06-07 |
Berry |
Storm |
Male |
Refugee |
Tom Ross |
2021-06-07 |
Ernie |
Fog |
Male |
Refugee |
Tom Ross |
2021-06-07 |
Costa |
Puddle |
Male |
Non refugee |
Tom Ross |
2021-06-07 |
Ane |
Ground |
Female |
Refugee |
Tom Ross |
2021-06-07 |
Tobby |
Sky |
Male |
Non refugee |
We can continue adding Trainings and their lists of participants to our Forms. All data added will be visible in the Table View of the Form and the Table View of the subforms.
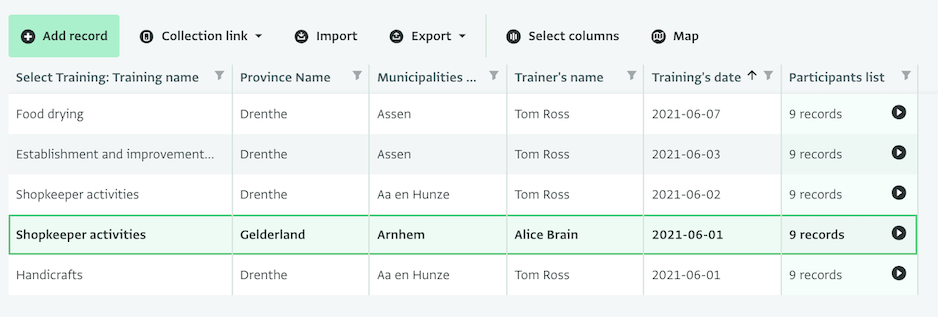
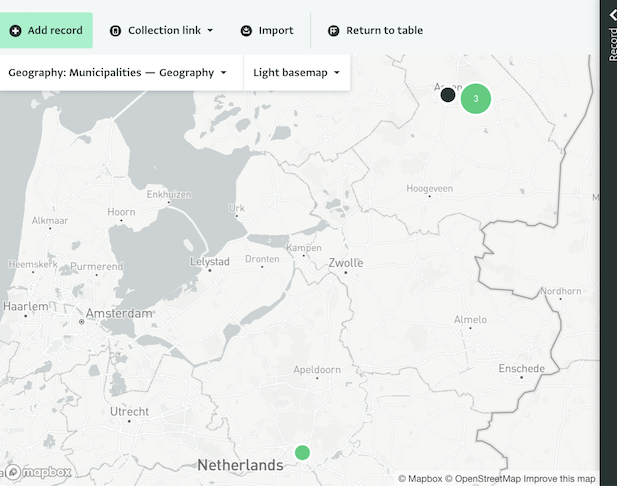
You can also use the Map View to view the trainings on a Map.
Step 5: Add a pivot table
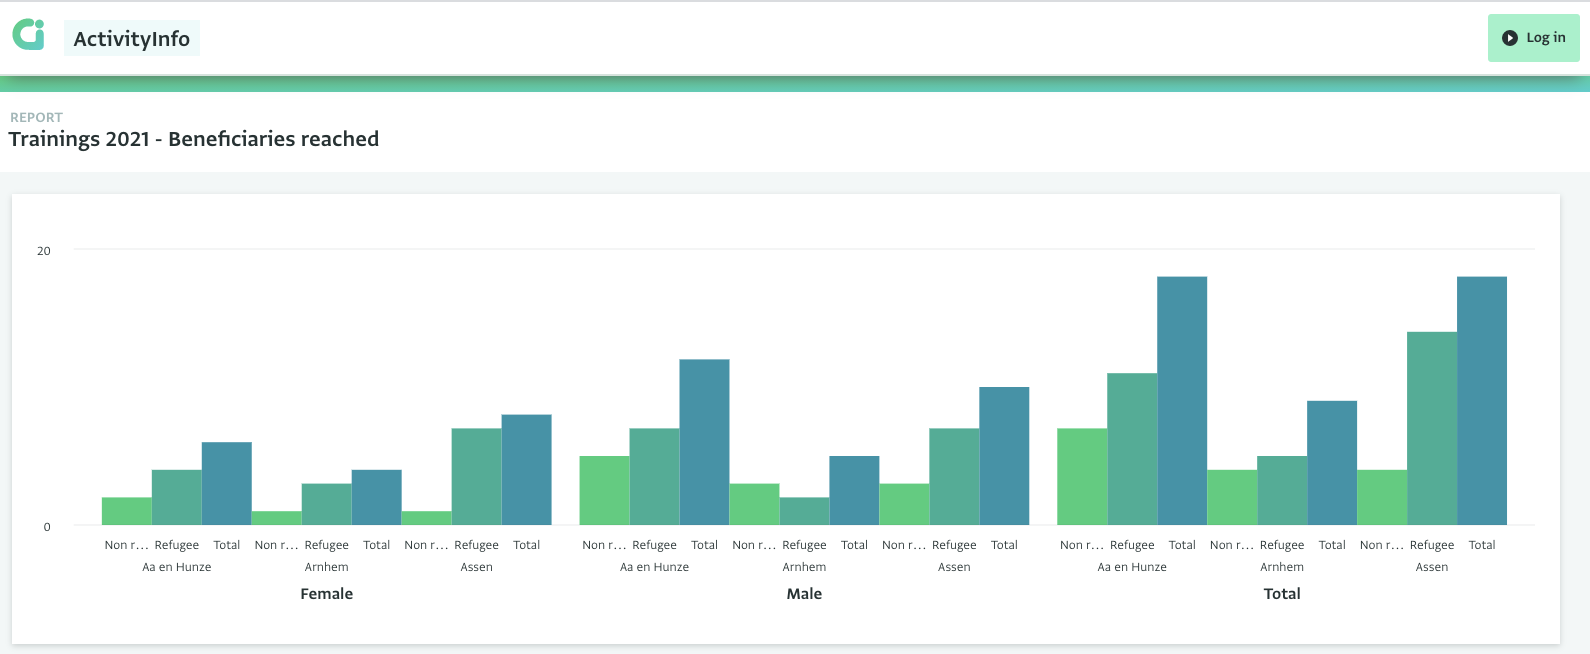
Once we have added some trainings and some participants to our forms we can create a Pivot table report to summarize our outreach. As we are defining the measures and dimensions of the Pivot Table we can see it forming. As new data is added to our form, the Pivot Table will be automatically updated.
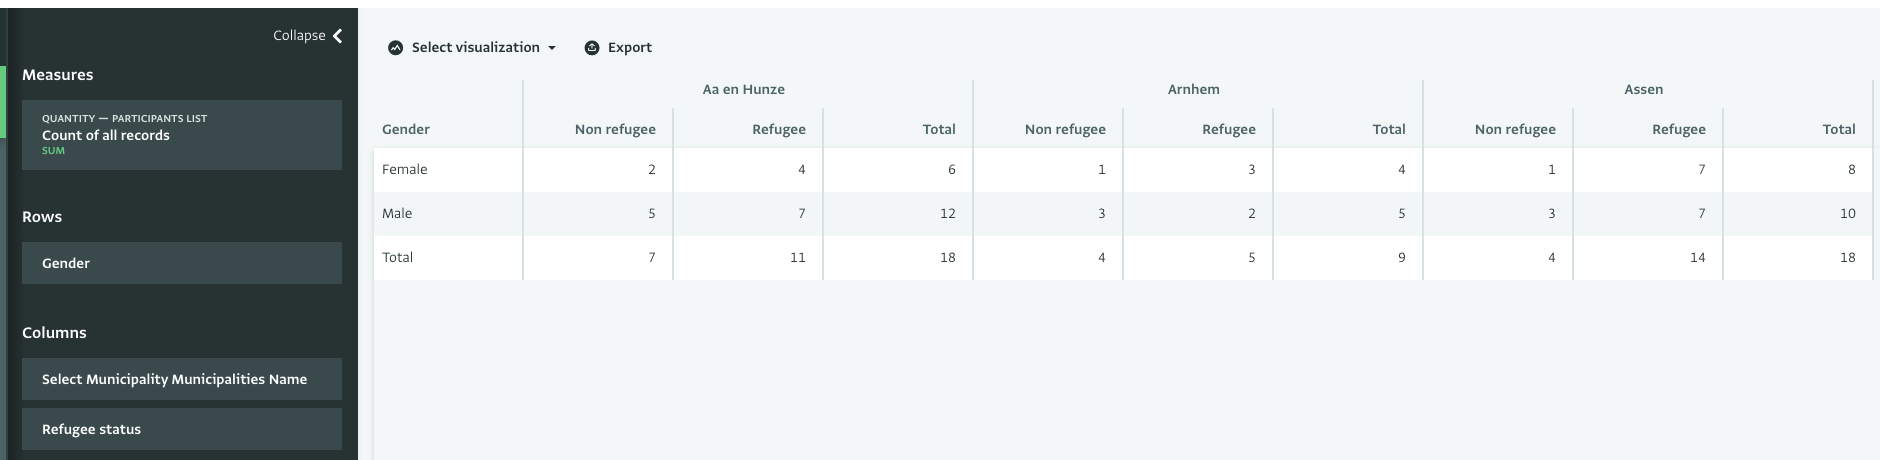
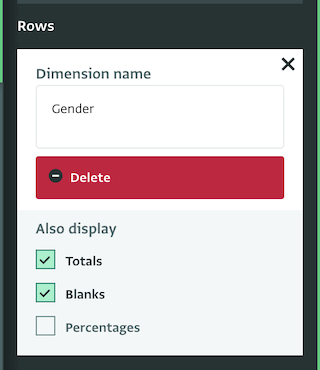
We will use as Measure the count of records of the subform ‘Participants list’ as that is the number that we want to explore. Then, we will drag and drop to Columns and Rows the fields that correspond to the types of disaggregation we want to use. In our case we want to disaggregate the data based on gender and refugee status. Out of interest we want to see how we did in each Municipality so we will add that dimension too.
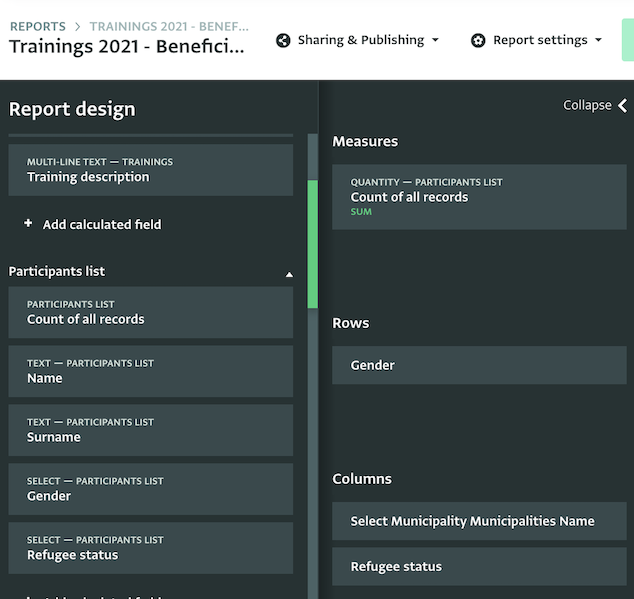
Finally, we can show the totals for each case. We can open the field card editor and tick the boxes of ‘Totals’ to include that in our Pivot Table too.
Optionally, we can share the Pivot Table with other colleagues in ActivityInfo or publish the Pivot Table to the public. Another option is to link the ActivityInfo database to Power BI or other visualization software and create dynamic dashboards using these tools.

Congratulations! You have completed the guide ‘Measure beneficiary outreach for income generation training activities’. Don’t hesitate to contact us if you need help setting up your own database in ActivityInfo.