Language: English
The Matrix View lets you enter and review disaggregated data in a pivot-table-style interface while keeping the underlying data in a long, analysis-friendly format.
Instead of submitting multiple records one by one, you can enter values directly into a grid where each row and column represents a combination of dimension values.
This feature is especially useful when secondary data collected through other systems are disaggregated into multiple dimensions and used for reporting against indicators.
When to use the Matrix View
Use the Matrix View when your form collects:
- Indicator results disaggregated by multiple categories (e.g., sex, age, location, population group).
- Large numbers of combinations that would be slow to enter row by row.
- Data that benefits from interactive table editing, paste from a spreadsheet, and matrix navigation.
How Matrix View works
The Matrix form view model has the following properties:
- One or more column dimensions, which are an ordered selection of key fields with single selection or single-select reference field types.
- One or more row dimensions, which are an ordered selection of key fields.
- One or more facet dimensions.
- One or more measures, that include quantity fields.
Prerequisites: key fields and measures
To enable a Matrix View, the form must contain at least one key field, which:
- Defines the unique combination of values for each record.
- Acts as the dimensions (row, column, or facet dimensions) in the matrix.
- Must be a single selection or reference field type.
Key fields may include:
- Single-select fields
- Reference fields
The form design must also include quantity fields.
An example of a form designed to collect secondary data on beneficiaries reached by a project in the health and education sectors, disaggregated by region, gender and age group.
| Label | Field Type | Options | Key? |
|---|---|---|---|
| Sectors | Single selection | Health, Education, Livelihoods, WASH, Food Security | Yes |
| Region | Single selection | North, South, East, West | Yes |
| Sex | Single selection | Male, Female | Yes |
| Age Group | Single selection | Children, Adults | Yes |
| Year | Text | No | |
| Target | Quantity | N/A | |
| Reached | Quantity | N/A | |
| % Achieved | Calculated (Reached/Target) | N/A |
Opening the Matrix View
- Click on "Views" to open the Views panel.
- Open the "Display table" drop-down and select "Matrix".
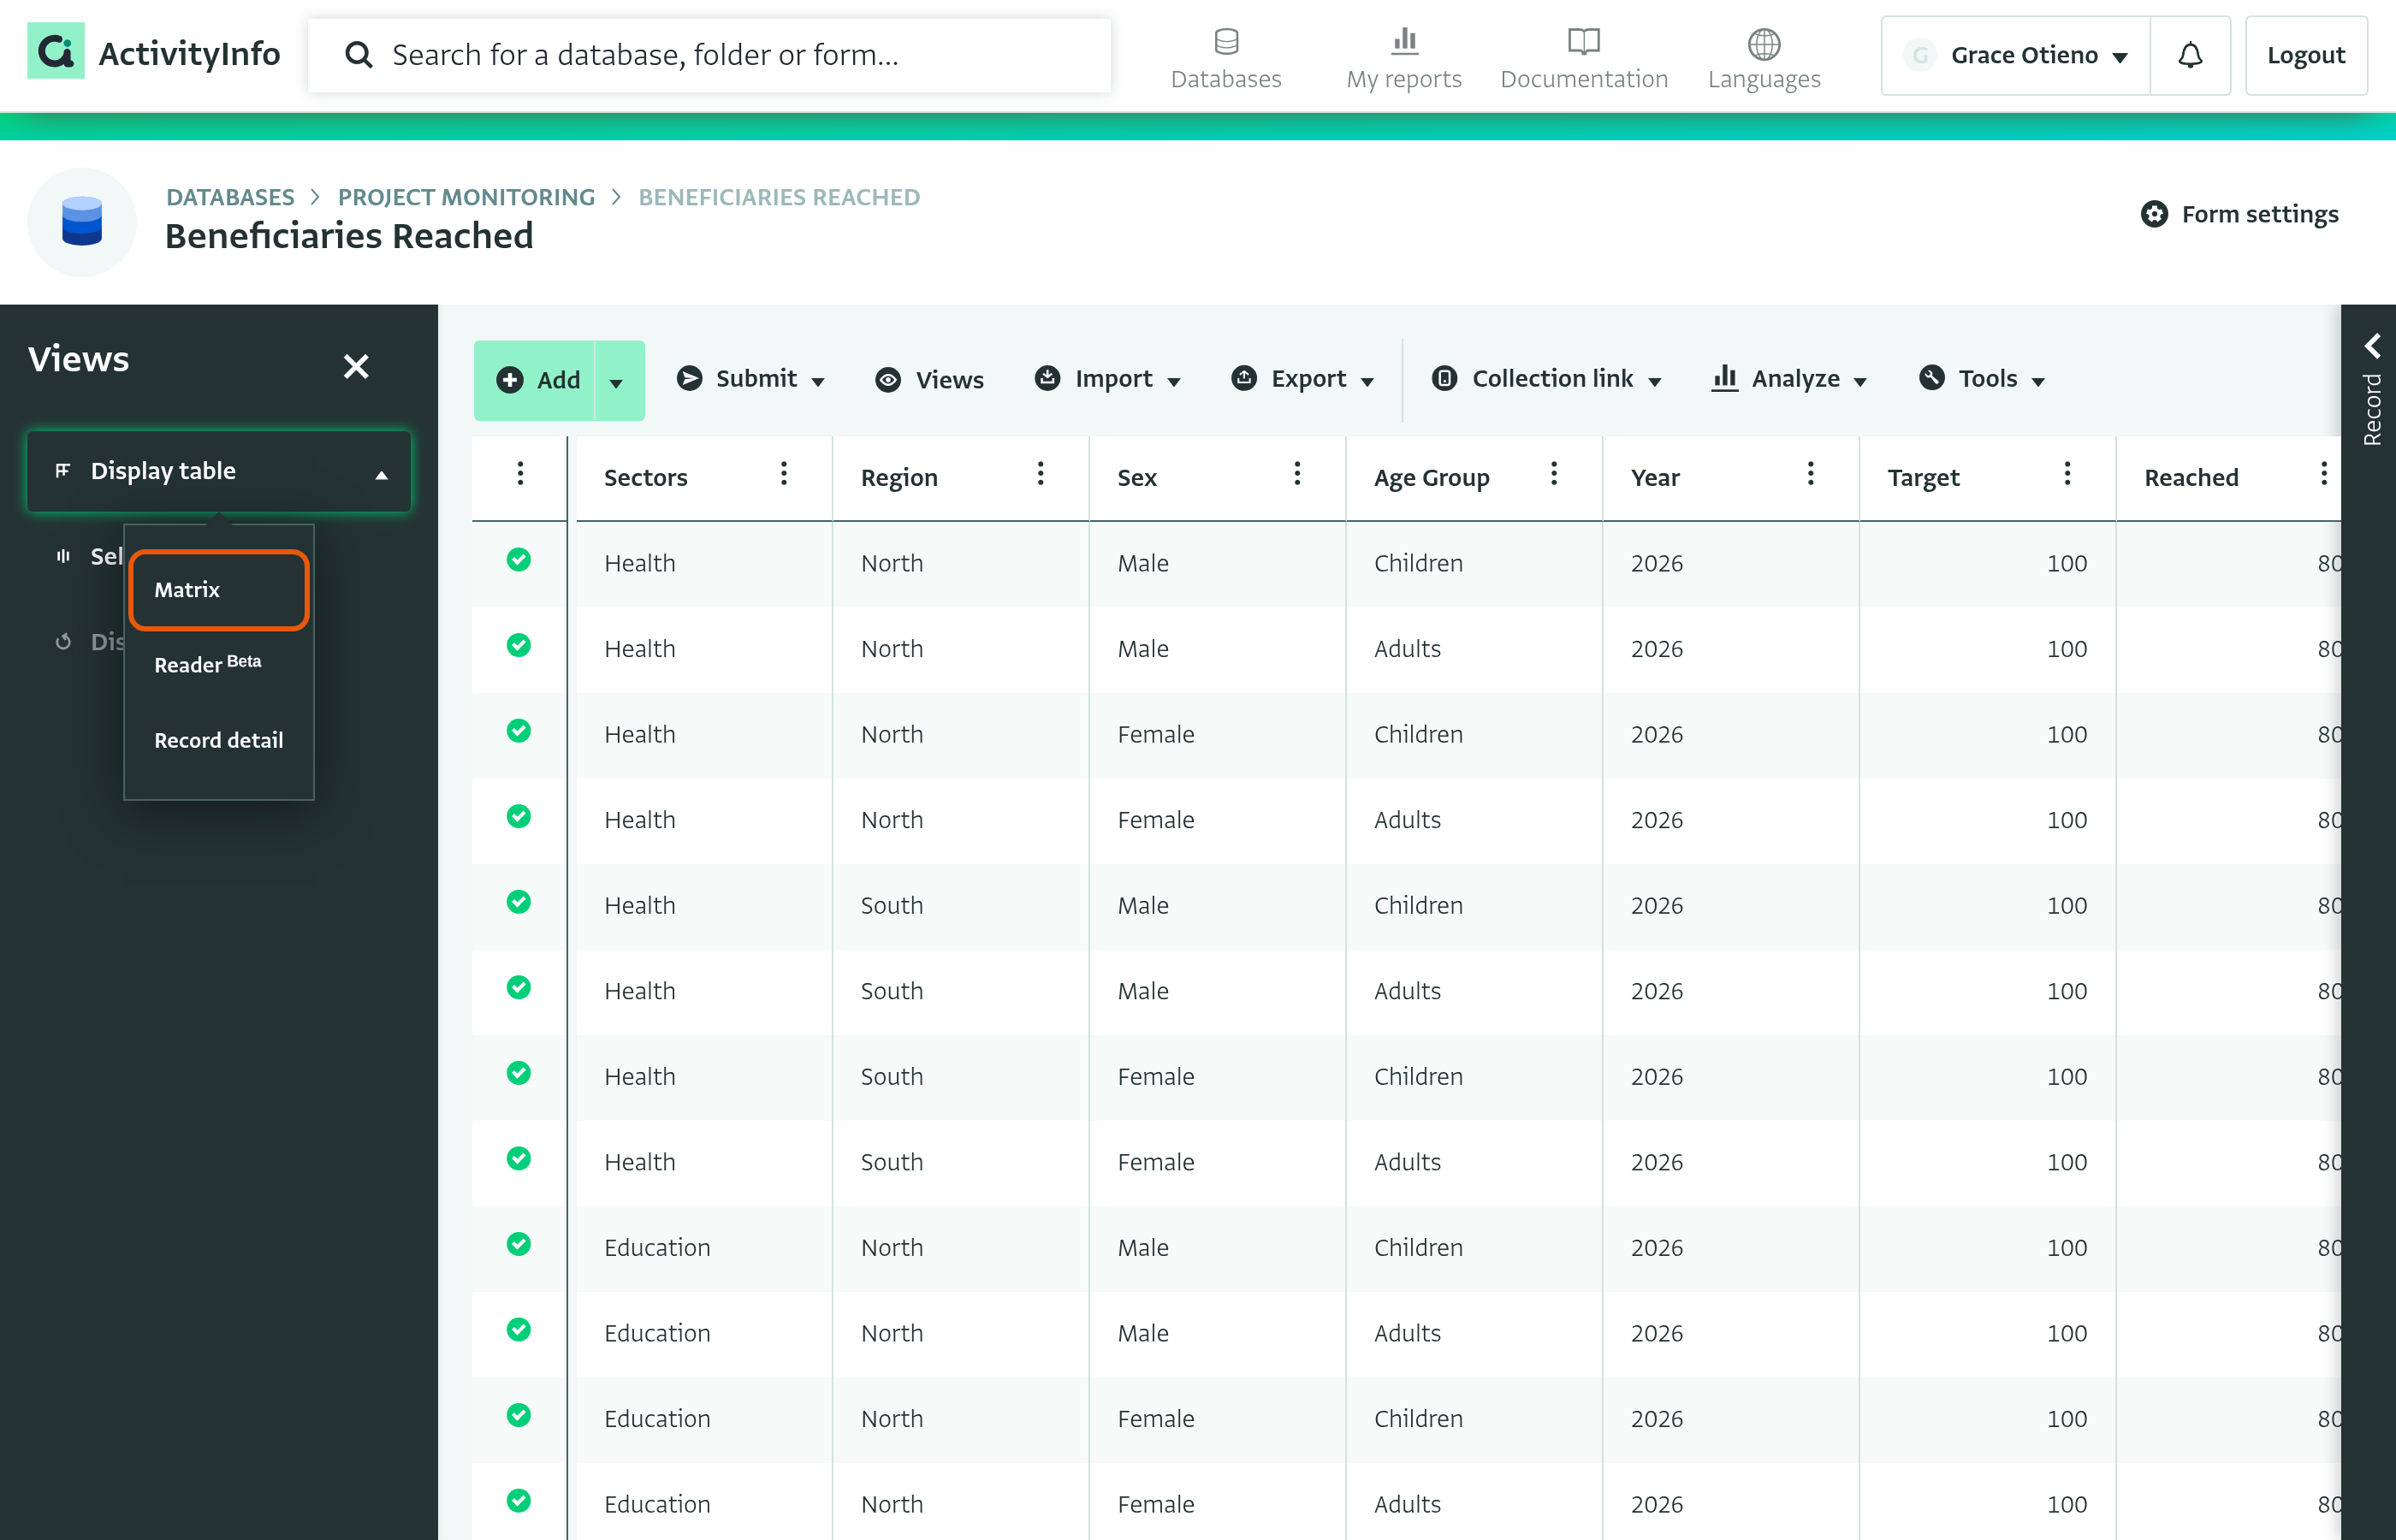
If the Matrix option does not appear in the Views panel, ensure that your form has at least one single selection or reference field set as a key field. No other field types can be set as key.
Selecting dimensions
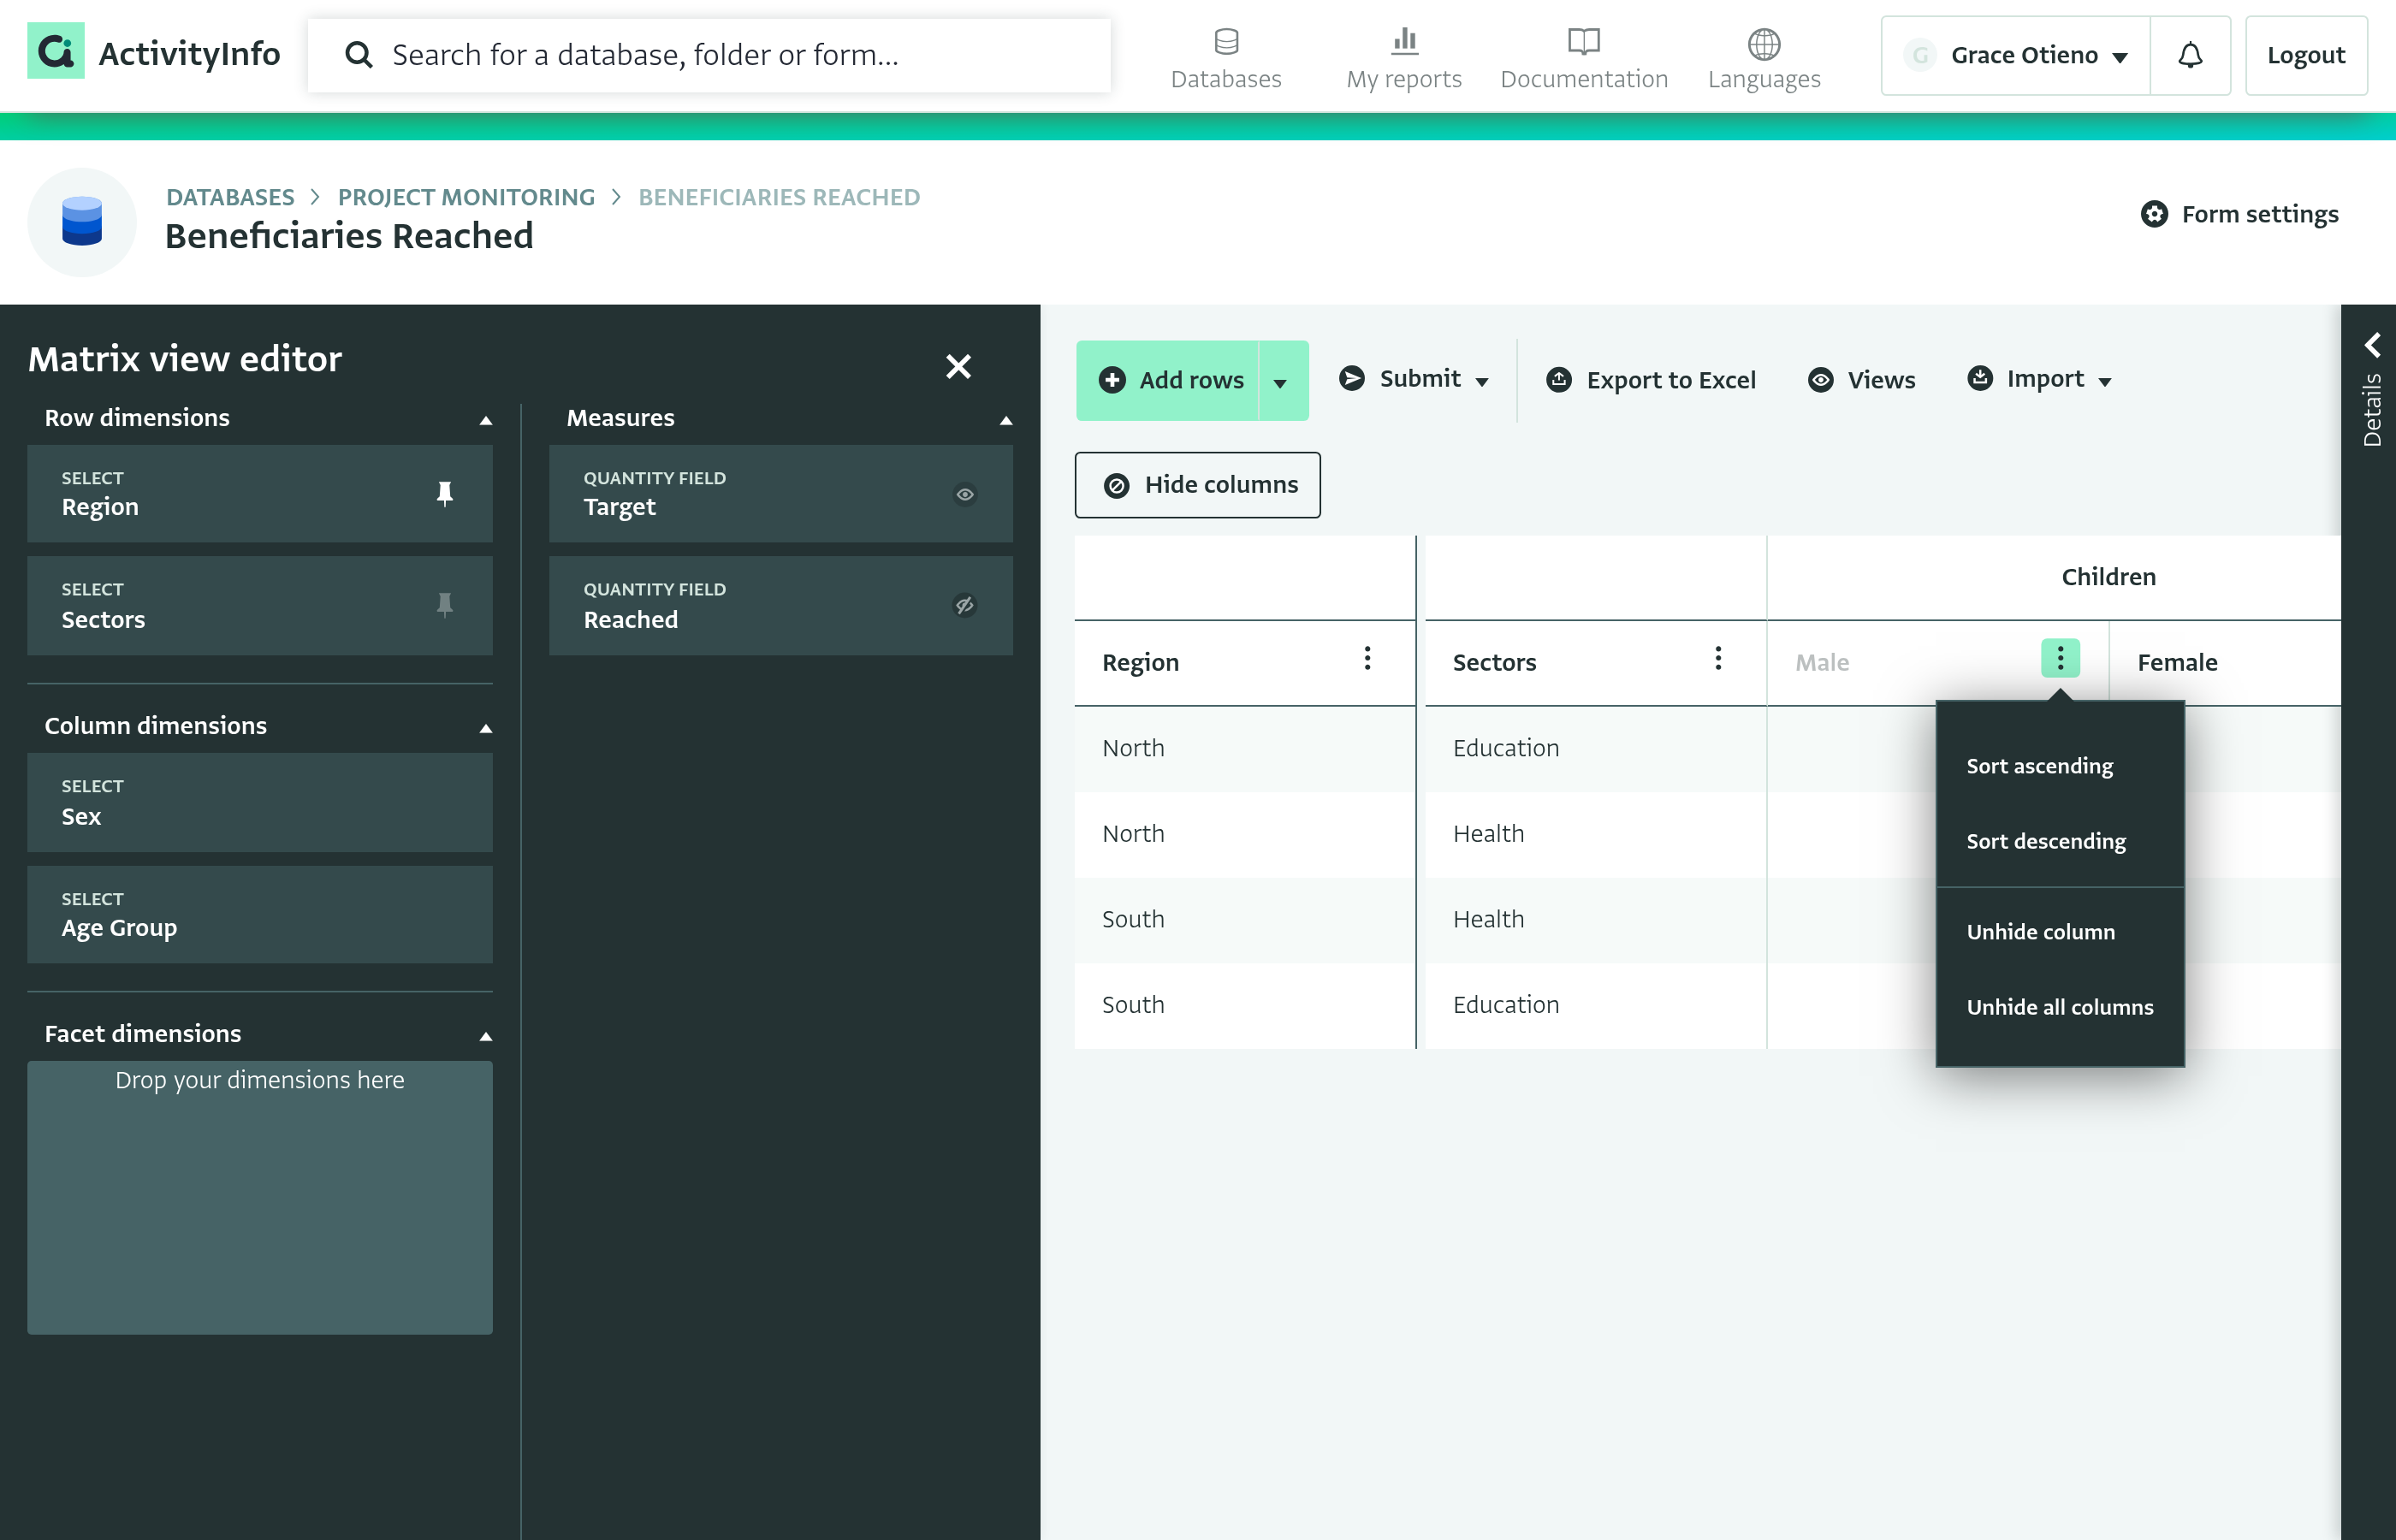
Click on "Select columns" to open the matrix view editor.
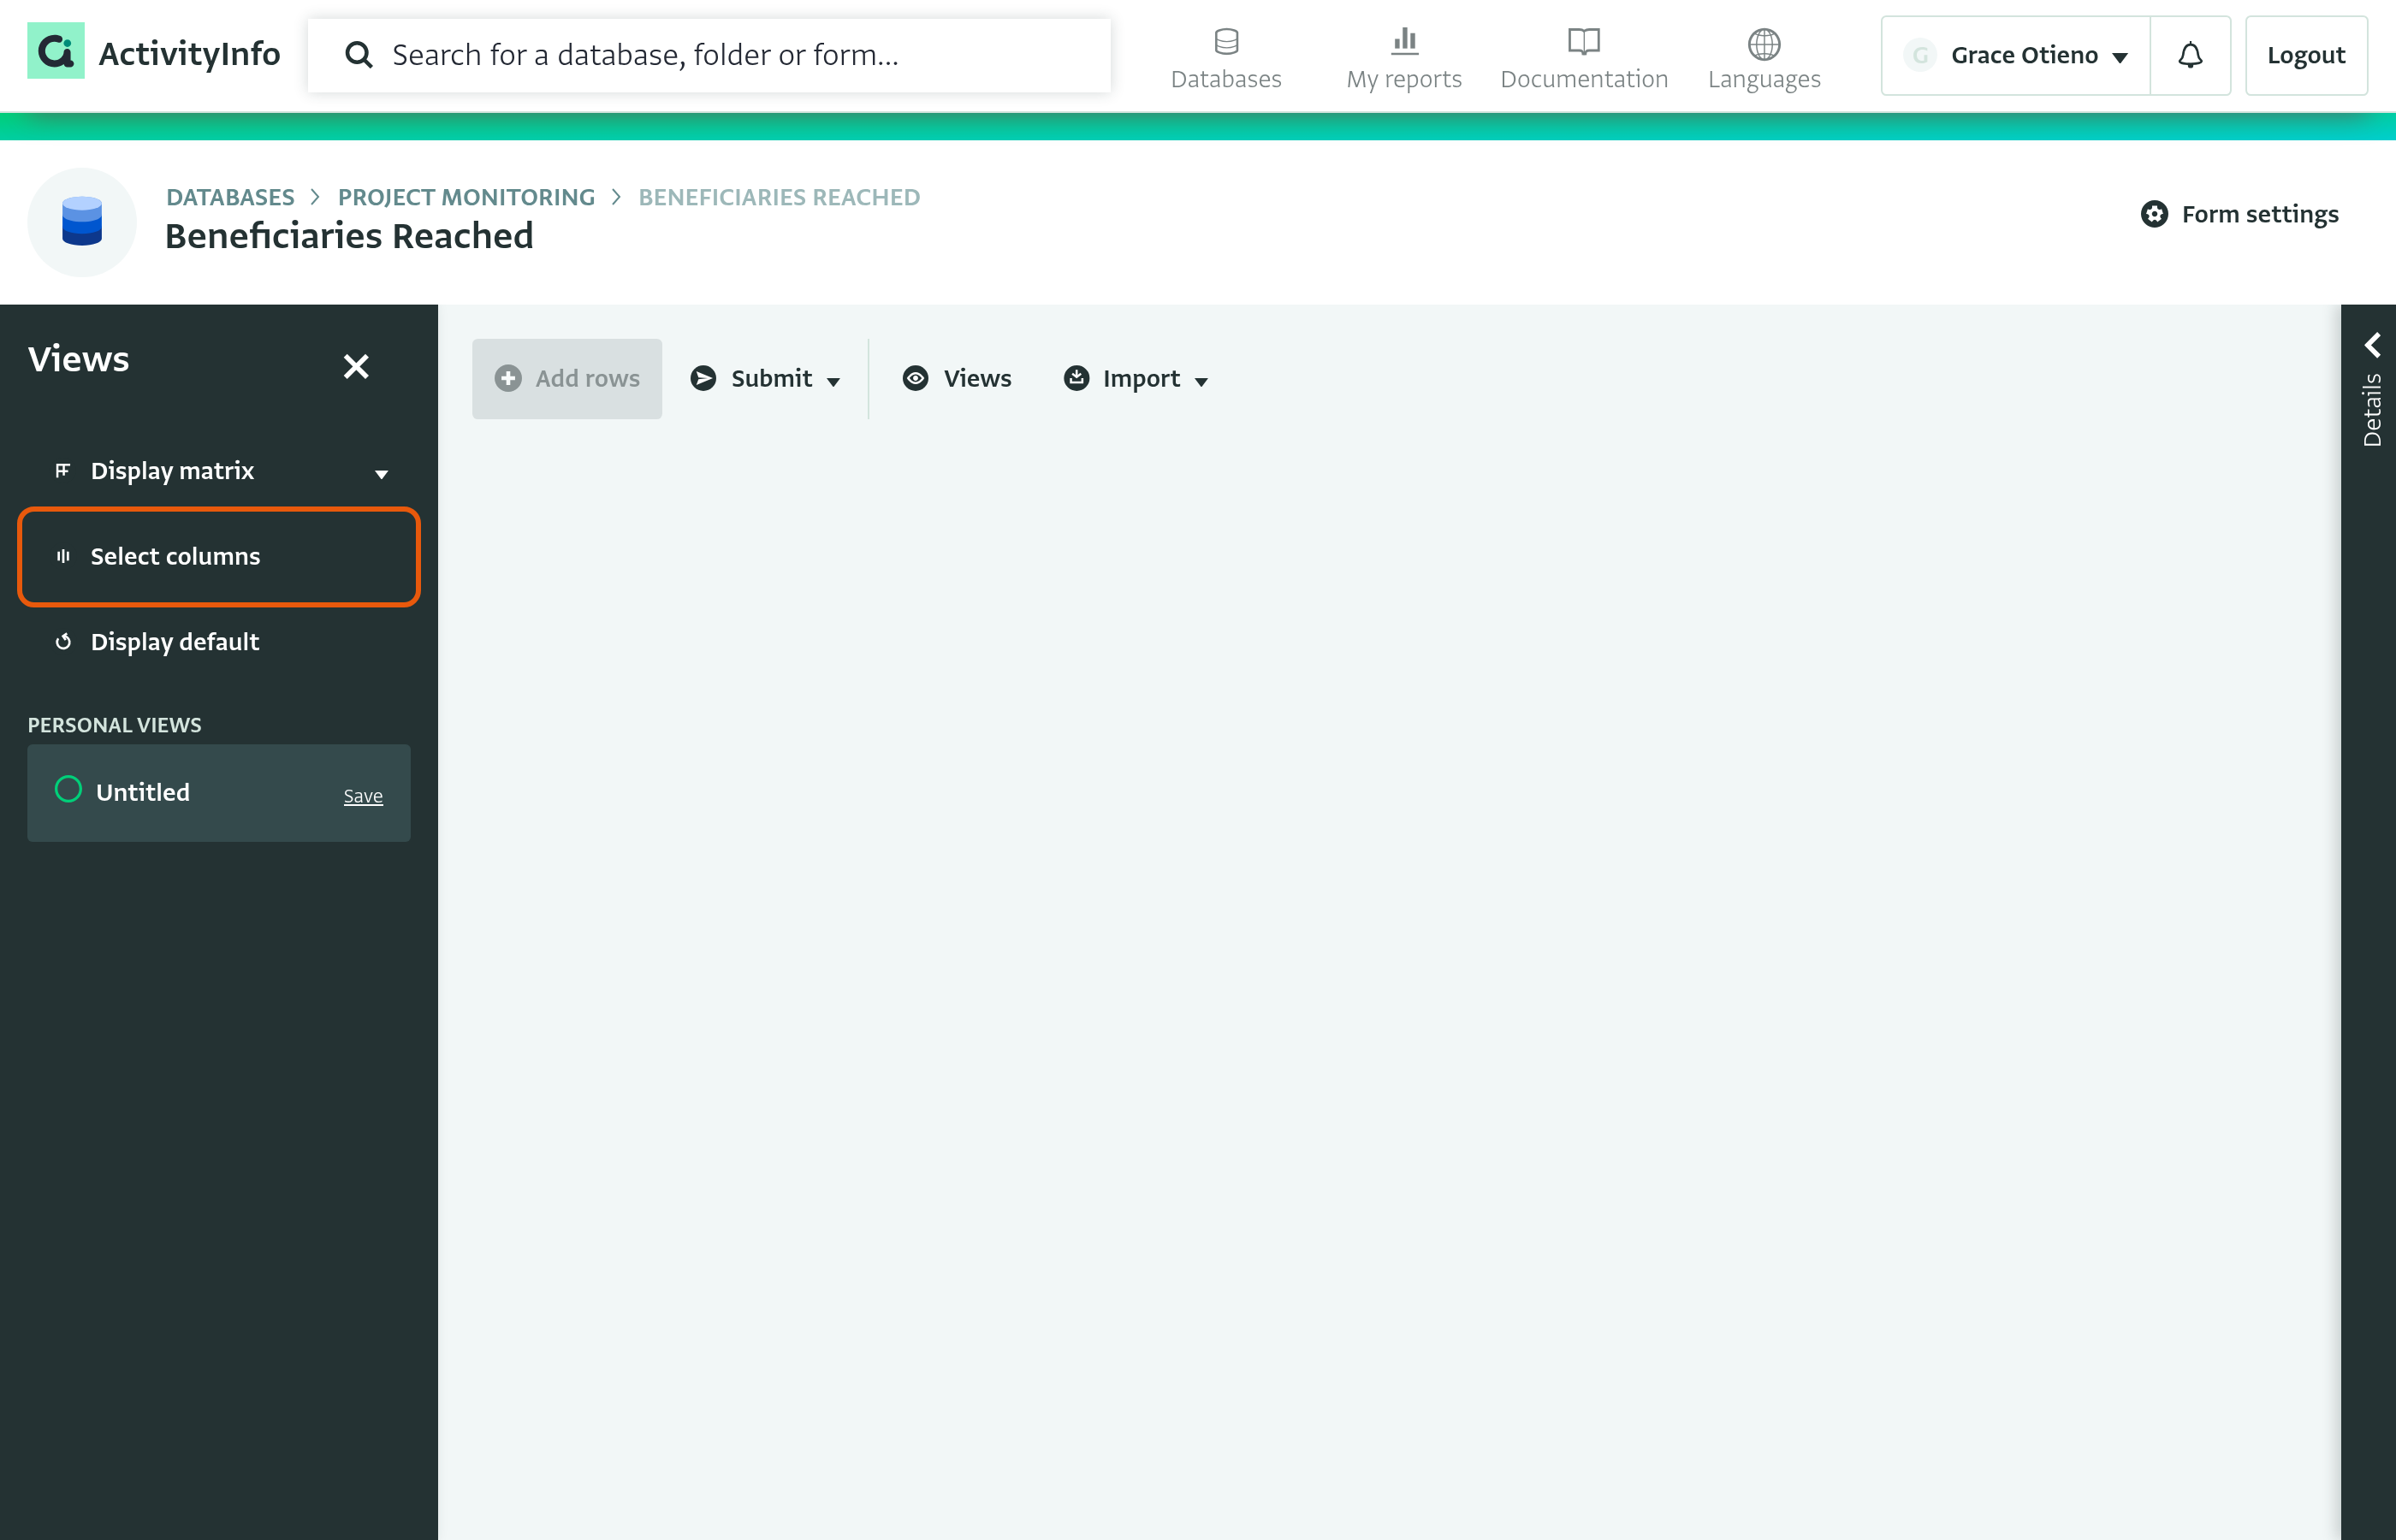
Available dimensions and measures
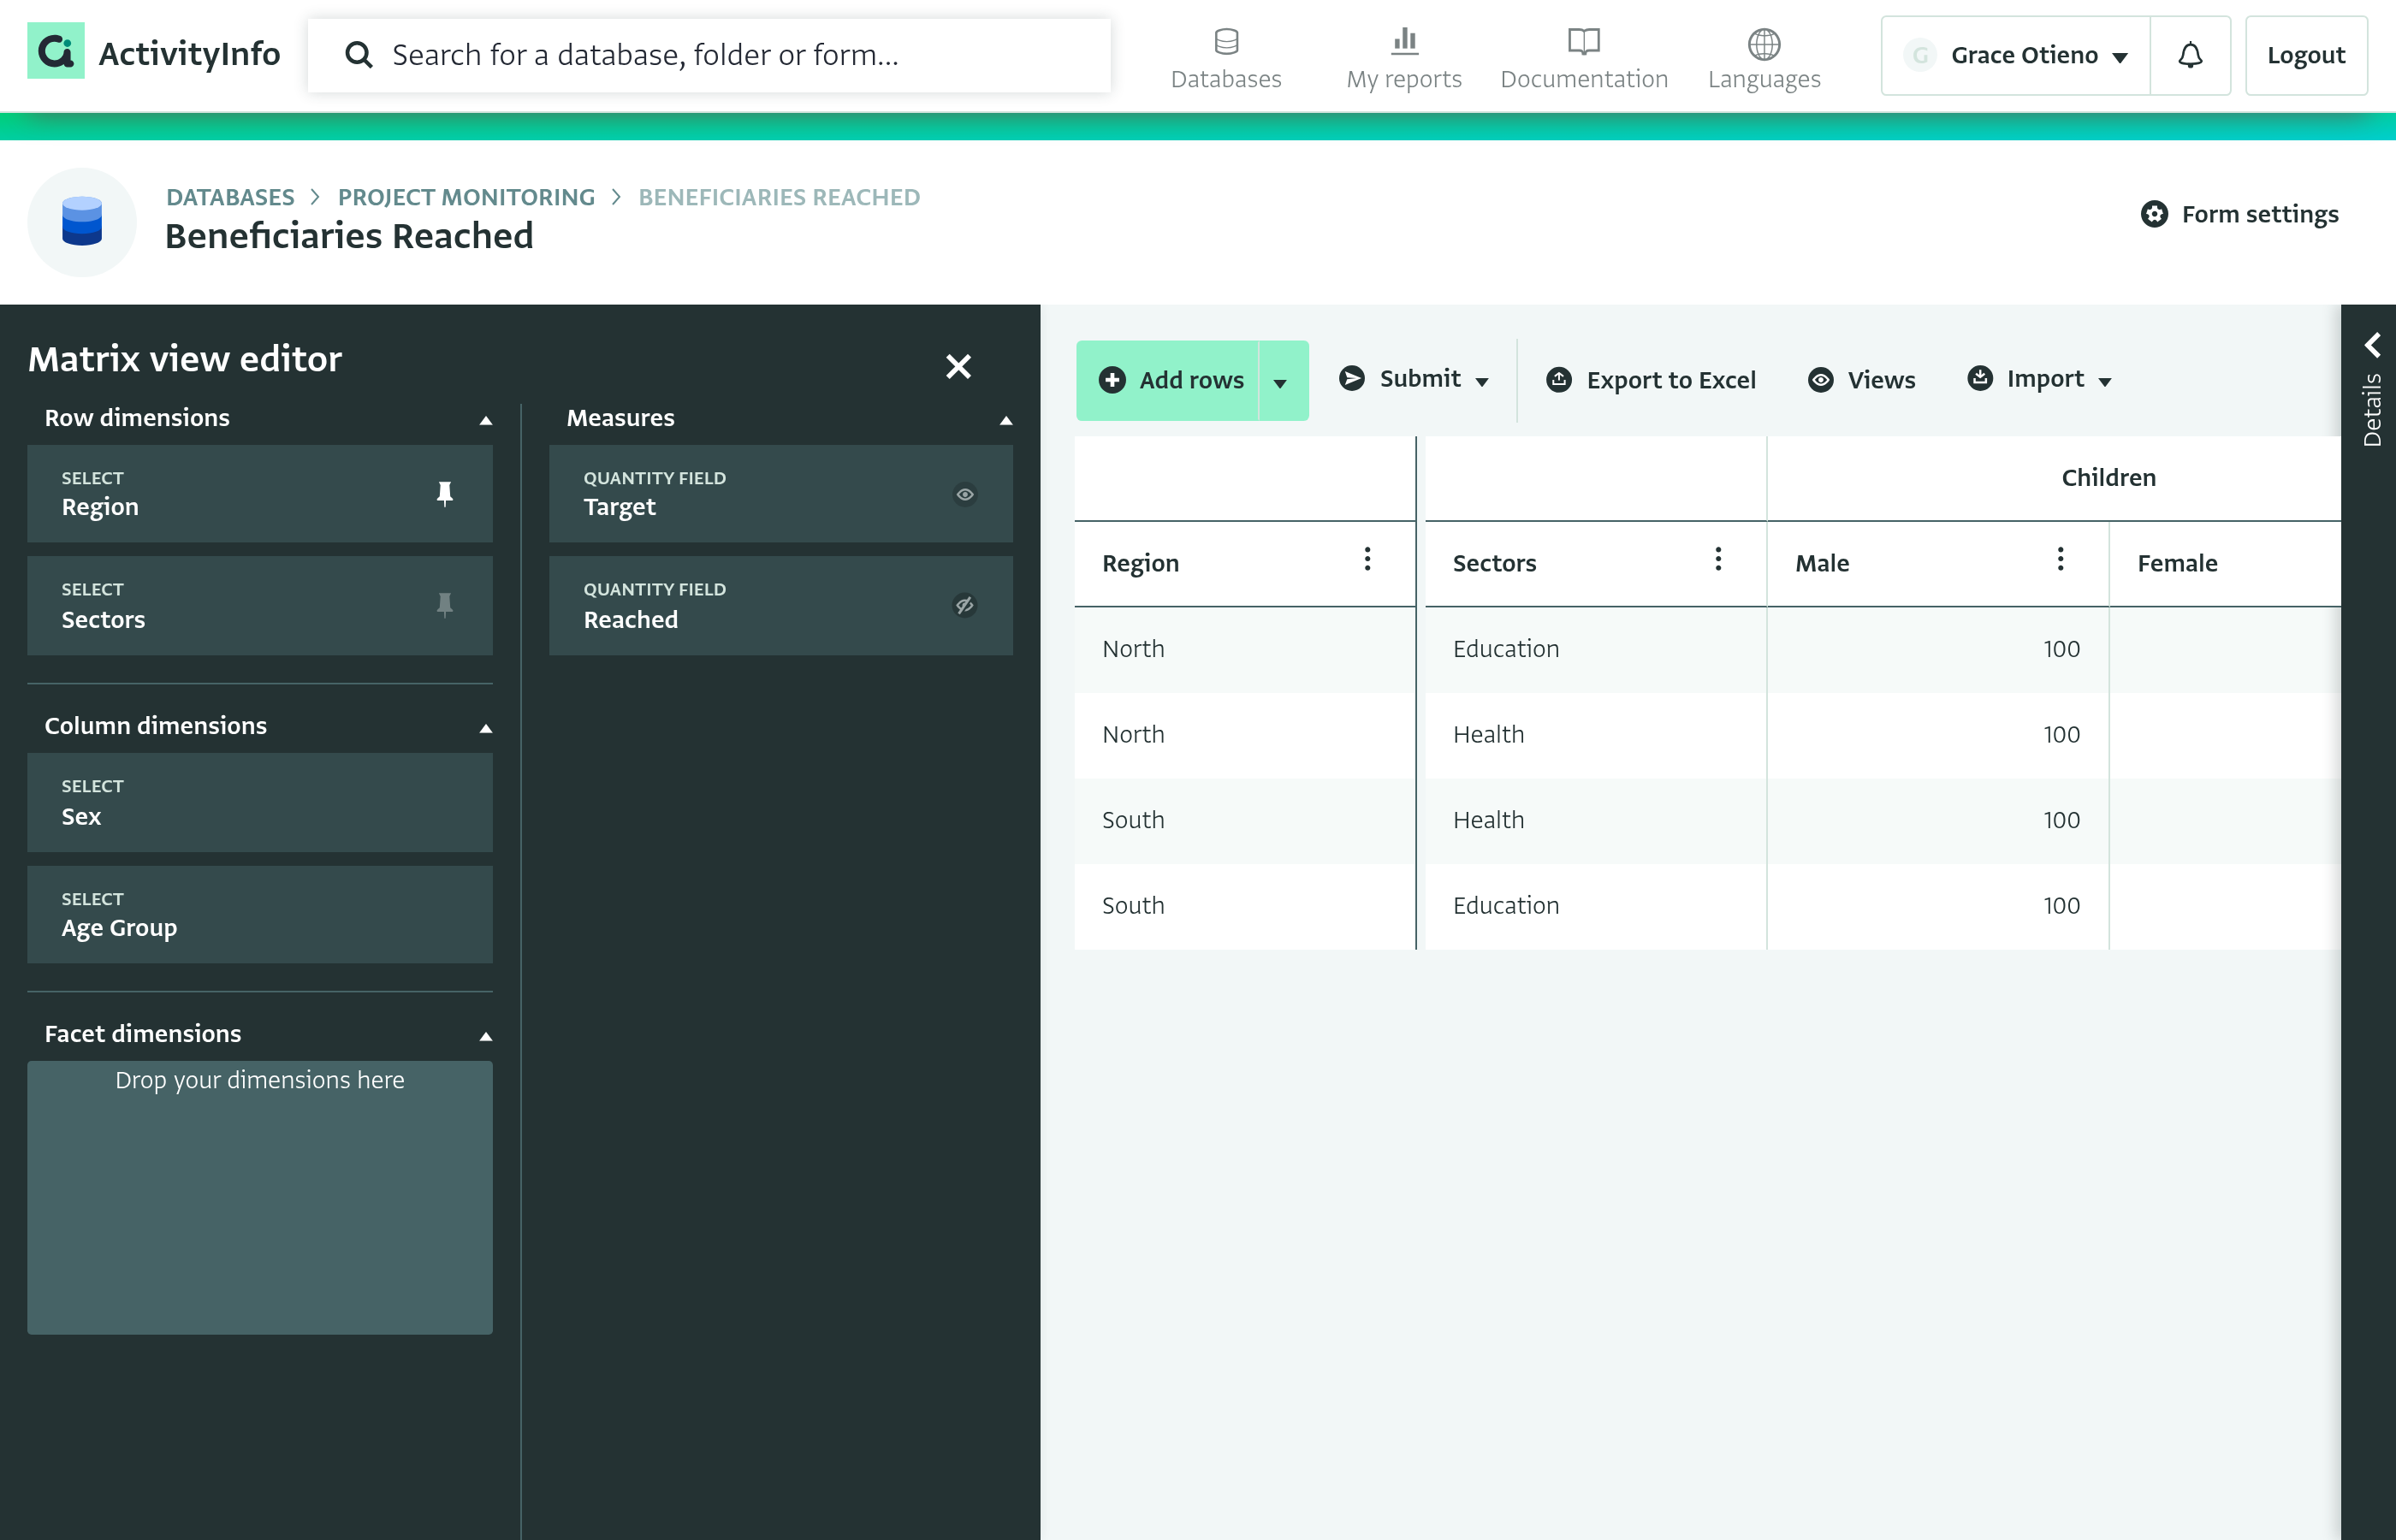
The Matrix configuration panel lists all key fields in your form. Drag and drop each key field to the column, row, or facet dimensions.
Row dimensions: Defines the vertical structure. You select a specific value for each individual row.
Column dimensions: Defines the horizontal structure. A new column is automatically generated for every possible value or selection.
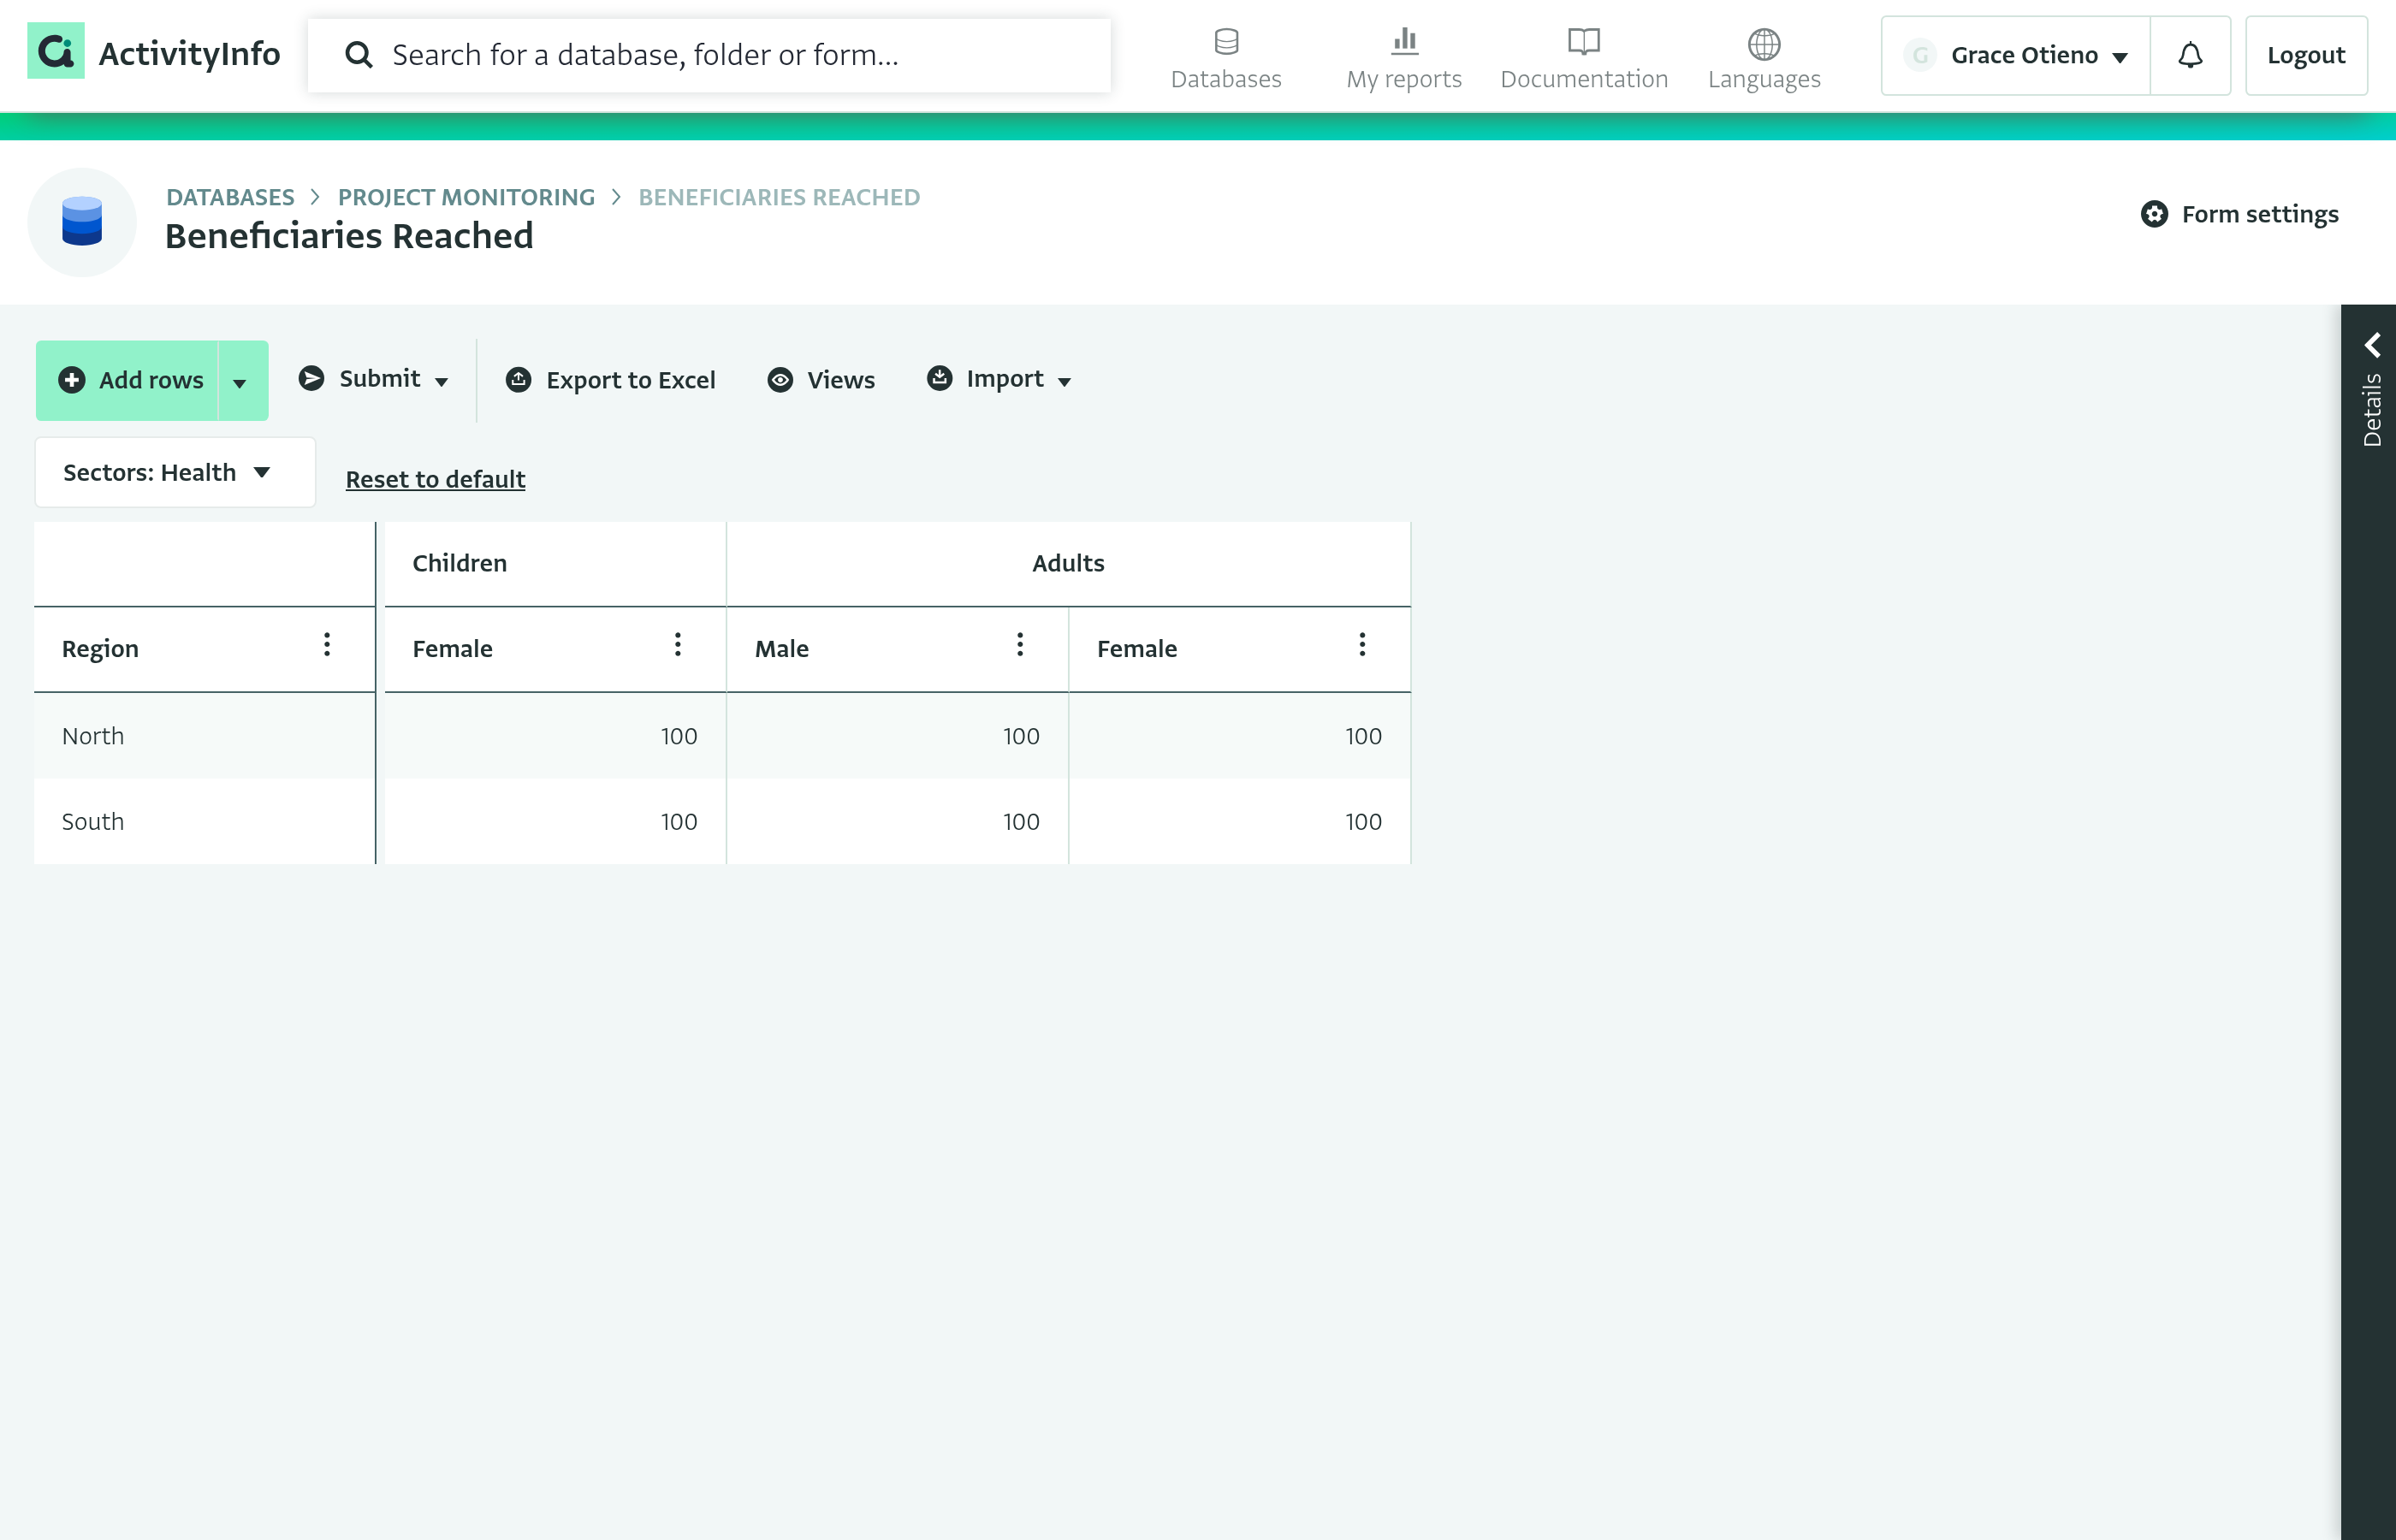
Facet dimensions: Allows you to segment or filter the entire matrix into distinct views based on the field value selected from the drop-down.
Measures are non-key quantity fields which you use to enter values. Click the eye icon on a measure card to show or hide the measure in the matrix.
Limits
- Every key field must appear in at least one axis. If you omit one, ActivityInfo places it automatically: parent fields become facet dimensions, and other fields are placed as row or column dimensions based on how many distinct values they have, to avoid generating too many columns.
- A field cannot be both a row and column dimension at the same time.
- Column, row and facet dimensions must be single selection or reference field types.
- If the resulting number of column combinations exceeds 200, the matrix shows only the first 200 columns. Additional column combinations are not displayed.
- At least one measure must be selected in the Matrix.
Irrelevant columns and cells
Columns and cells that don't apply, based on the form's own relevance rules, are handled automatically. If a whole row or column dimension is irrelevant for every record currently shown, it is hidden from the matrix, though it remains visible (grayed out) in the dimension configuration panel. If only specific cells are irrelevant for their row, those cells are grayed out and cannot be edited. This behavior follows how the form was designed and does not need to be configured in the Matrix View.
This also applies dynamically as you filter with facet dimensions: if a facet selection makes a row or column dimension irrelevant for every record currently matching that selection, the dimension is hidden until the facet selection changes.
For example, if the Age Group field has a relevance rule of Sex == "Male", it is only relevant for records where Sex is Male. With Sex set as a facet dimension and Age Group as a column dimension, selecting Male in the facet shows the Age Group column as usual, disaggregated by Children, Teenagers, and Adults.
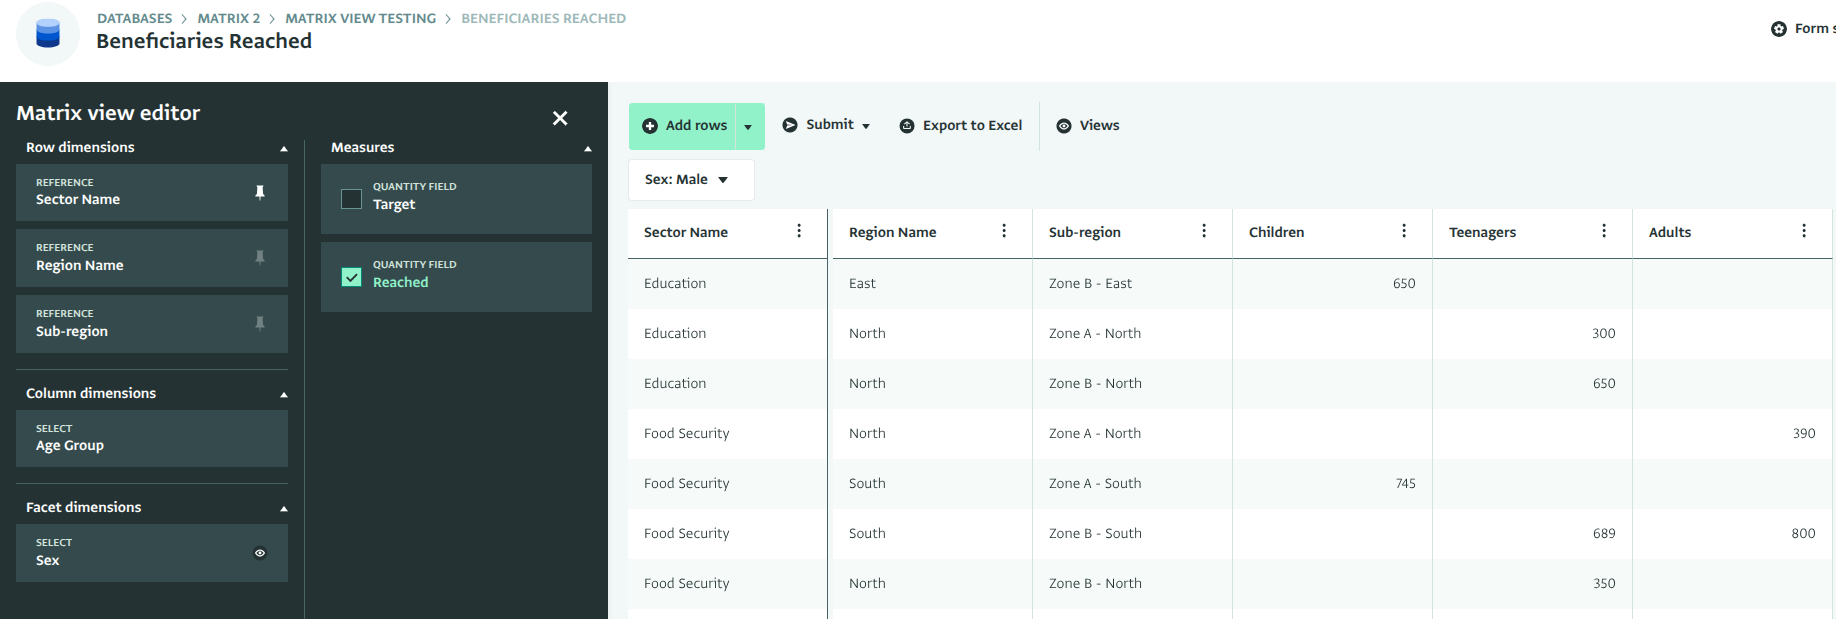
Selecting Female in the facet instead hides the Age Group column entirely, since it is irrelevant for every record now matching the filter.
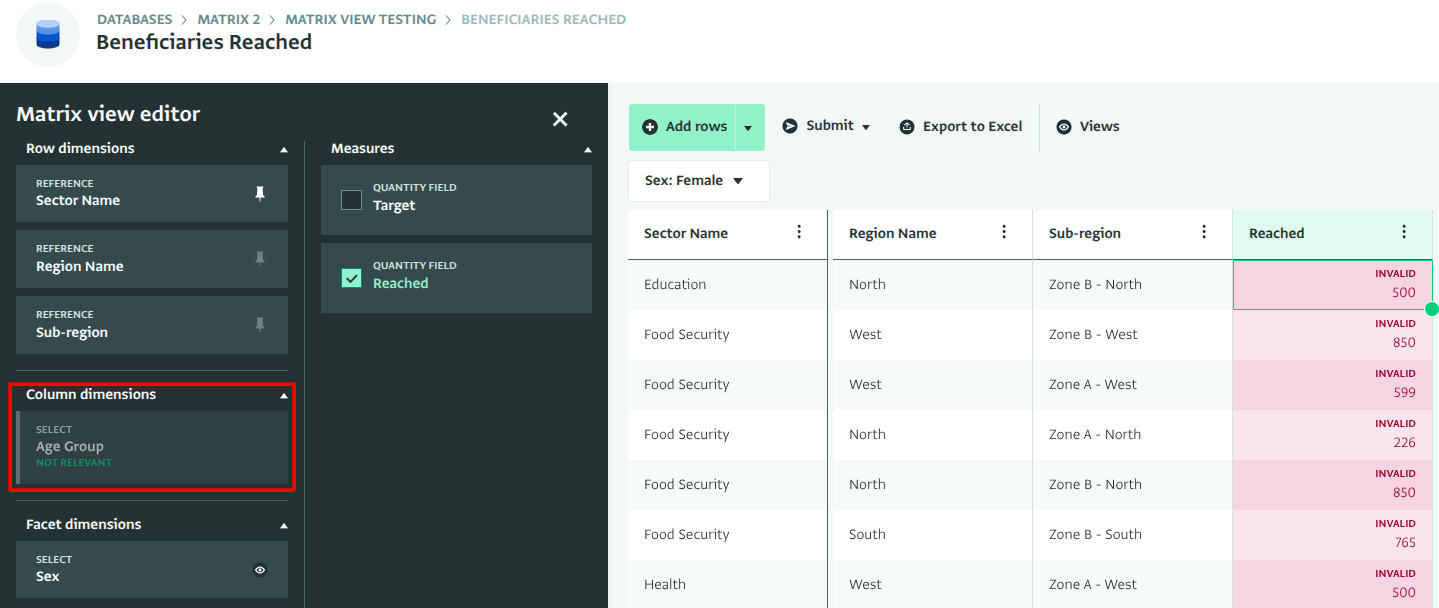
Since at least one measure must be shown, the Reached measure is still displayed, but marked invalid, as there is no valid Age Group column left to attribute it to.
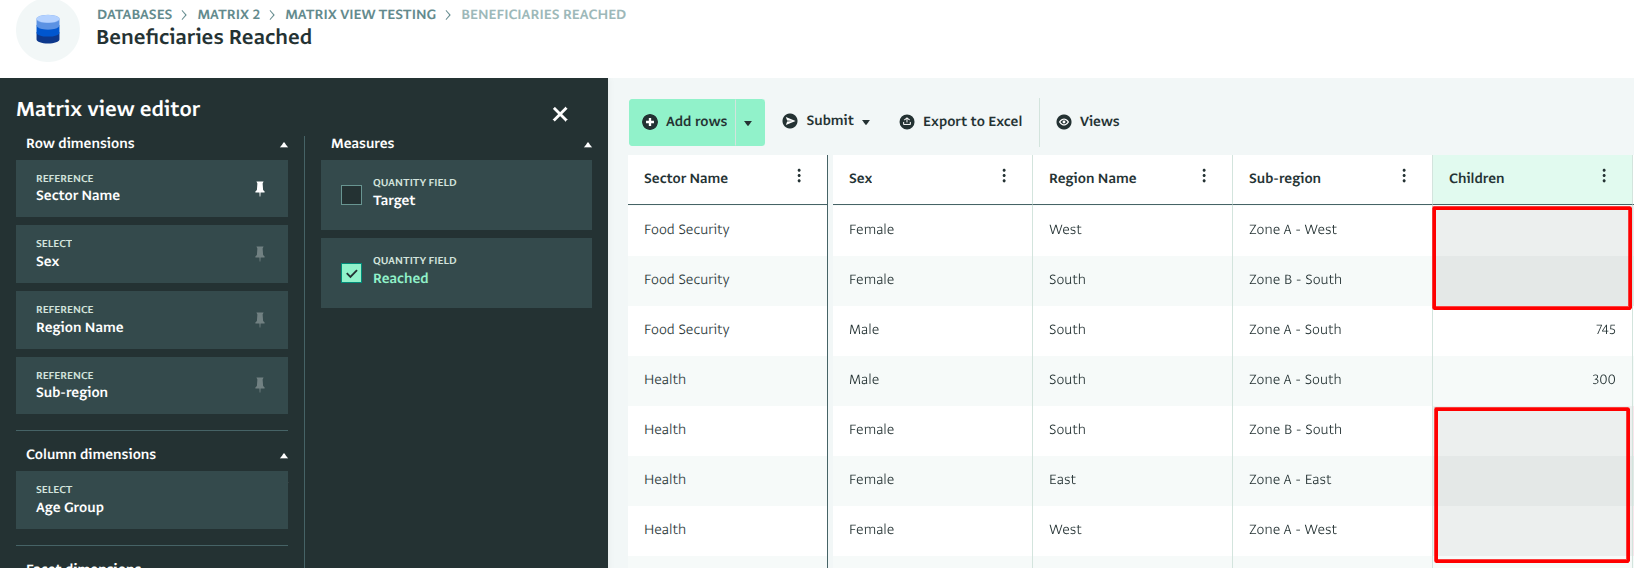
With Sex as a row dimension instead of a facet, the Age Group column stays visible, since it is still relevant for Male rows. But on the Female row, the cells under Age Group are grayed out and cannot be edited, since Age Group is irrelevant for that record.
Multiple measures
You can add multiple measures in the matrix. Click the eye icon on each measure card that you want to include.
Ordering measures
You can change the order of the measure columns, for example to match the layout of a reporting template. In the matrix view editor, drag a measure card up or down in the "Measures" list. The matrix shows the measure columns in the same order as the cards. The order is saved as part of the view.
Renaming dimensions
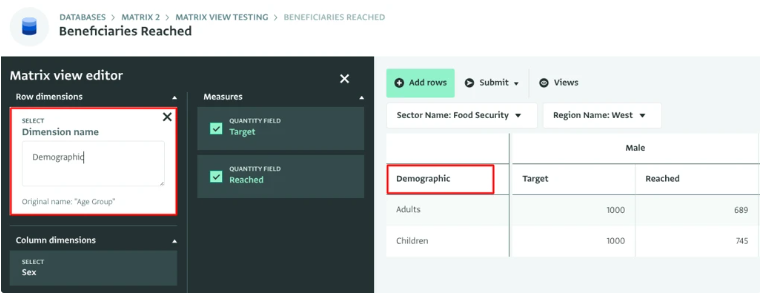
You can give any dimension a custom label to replace the field name shown in the matrix. Click the label field on the dimension card and type in the new name.
Renaming measures
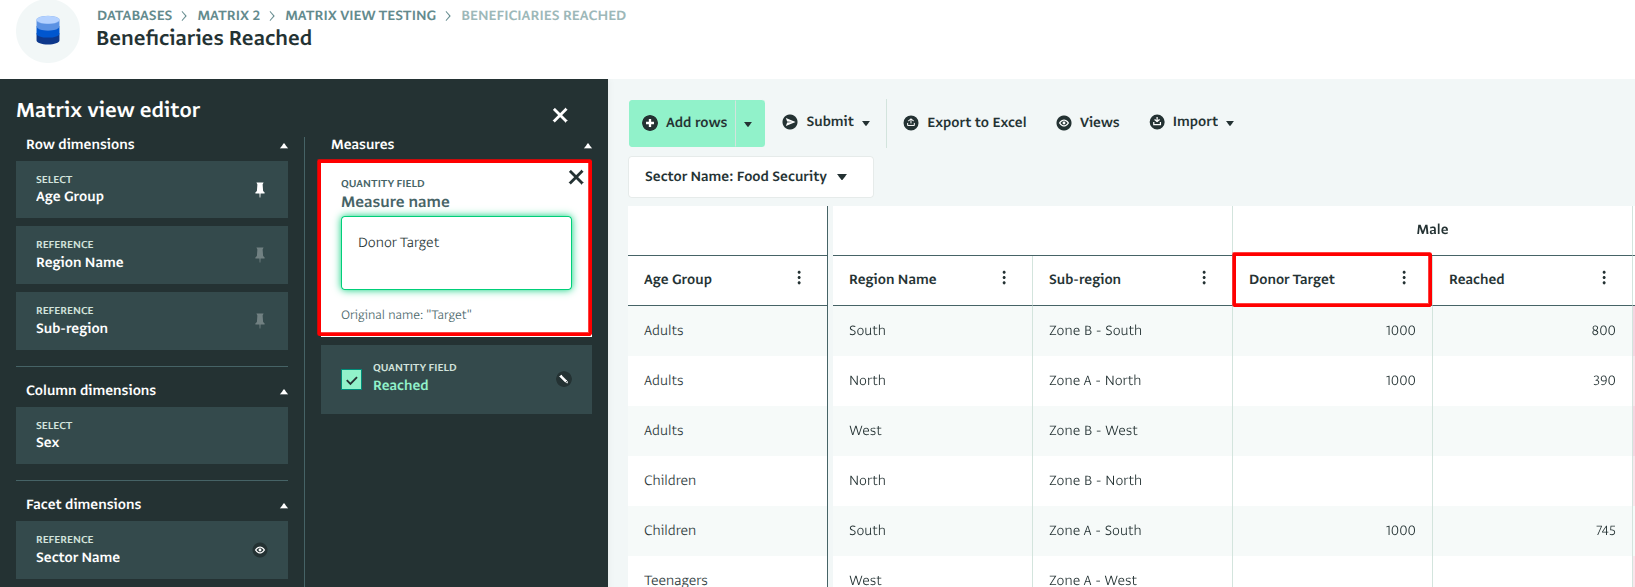
You can also give any measure a custom column label to replace the field name shown in the matrix. Click the rename icon on the measure card in the configuration panel and type in the new name.
Pinning row dimensions
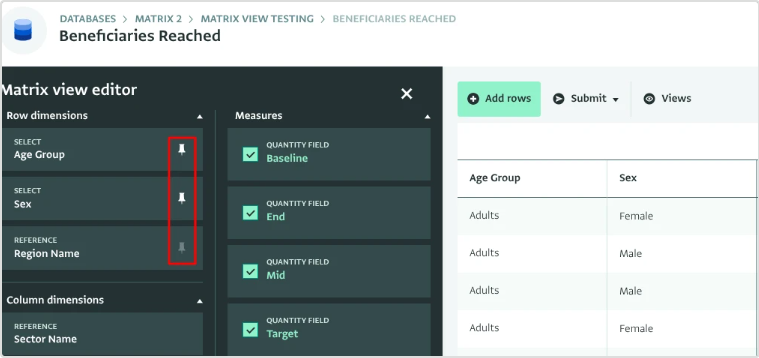
You can pin a row dimension to freeze it as a fixed column on the left side of the matrix. This keeps row labels visible as you scroll right through wide matrices.
Click the pin icon on a row dimension card to pin or unpin it. The first row dimension is pinned by default.
Sorting the matrix
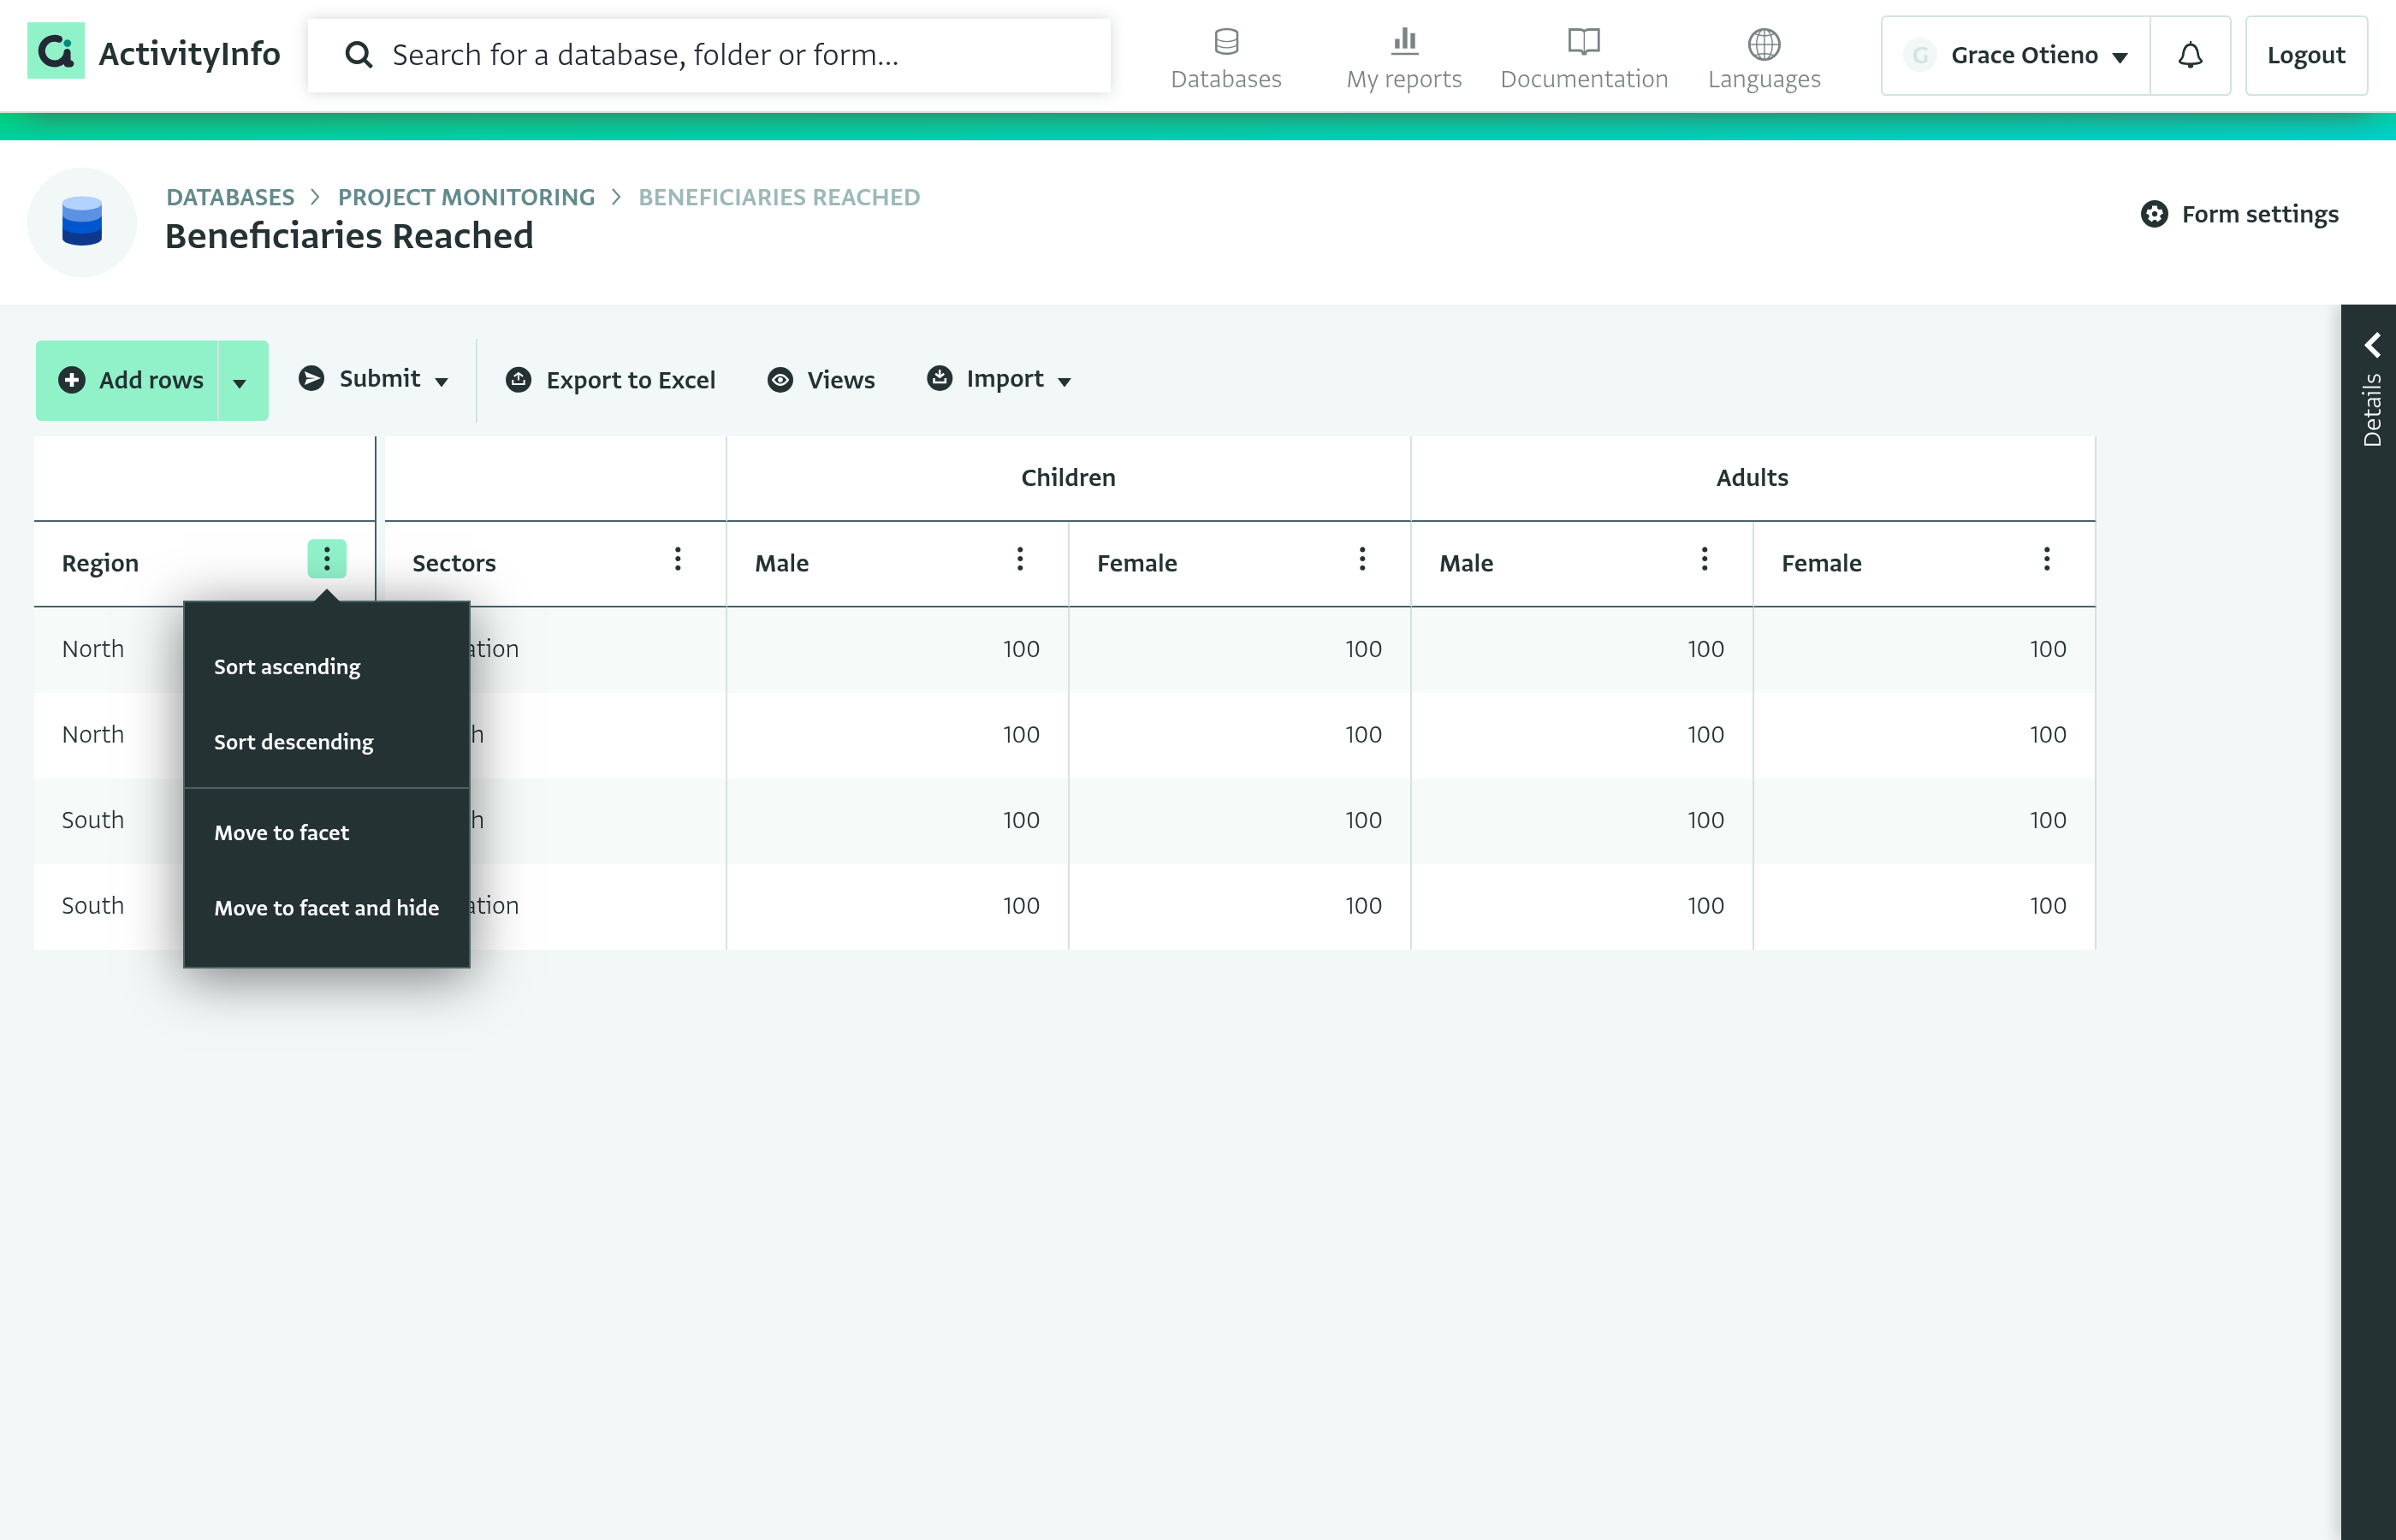
Click the menu icon on a row dimension or measure column header, then click "Sort ascending" or "Sort descending" to sort the matrix by that column. Only one column can be sorted at a time; sorting a different column replaces the previous sort. Blank values always appear at the bottom, regardless of sort direction. The sort order is saved as part of the view.
Hiding measure columns
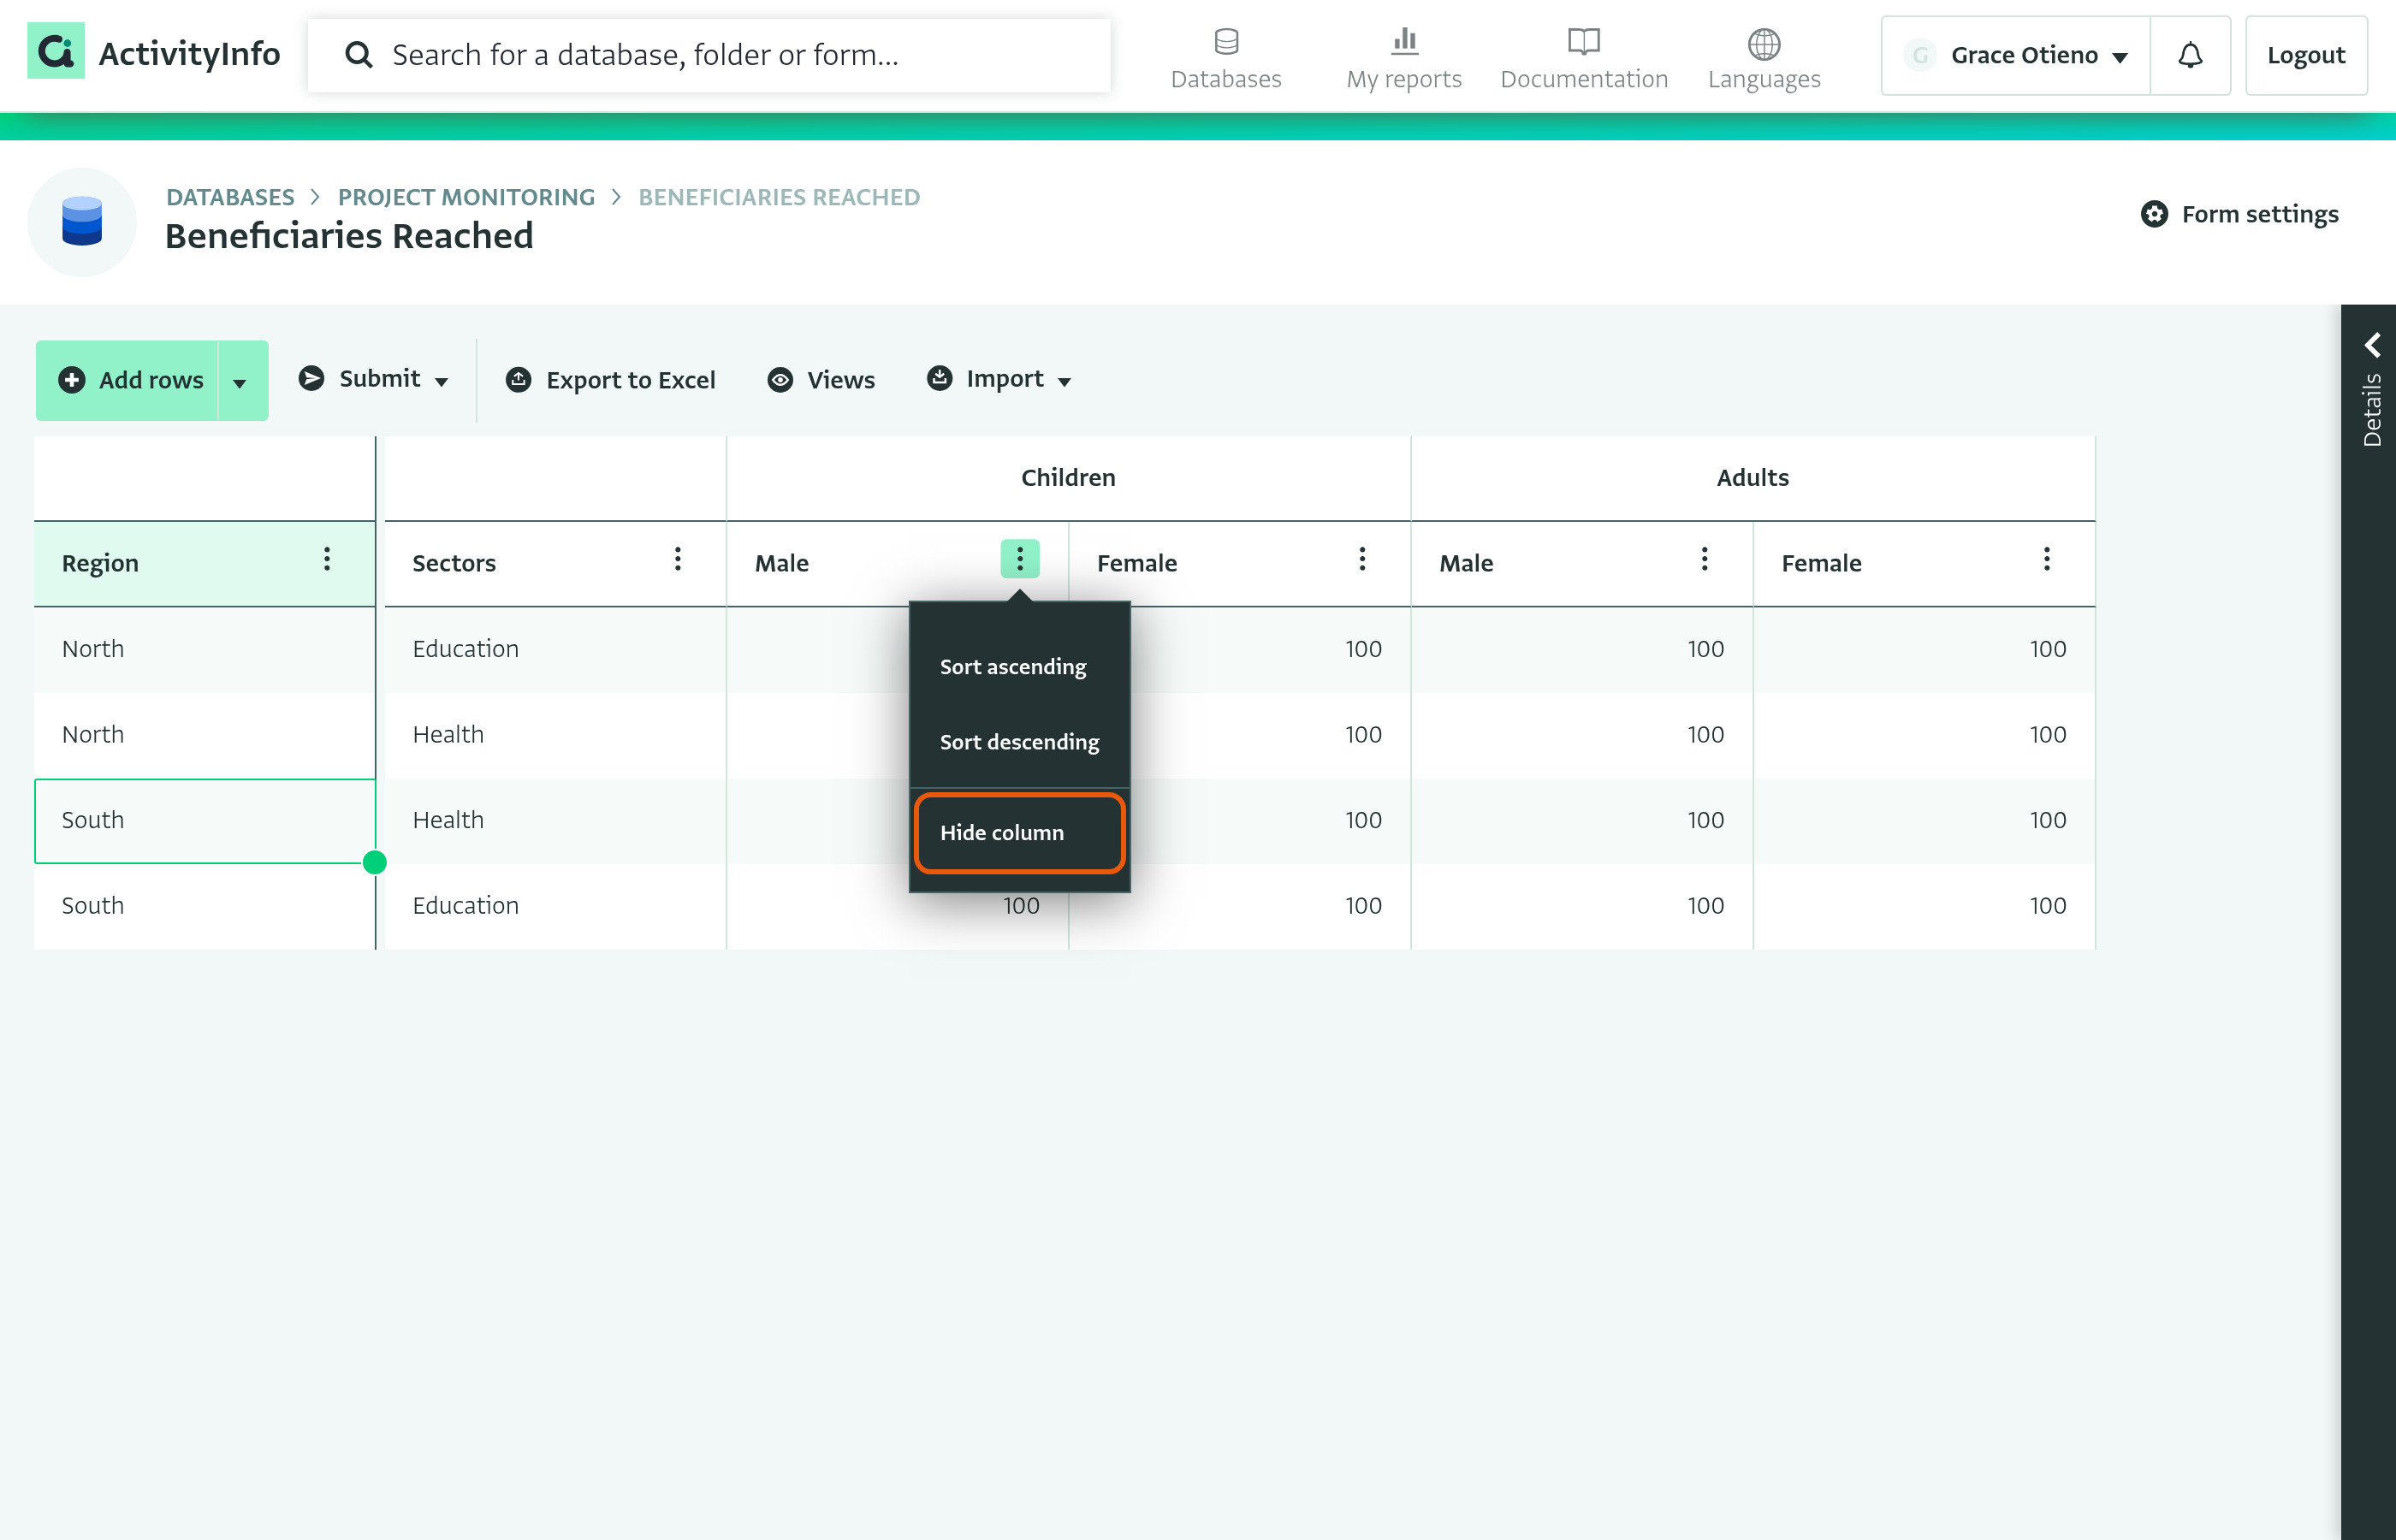
You can hide measure columns that you don't need to see while you enter data. Hidden columns are saved as part of the view.
- Click the menu icon on a measure column header and click "Hide column".
- The column disappears from the matrix, and a "Show hidden columns" button appears above the matrix.
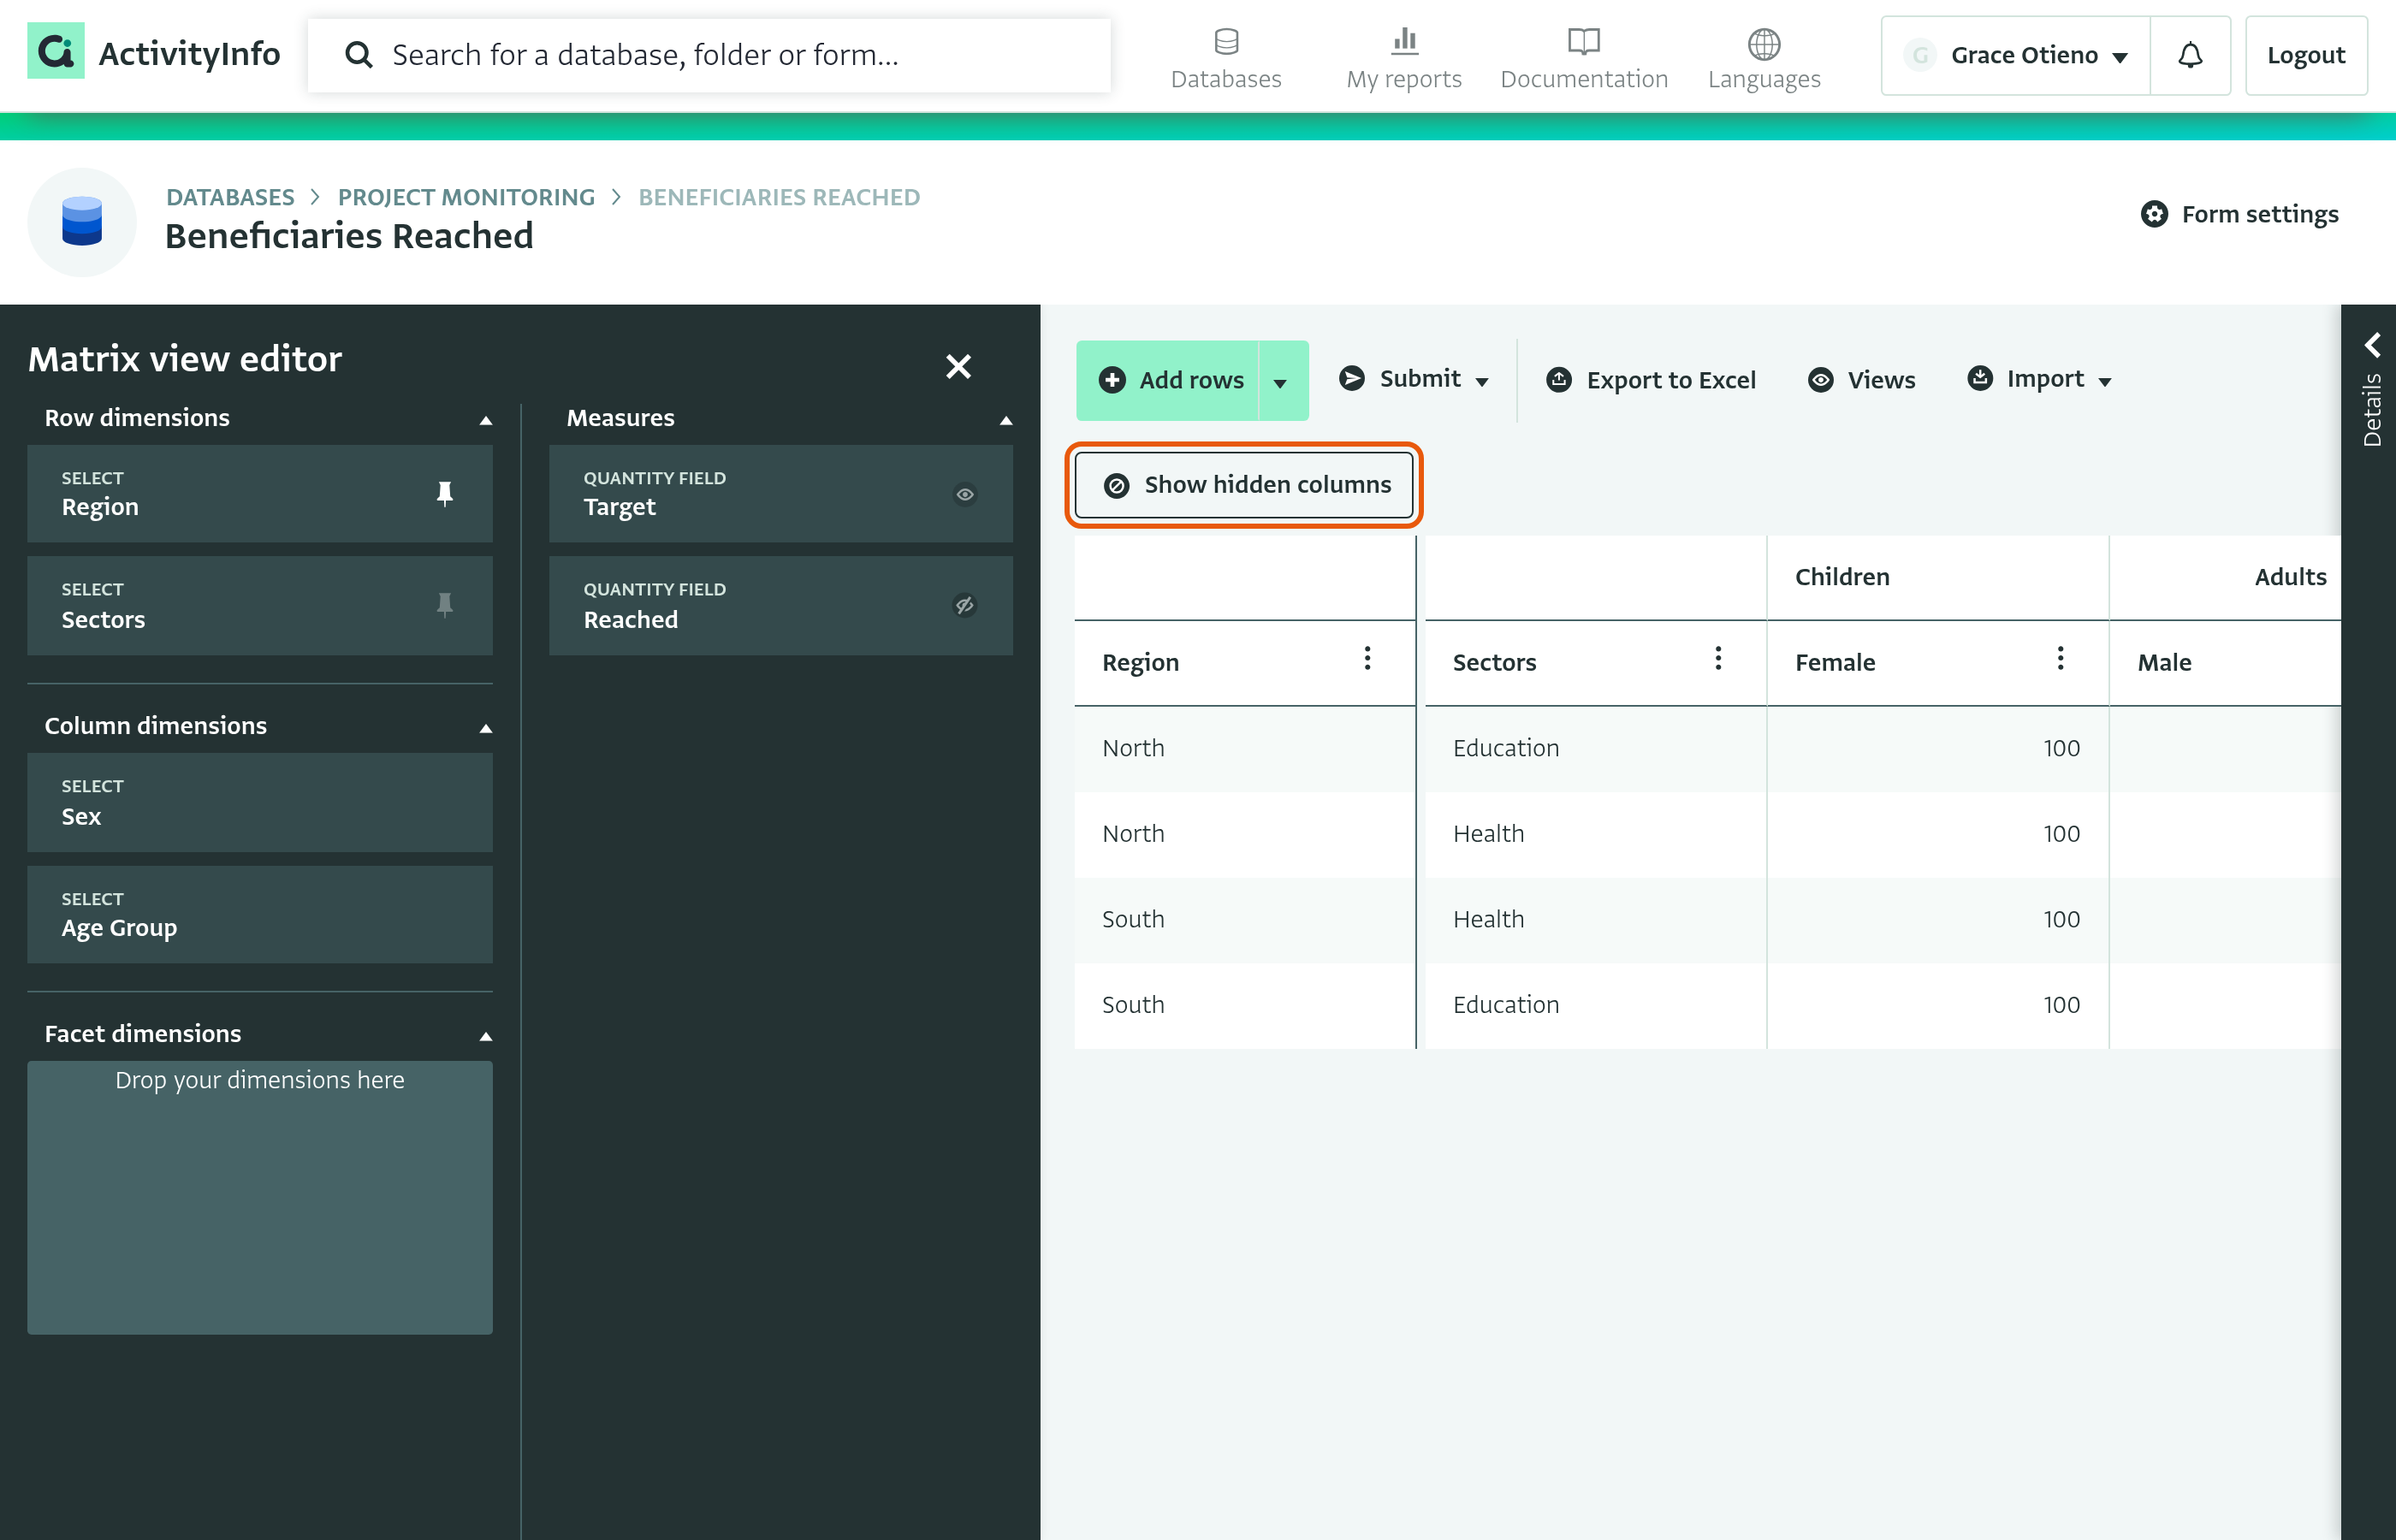
- To see the hidden columns, click on "Show hidden columns". The hidden columns appear grayed out, and the button changes to "Hide columns".
- To show a hidden column again, click the menu icon on its header and click "Unhide column". Click "Unhide all columns" to show every hidden column.
Facet dimensions
The facet dimension filters the matrix to show only records matching a selected value. You can add multiple facet dimensions to further filter the records in the matrix.
Click the drop-down on the facet dimension card to select a value.
Example of a Matrix View showing the number of adults and children beneficiaries reached in the Food Security sector in the West region disaggregated by gender.
You can hide a facet dimension from the interface while keeping its filter active. A hidden facet does not appear as a visible drop-down, but the saved selection continues to apply. To hide a facet, click the visibility icon on the facet dimension card.
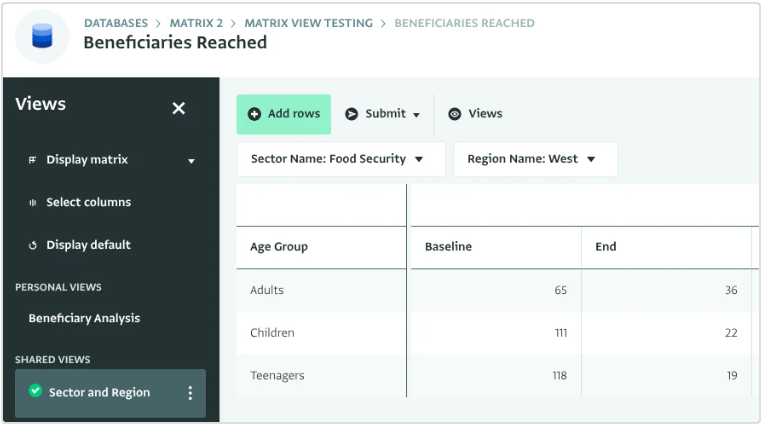
You can save your facet selection as part of the matrix view configuration. When another user opens a shared view, the matrix opens pre-filtered to that facet selection.
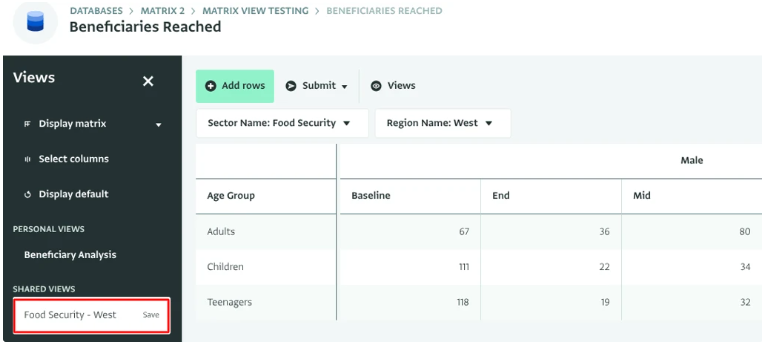
Save the view as a personal view first, then set it to shared to make it available to other users.
Moving a row dimension to a facet
You can turn a row dimension into a facet dimension from the matrix, without opening the matrix view editor. Click the menu icon on the row dimension header and choose one of these options:
- "Move to facet": moves the dimension to the facet dimensions.
- "Move to facet and hide": moves the dimension, and any lookup fields that come with it, to the facet dimensions, sets them to blank and hides them.
A dimension that you move to a facet starts with a blank value. Click the facet drop-down above the matrix and select a value.
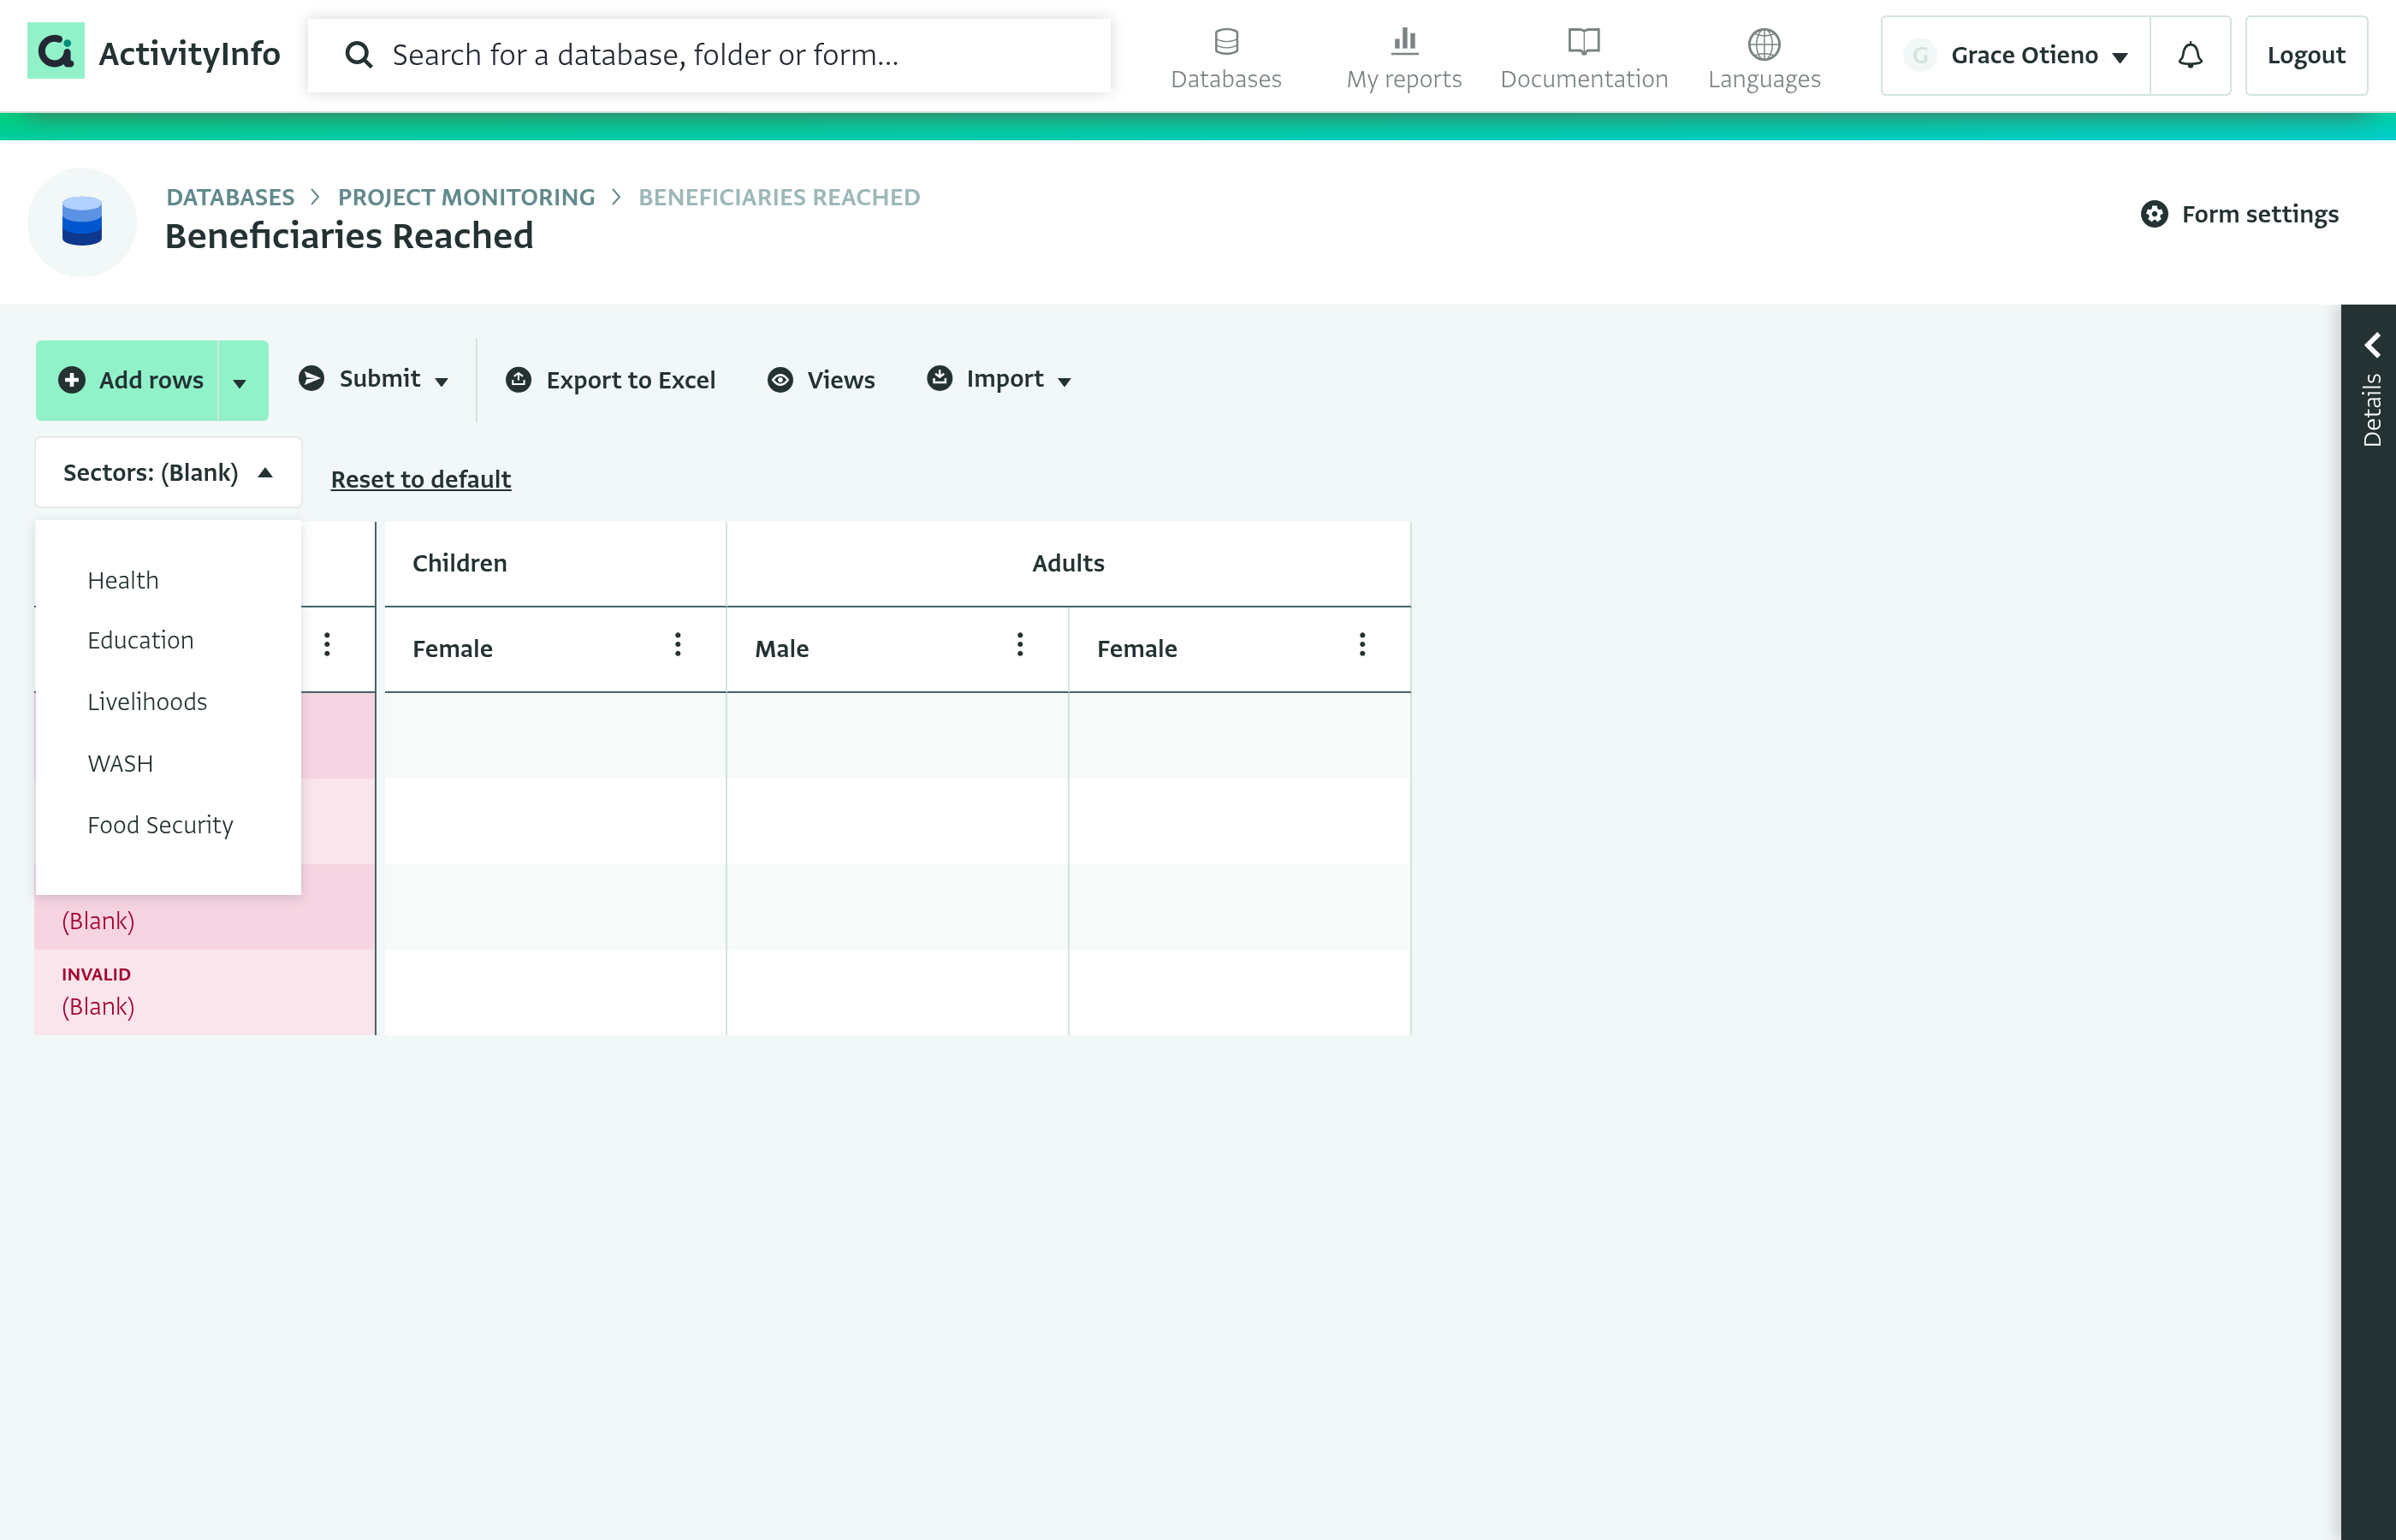
The matrix then shows only the records that match the selected value.
Cascading facet dimensions
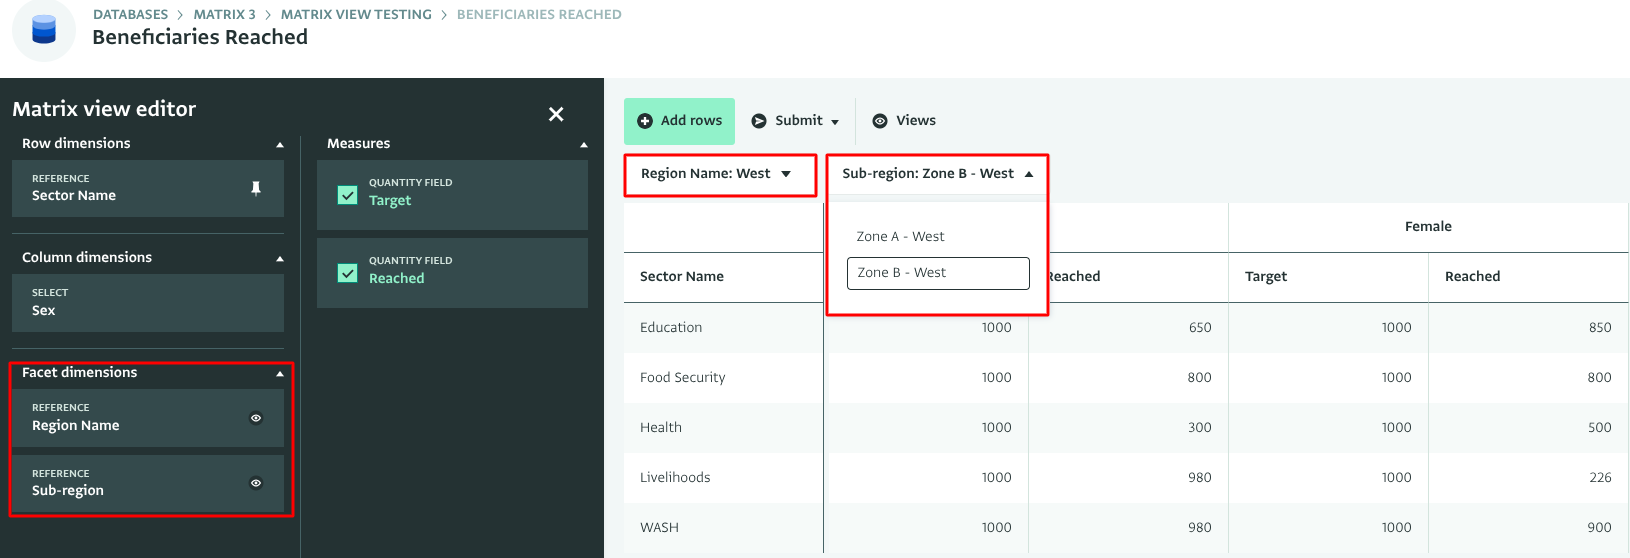
Cascading facet dimensions create a parent-child relationship between filters. This lets you drill down into the matrix data and view localized results with precision. When you link two facet dimensions, selecting a value in the parent dimension filters the options shown in the child dimension. For example, selecting West in the Region Name facet filters the Sub-region drop-down to relevant options such as Zone A West or Zone B West. This lets you compare indicators across administrative levels without navigating multiple separate reports.
Data entry in the Matrix View
Once you have configured your Matrix, you can use the Interactive Table feature within the matrix. This allows you to:
- Edit field values directly from inside the cells
- Add multiple new records at the same time from an external data source
- Fill down repeated values
- Review validation status and correct field values
- Save or delete records or draft records in bulk
Editing field values in the Matrix
You can edit individual field values in the Matrix by:
- Double-click on a cell in the matrix.
- Type in the new value and press enter.
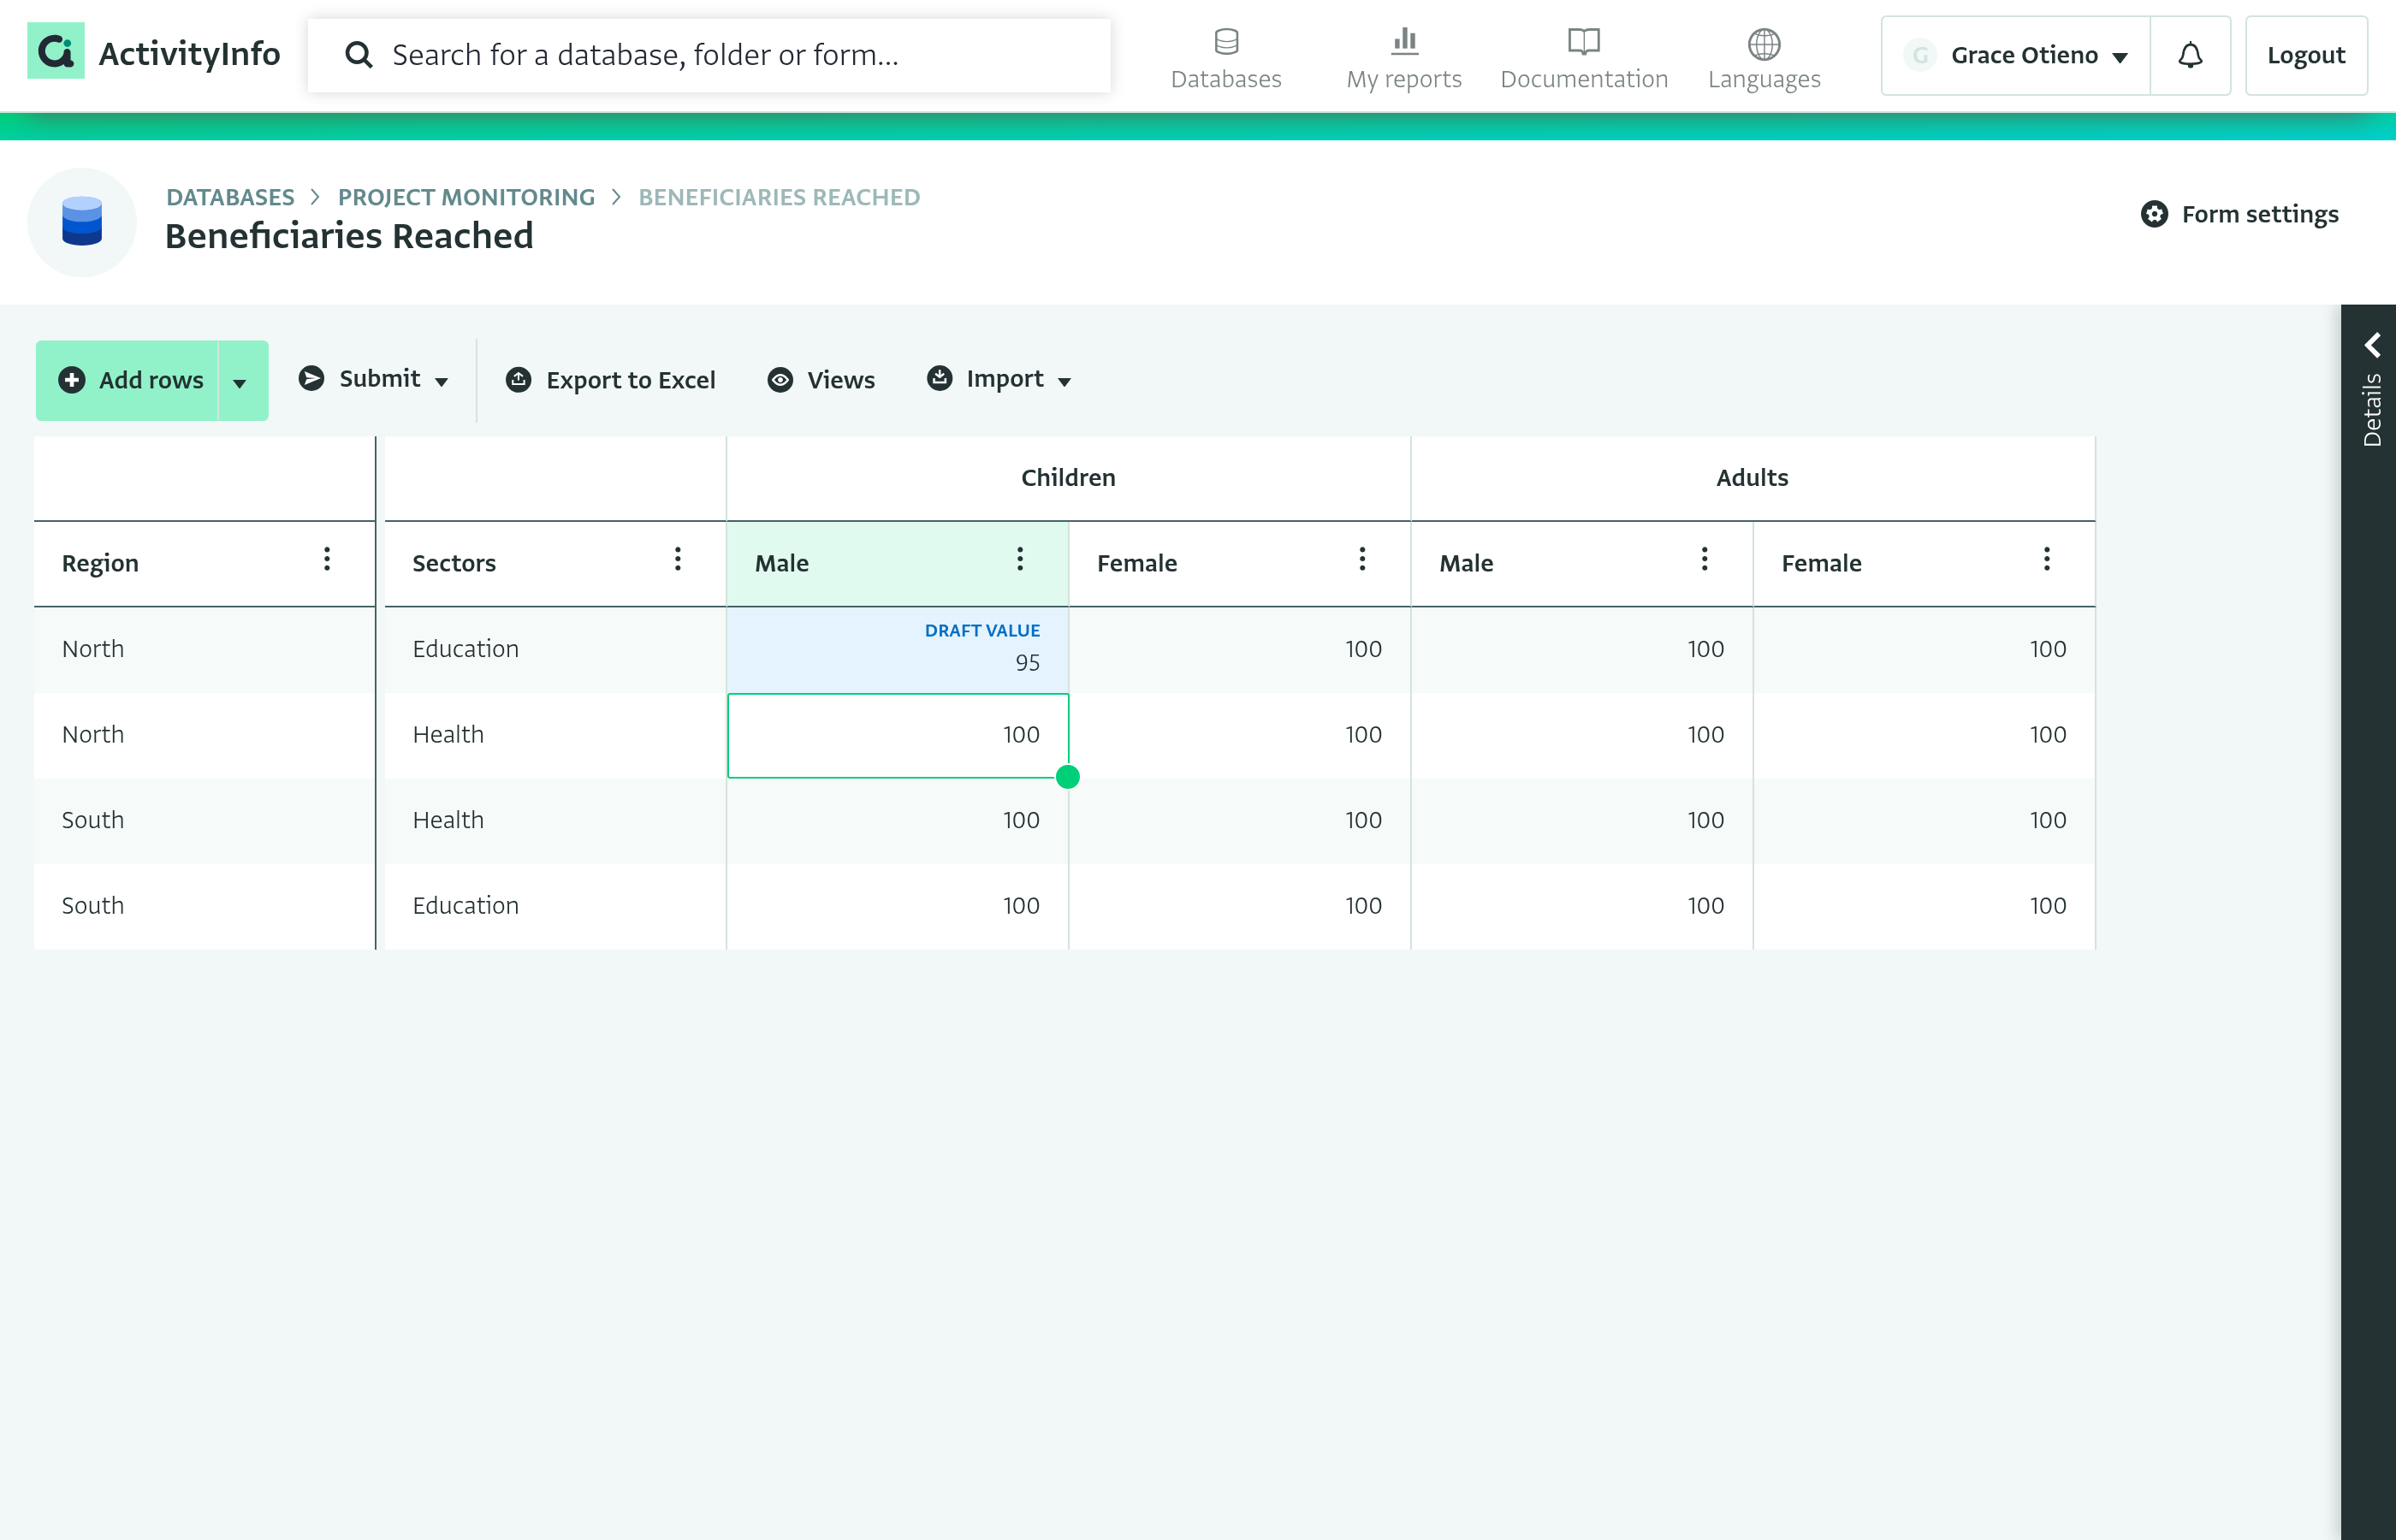
- The record immediately turns into a draft that is saved on your local device until the record is submitted to the server to commit the changes. Click on "Details" on the right side to open the record panel, then click on "Submit drafted records to server".
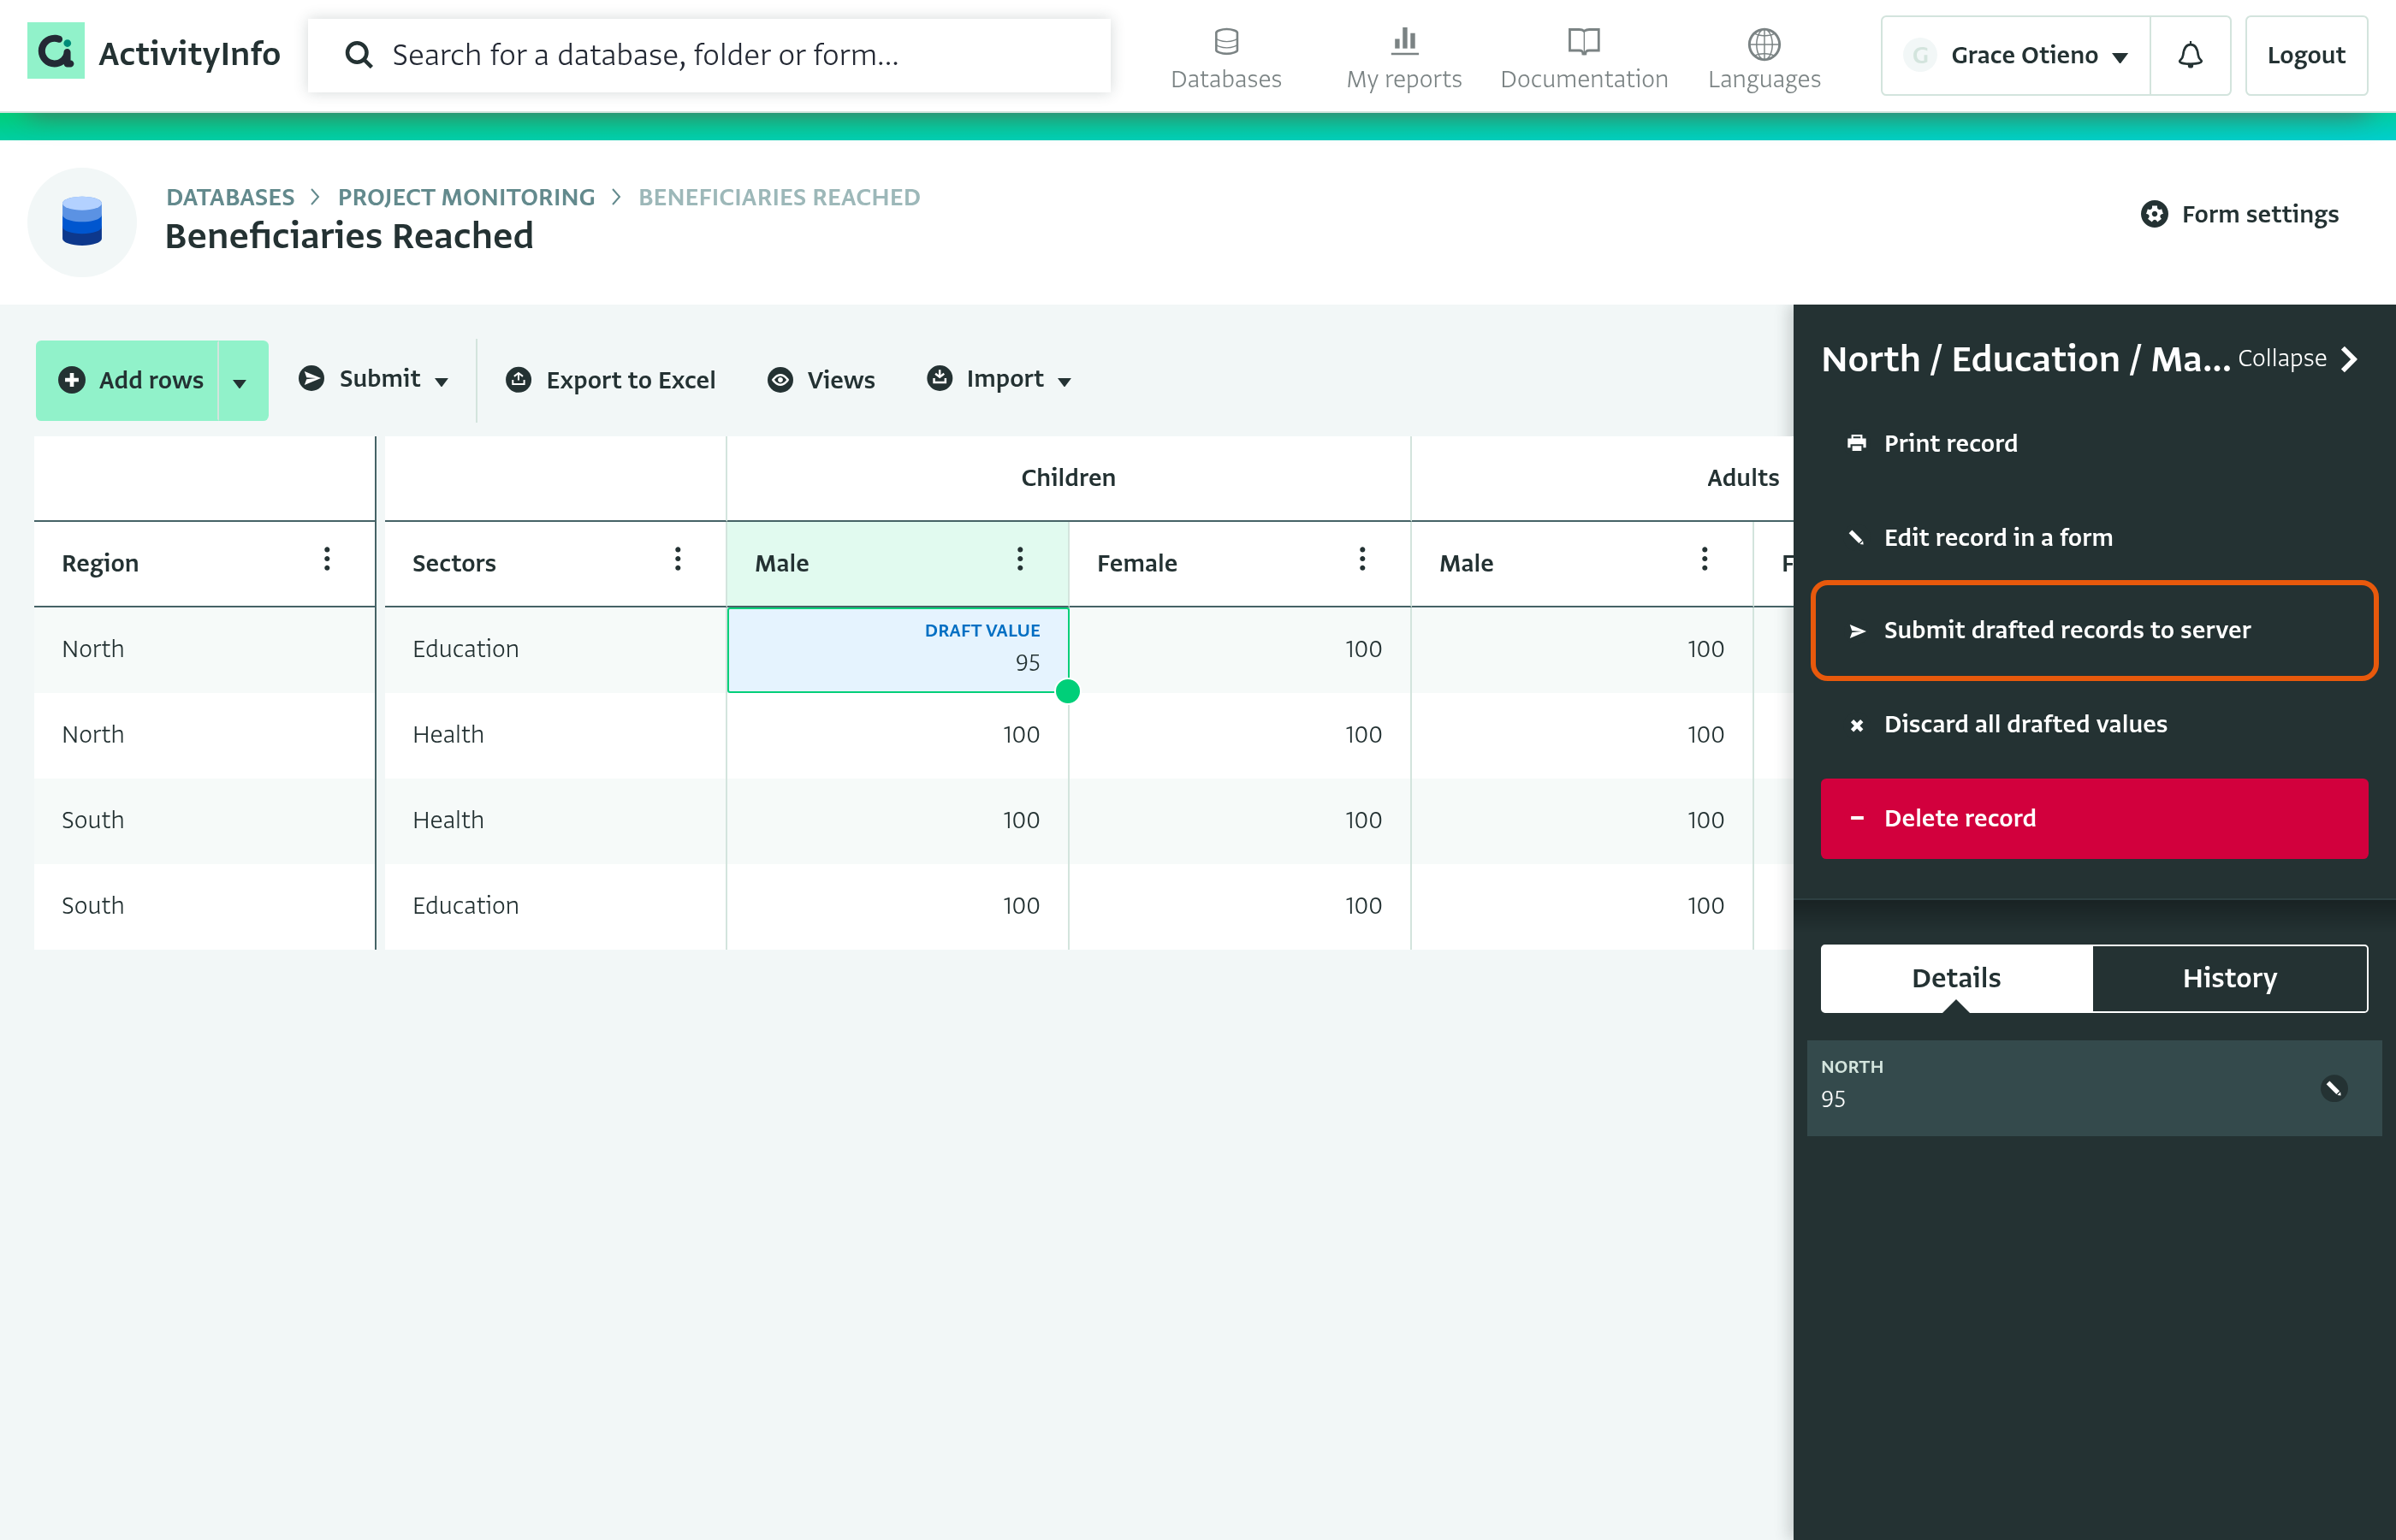
- The new value has now been sent to the server and can be viewed by other users.
Editing records from the record panel
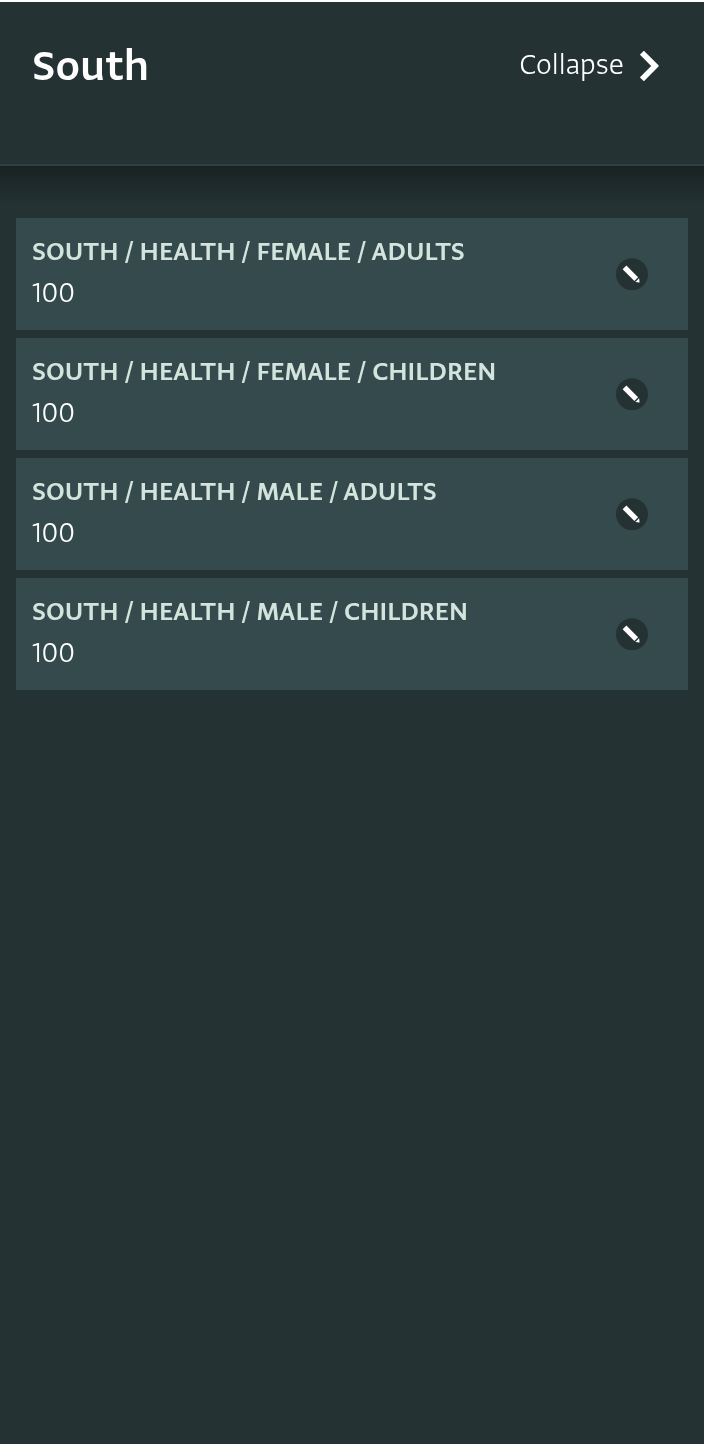
When you select a row dimension value, such as "South", the record panel lists each record in that row with its value. Click the pencil icon on a record card to edit the record in the data entry form.
Adding multiple new records
This feature is useful when you have a matching matrix in an Excel or Google Sheets spreadsheet. It allows you to copy and paste values directly into the matrix.
- Add rows depending on the number of records you want to add to the matrix. Click the "Add rows" button to add a single row, or click the small arrow next to it to open a field where you can type a number of rows (up to 100) and click "Add".
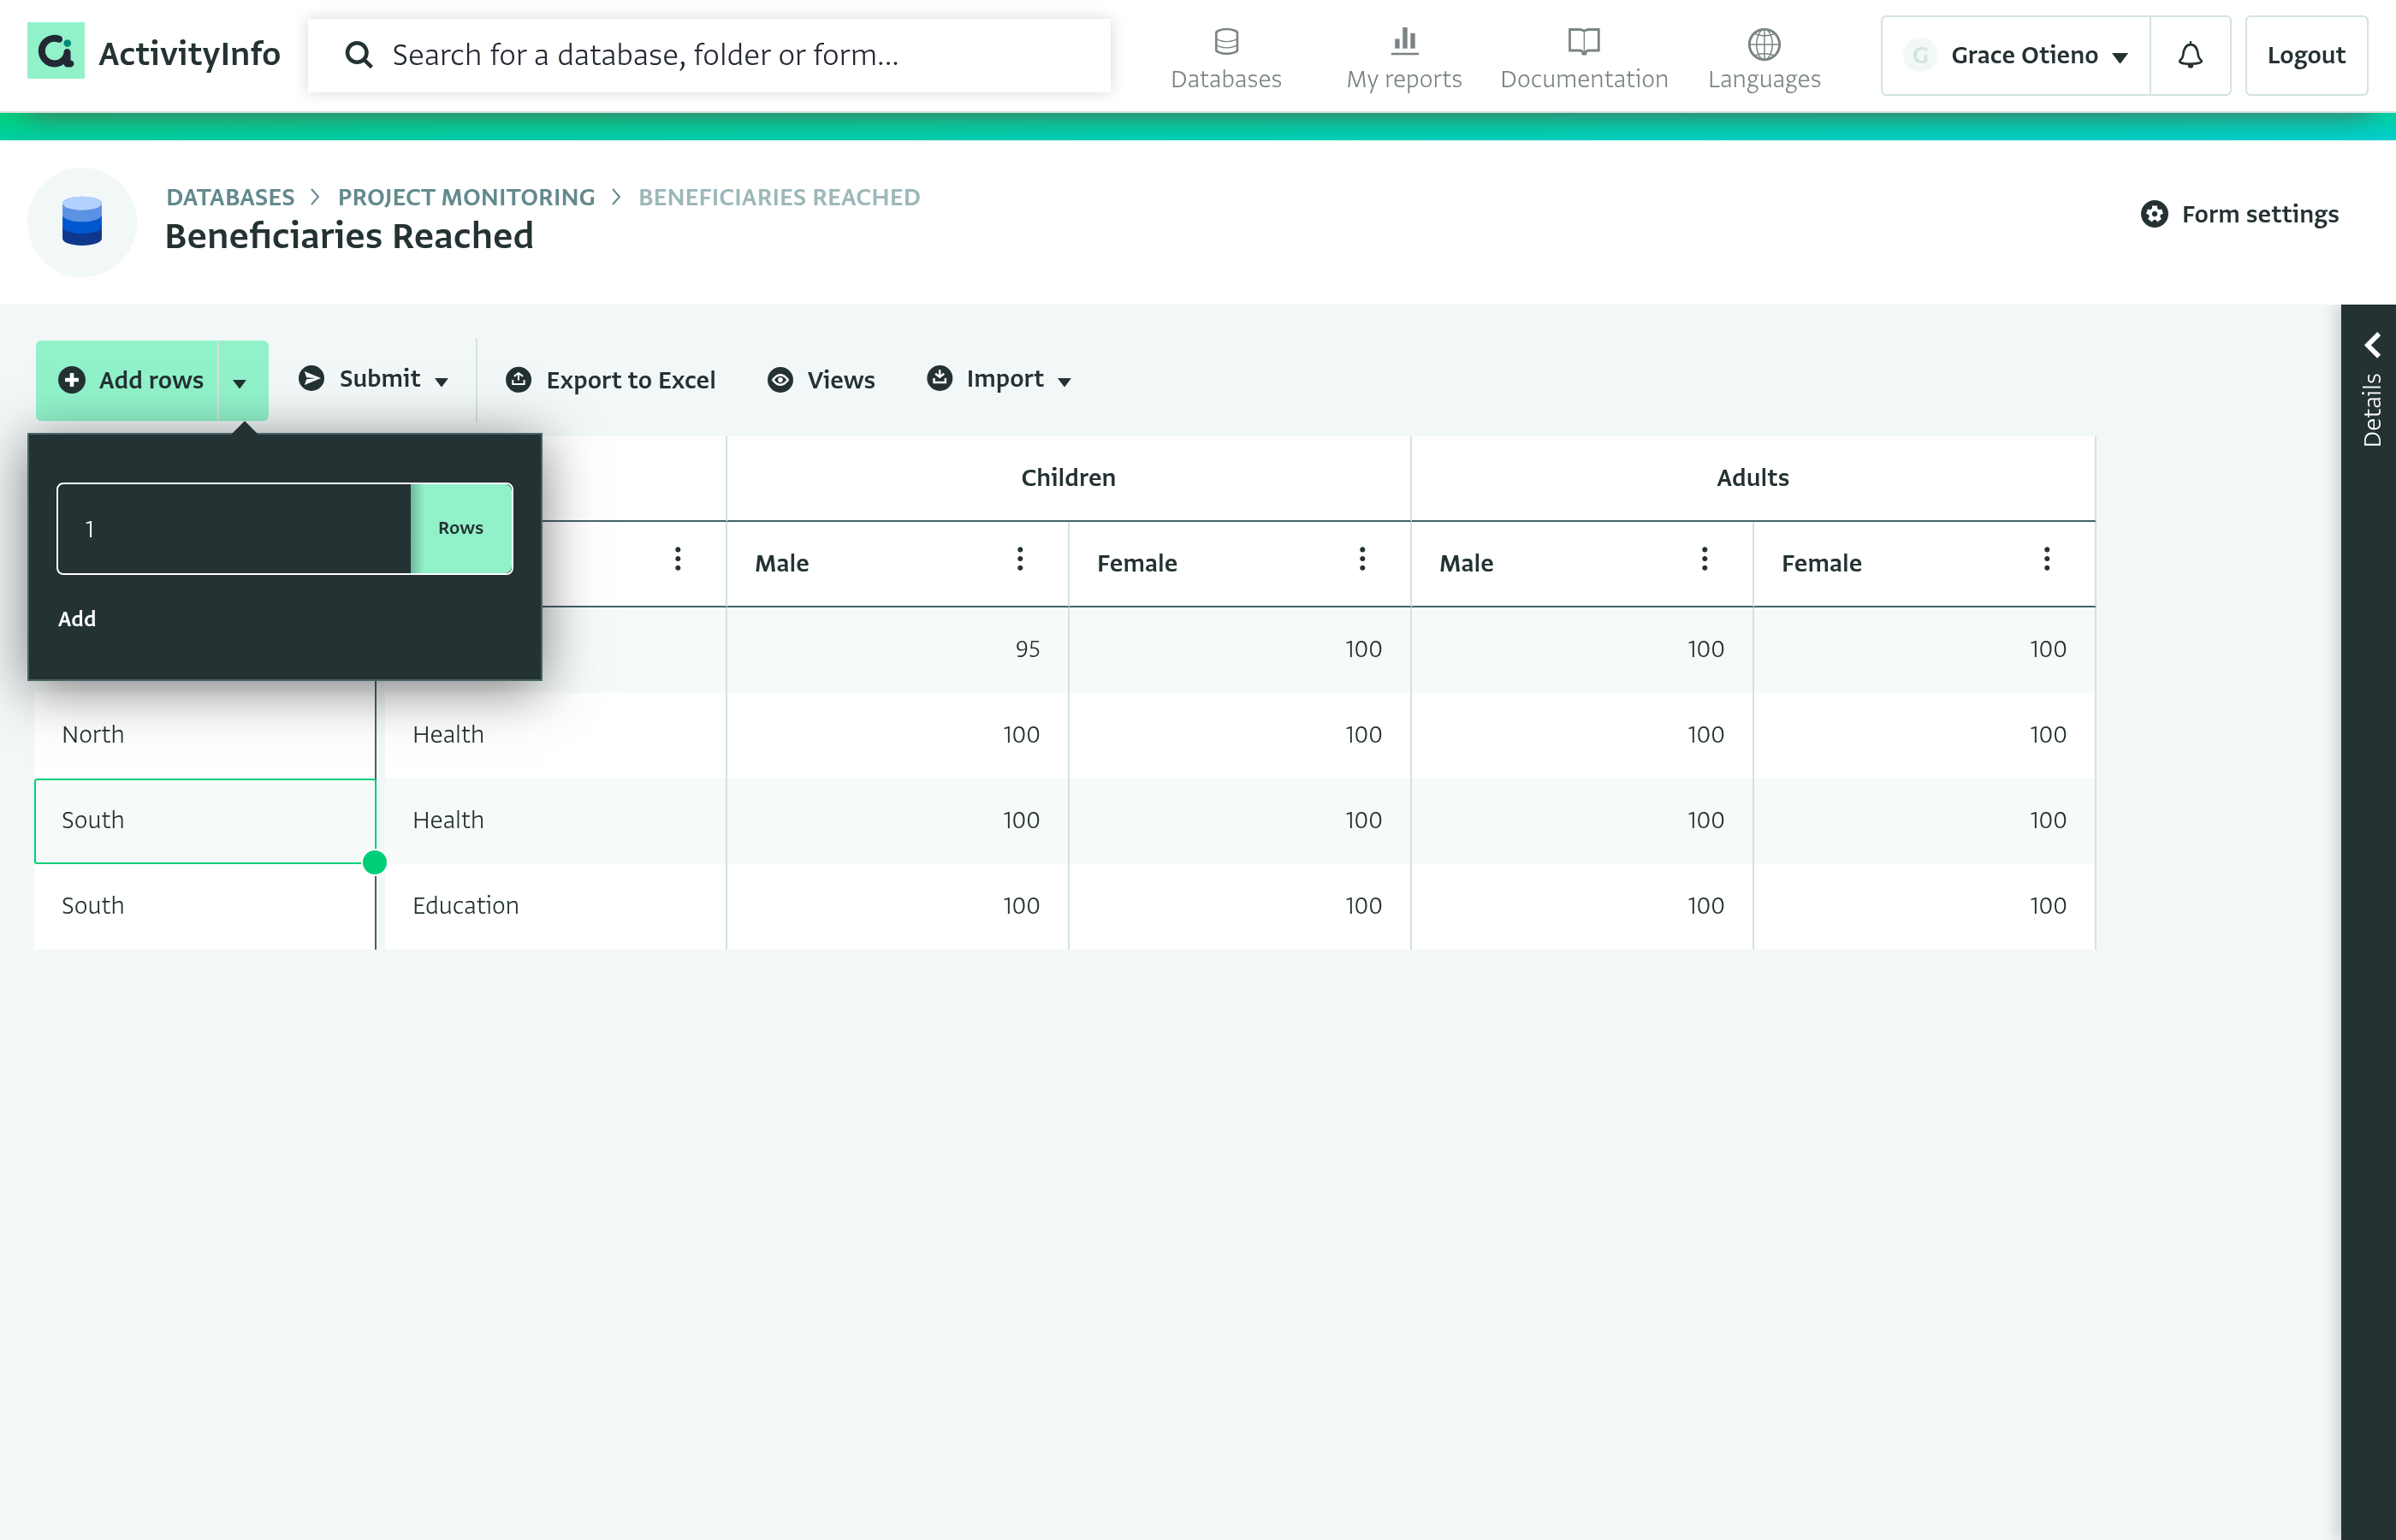
- Copy the rows you want to add into the matrix from the external source.
- Click on the first cell of the added rows and press Ctrl + V to paste the record.
- Once you have pasted the records, click on Submit and select All valid records in this form to commit.
Reviewing validation status and correcting field values
All fields in the matrix that are incorrect will be highlighted and marked either invalid or duplicate.
You can correct the records within the matrix by double-clicking on the affected cells and rectifying the values.
Fill down values
You can use the fill handle in the bottom-right corner of a cell or selection to copy values up or down in a column or from left to right in a row, similar to spreadsheet behavior. The fill down will be subject to validation rules.
- If one cell is selected, its value is repeated.
- If multiple cells are selected, the pattern is repeated.
Records will appear as draft records until they are submitted to the server.
Importing records
In addition to pasting rows directly into the matrix, you can import records using the "Import" button in the Matrix View toolbar.
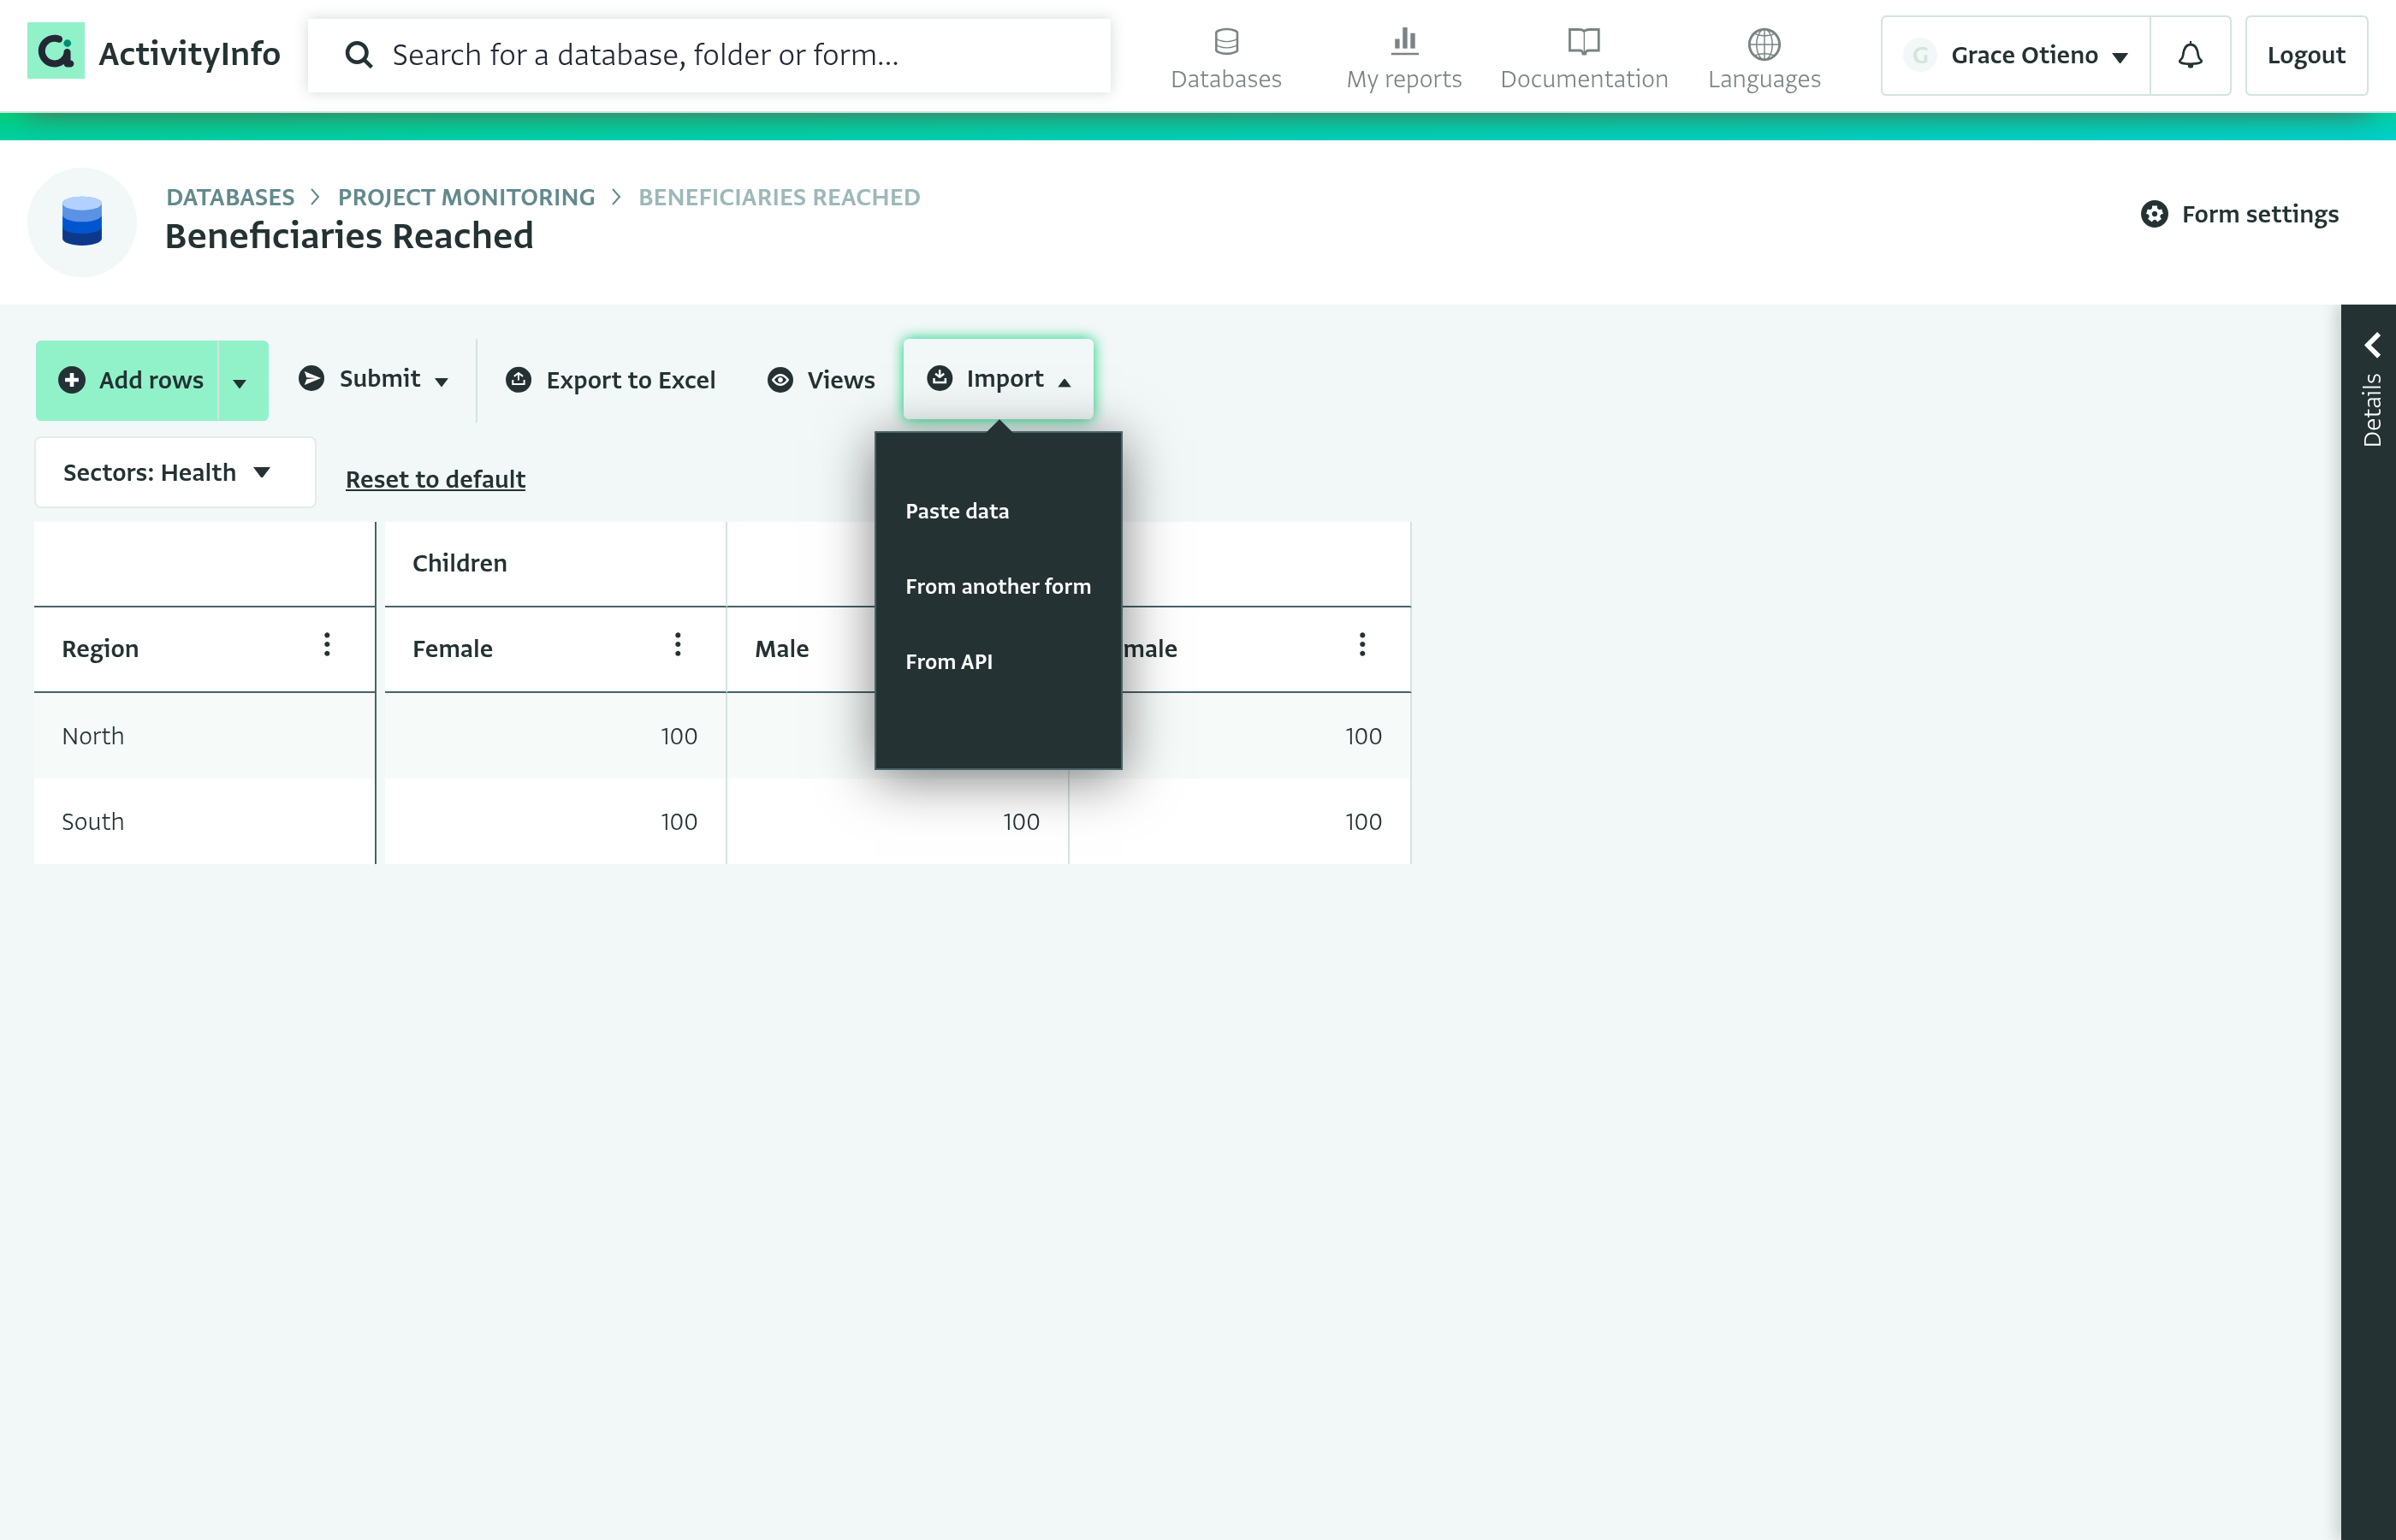
We have three options available for importing records.
- Import records from a spreadsheet
- Import records from another ActivityInfo Form
- Import data from an external API
Submitting, discard drafts or deleting bulk draft records
You can submit or delete multiple draft records that have been selected in the matrix.
- Click on a cell and drag downwards to select the cells you want to submit or delete.
- On the records panel, there are options to submit the drafted records to the server, discard all the drafted values or delete the selected records.
Exporting to Excel
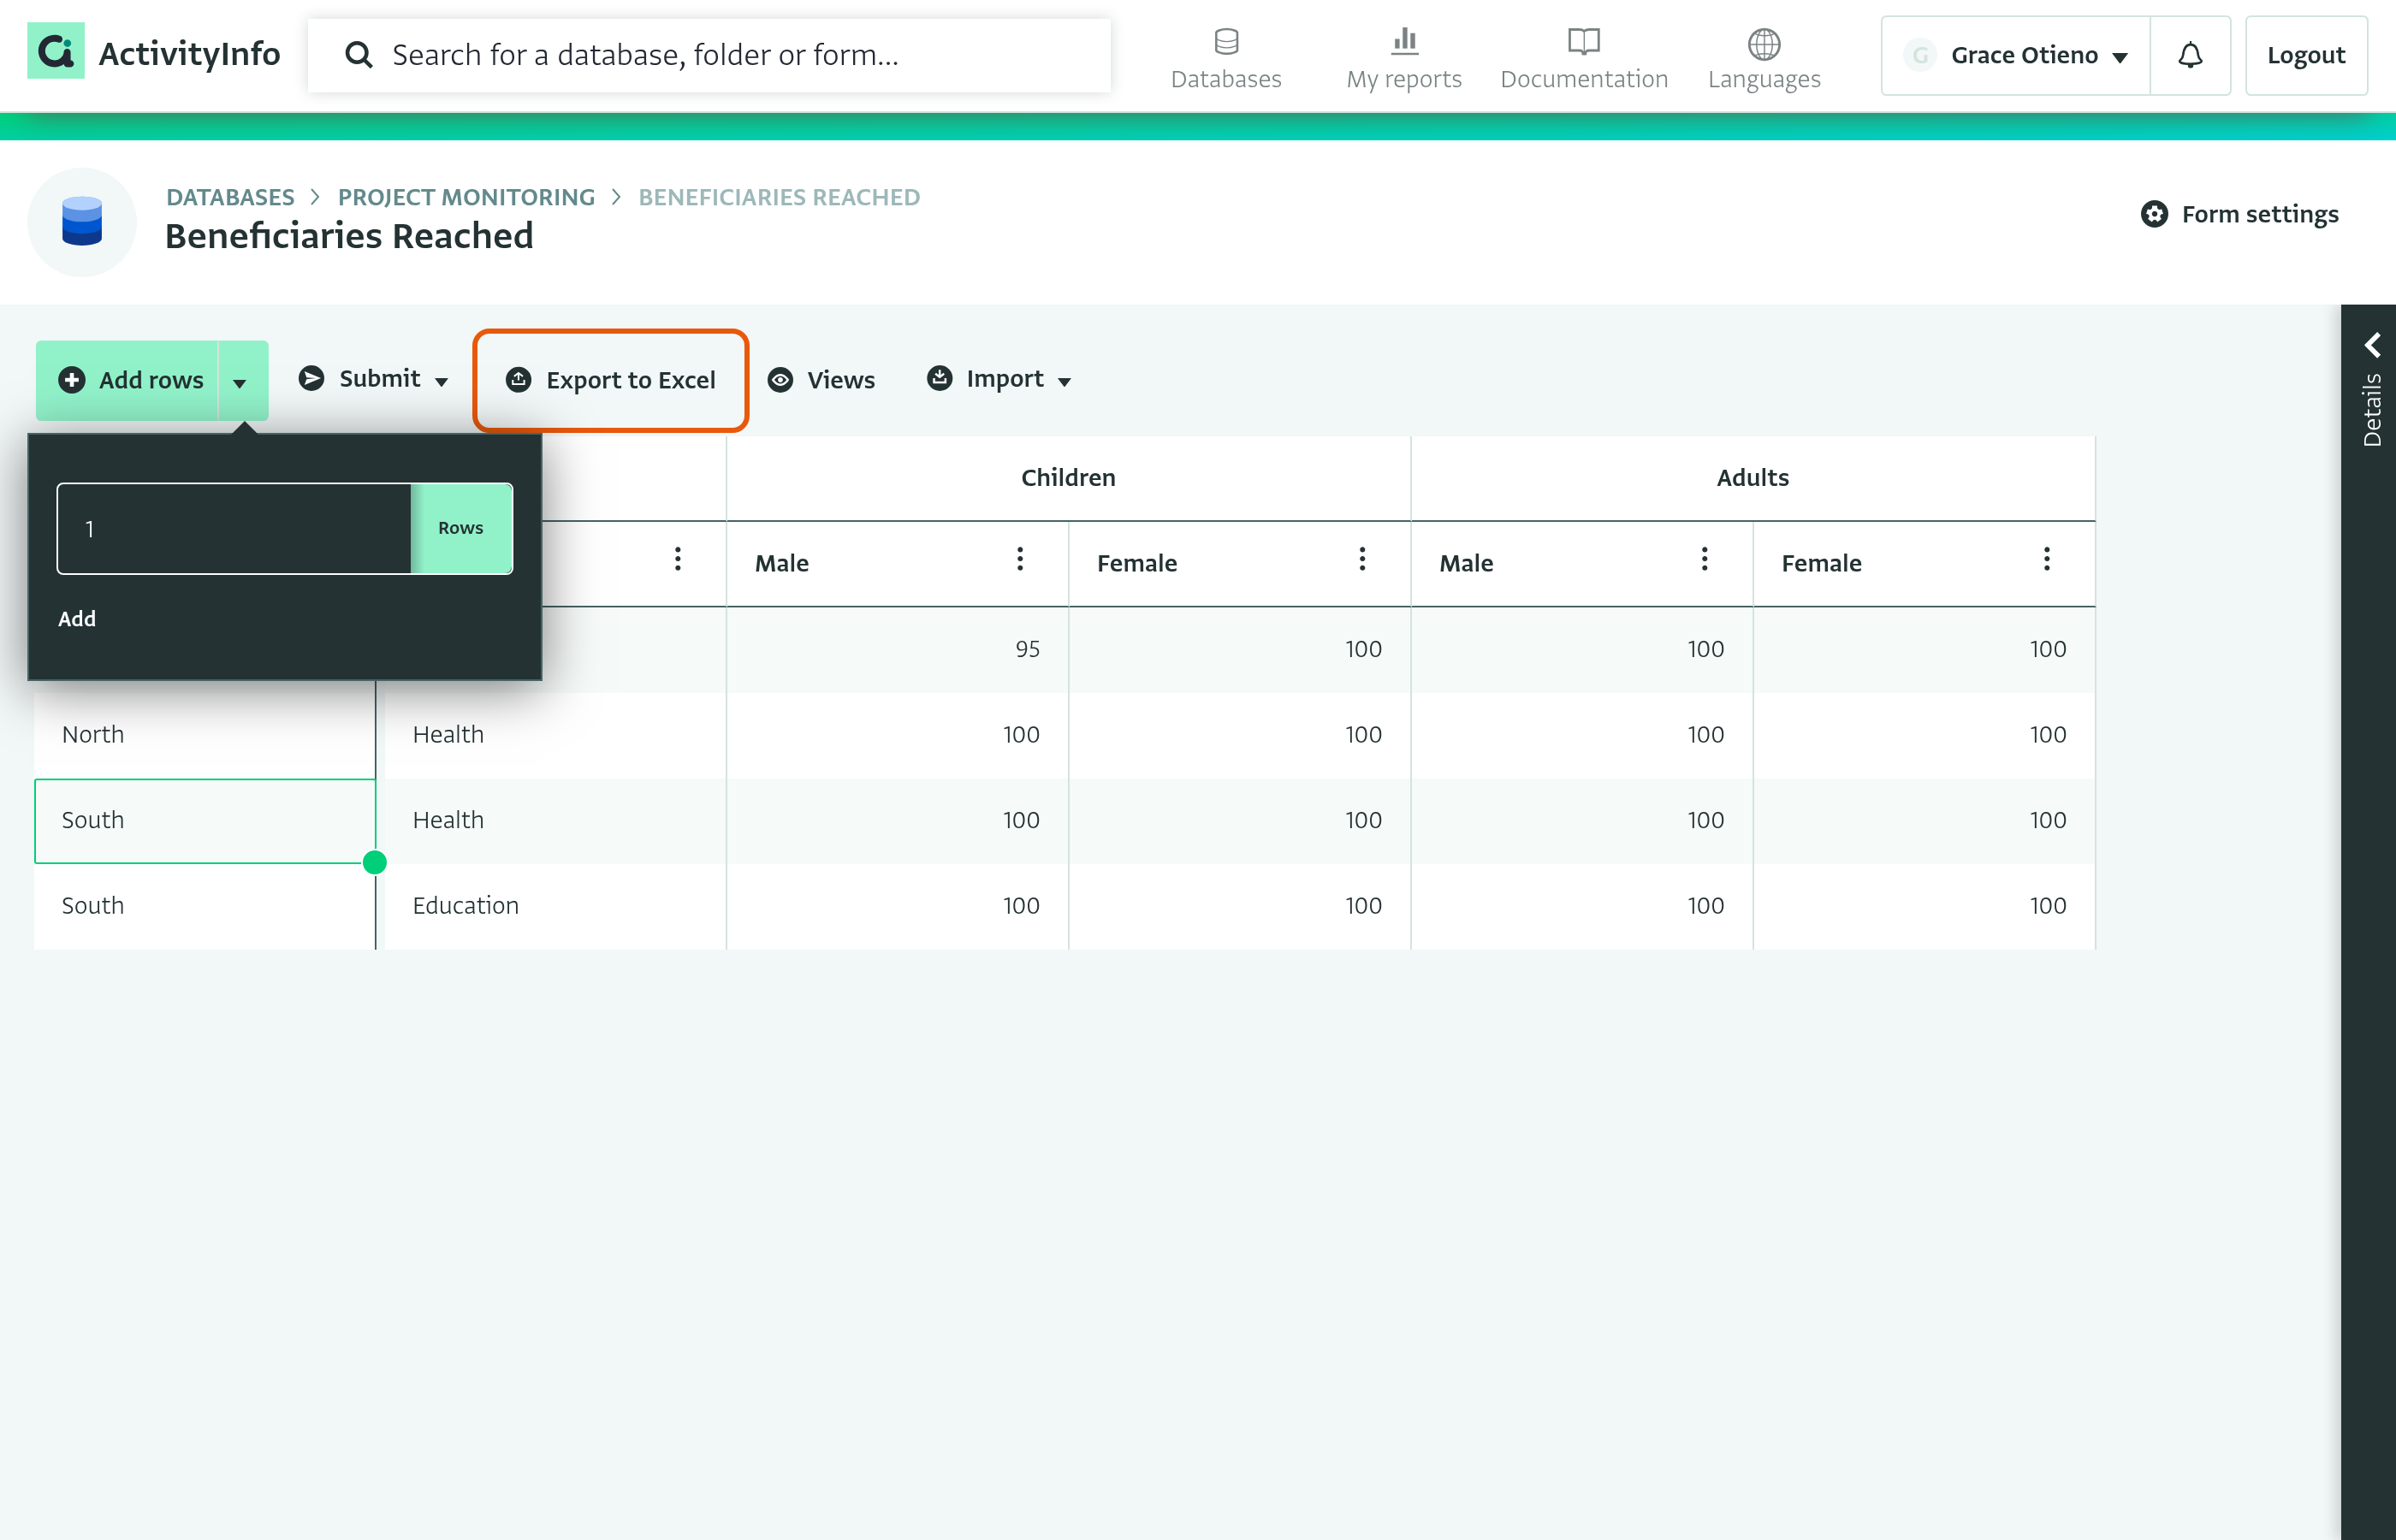
Click "Export to Excel" in the toolbar to download the matrix as an Excel file. The exported file matches what is currently displayed, including the selected dimensions, measures, facet filters, and sort order, and includes values from any unsubmitted draft records. The button is disabled if the form is not compatible with the Matrix View.
The export includes every row that matches the current facet selection, not only the rows currently visible on screen, and is written to a single-sheet workbook named after the Form.
This is useful for sharing a snapshot of your data with people who do not have access to ActivityInfo, or for further analysis in a spreadsheet application.
Troubleshooting
- The Matrix option does not appear in the Views panel: Check that your form has at least one single selection or reference field marked as a key field.
- The Matrix shows a "This form is incompatible with the matrix view" message: Check that your form has at least one quantity field to use as a measure, and that all key fields are single selection or reference field types.
- The Matrix is showing fewer columns than expected: The number of column combinations exceeds 200. Move one or more column dimensions to the row or facet dimension to reduce the column count.
Summary
The matrix view transforms long-format records into an interactive, pivot-table-style interface for entering, reviewing, and validating disaggregated indicator data.
An analysis-ready data model is maintained while providing a flexible interface for data entry through an interactive table when working with many combinations of disaggregation values.
By enforcing the use of key fields as dimensions, the matrix view ensures that every data point is uniquely defined and consistently structured. Features such as multiple measures, facet dimensions, pinned row headers, and spreadsheet-style paste support make it practical for reporting scenarios, including the integration of secondary data from external systems.