A complete guide to data importing in ActivityInfo
In the past, we discussed how you can import your questionnaires into ActivityInfo. Another importing option you have in ActivityInfo is to import your existing data to the platform.
There are many cases when you might want to import data in ActivityInfo instead of manually fill in a data collection form. For example, you might have a lot of data residing in files outside ActivityInfo which you need to add to the system to create a more comprehensive view of a programme. In some cases, you might be collecting one-time data from partners or actors who are not ActivityInfo users and thus don’t have access to the system. Another interesting possibility that the ActivityInfo importer offers is that it can help you bring structure to your data and ensure that you have harmonized, validated records in place of messy spreadsheet files. No matter what your case is, you can always import large lists of indicators and other data to ActivityInfo and work with complete datasets using the importer in the platform. With this guide we want to share various tips and tricks to work fast and efficiently when importing your data.
Please note that in our User Manual you can find step-by-step instructions and videos on how to import records to forms and subforms. This guide provides you with more examples and tips and can be read in combination with the User Manual.
To import data to ActivityInfo you need:
- an ActivityInfo account
- to be invited to the form for which you need to do the importing with the respective permissions
- a spreadsheet app (ActivityInfo supports the formats found in Excel, Open office, Libreoffice and Numbers)
- and… the data you want to import
After preparing the data in the spreadsheet app, we will use the ActivityInfo data importer to add them to the data collection form. Then, if needed we will correct pending issues to ensure the data is imported correctly.
Step 1: A close look at the data collection form
To collect data in ActivityInfo you need to design (or import) a data collection form. This is the form that includes all the questions for which you need answers and it can be as long, short, simple or intricate, as you need. Each answer submitted to this form is called a record in ActivityInfo.
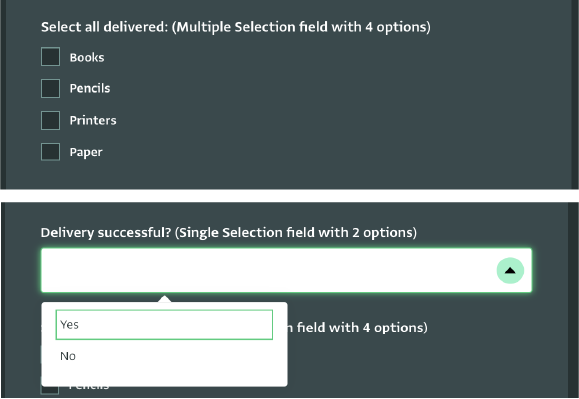
Whether it is you who designed the form or you are responsible for importing the data into that form, the first thing that you need to do is to navigate to the data entry form and take a close look at it. Take a look at every field and note mentally, in a piece of paper or in a spreadsheet what kind of answer each field requires; whether it is a required field and whether the answer required is open-ended or closed-ended. This is very helpful for the spreadsheet preparation phase. For closed-ended questions, such as multiple and single selection fields or lists of answers coming from reference fields, you need to note down the exact names of the available answers as these need to be typed in the spreadsheet in exactly the same way.
Step 2: Are there Keys in this form?
Understanding what Key fields are in ActivityInfo can unlock a lot of possibilities both in form design and data importing. One or more fields can be defined as ‘Key(s)’ during the form design phase so you can always ask the colleague who designed the form to point you to the Key field(s) used in the form. If you don’t plan to update records that have been already added to ActivityInfo using your imported data, you can skip this step.
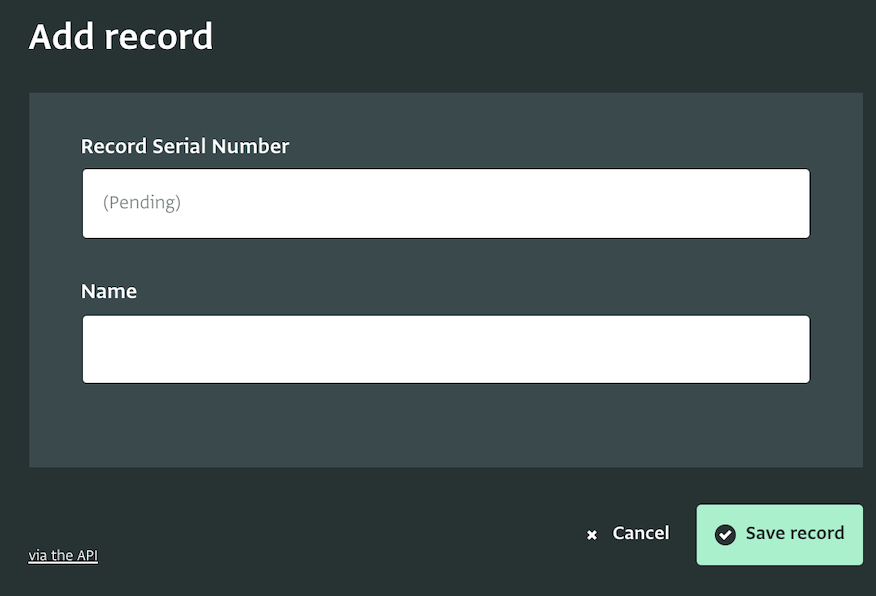
Tip: If the form uses a Serial Number field then this is the key of the form, you can recognize a Serial Number field by the grayed out ‘(Pending)’ text in the data entry form.
A Key field can be used to uniquely identify a record. When importing data, key fields are helpful because when a form has one or more key fields you can easily update multiple existing records just by using the answer given to these fields.
Example:
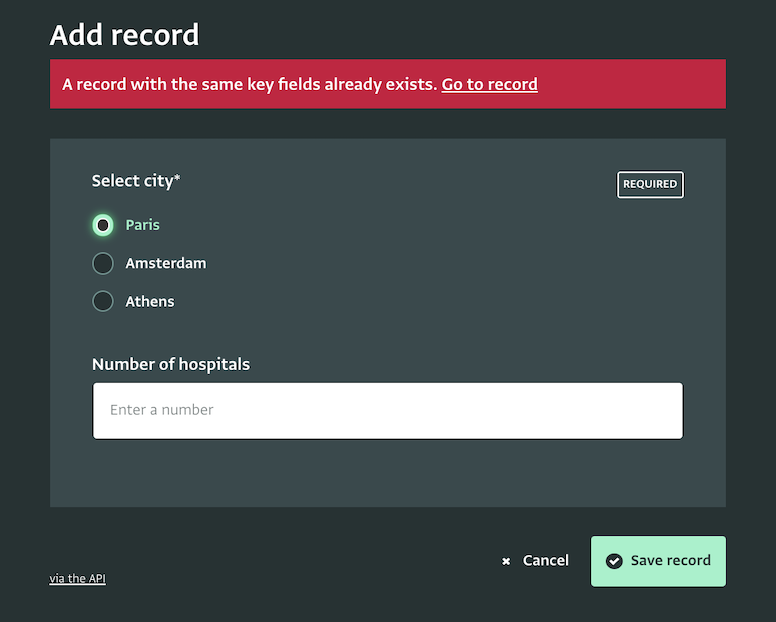
So if you have a form with two fields, “Select city” and “Number of hospitals”, and you define the field “Select city” as Key, then the answer given to this field will identify the whole record.
This means that if you add a record and select ‘Paris’ in the “Select city” field and type “50” in the “Number of hospitals” field, then all information related to ‘Paris’ needs to be added to this record. This ensures that there are no duplicate answers for ‘Paris’.
So if another colleague adds a record and selects ‘Paris’ in the “Select city” field and types another number in the “Number of hospitals” field, they won’t be allowed to save the record. Instead they will be asked to update the existing record, where the answer for “Select city” was ‘Paris’.
When designing a form you might decide to define more Key fields. This way you can create a combination of answers that will identify the record.
So in the example above you could add another field with the name “Arrondissement” and make it a Key field. Then, the record would be identified both by the “City” name and the “Arrondissement” number. So multiple answers for the “City” of ‘Paris’ would be accepted as the ““Arrondissement” would be different every time. However, only one answer would be accepted for “Paris” and “4e Arrondissement”.
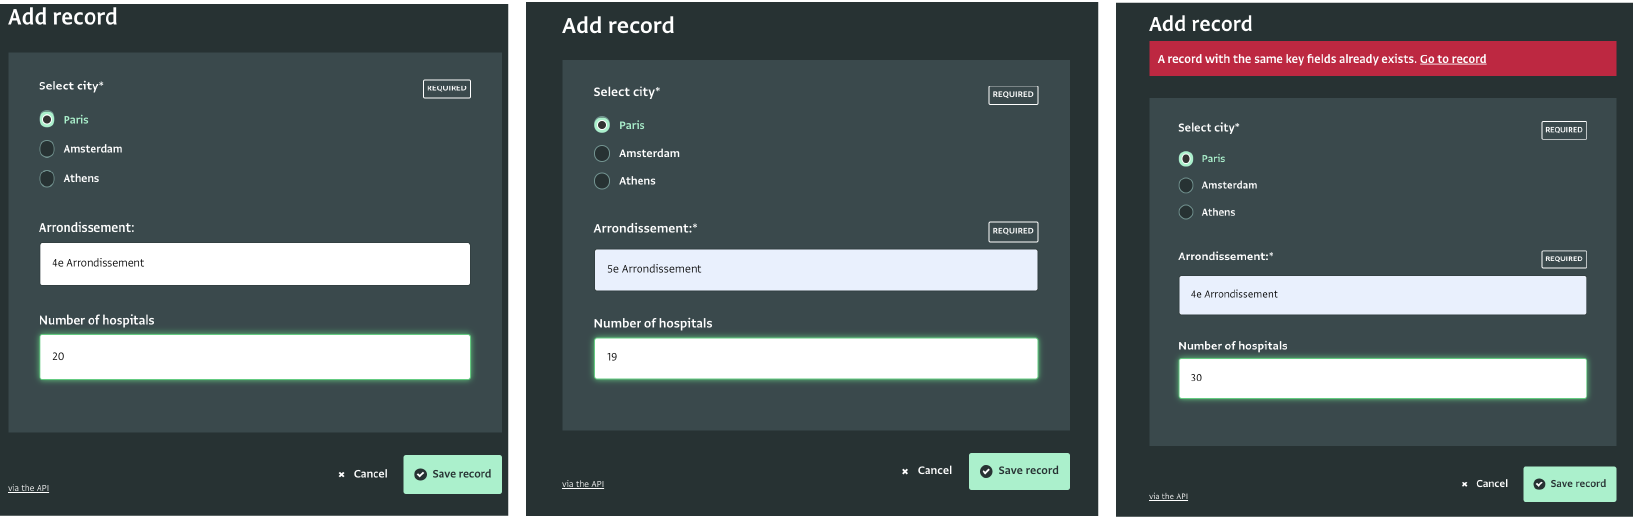
So if there was a record with the answers “Paris”, “4e Arrondissement” and “20 hospitals” already submitted and you wanted to update the number of hospitals with the data in your spreadsheet, you could easily do so by using the answers of the Key fields “Paris”, “4e Arrondissement” and the new number of hospitals in the spreadsheet.
Step 3: Are there subforms in the form?
Subforms are part of forms and they are used to collect additional information about a record such as more details or repetitive numbers. A common example is a form about an entity or programme with a subform that collects monthly data about monthly activities regarding the entity or programme.
You might need to import data only to the subform(s) of the form. The process to do that is exactly the same as importing data to a form. The only difference is that in the spreadsheet you prepare, you need to define the parent record to which the record of the subform belongs. To do that you need to know the Key field(s) of the parent form.
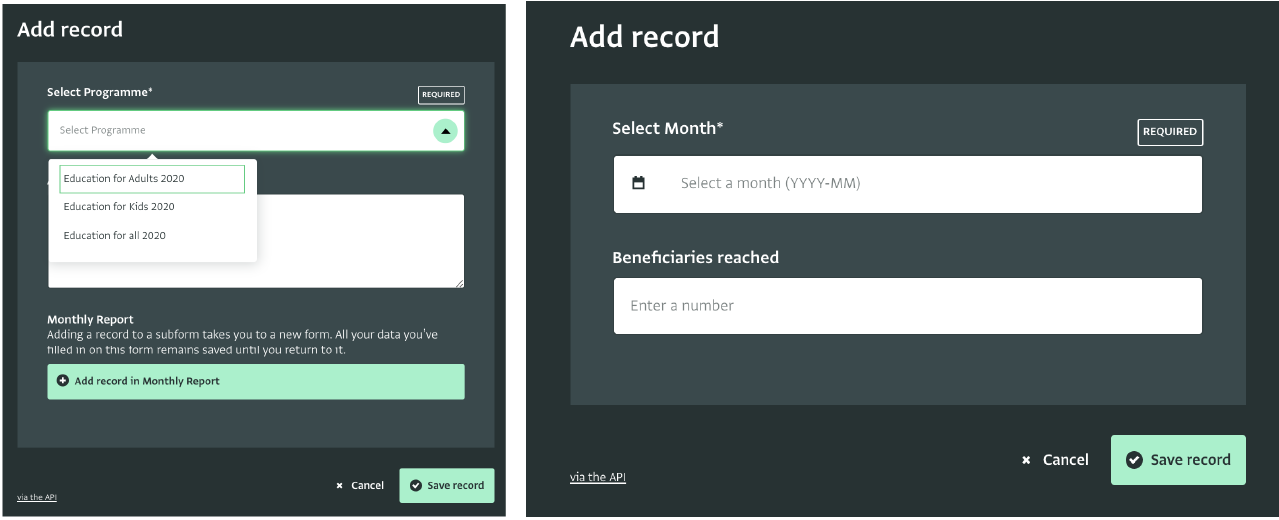
Example:
Imagine you have a very simple form with a subform which collects monthly indicators for each active programme. It would be useful during form design to make the “Select Programme” field a Key field. Then, in the spreadsheet where you are preparing the data for the monthly report of the programme “Education for Adults 2020”, you need to add an additional column. The header should be “Parent - Select programme” - which is the label of the Key field in the parent form. Under this header the name of the programme “Education for Adults 2020” should be repeated for every record you want to import.
| Records to be imported in subforms of 2 parent forms | ||
|---|---|---|
Parent Select Programme |
Select Month |
Beneficiaries reached |
Education for Adults 2020 |
2020-10 |
90 |
Education for Adults 2020 |
2020-11 |
100 |
Education for Kids 2020 |
2020-11 |
12 |
The data in the spreadsheet use the parent form Key to identify where each record of the subform should be added.
Step 4: Preparing the data for the importer
Now, it is time to prepare the spreadsheet and the data to import. Add as headers all the labels of the fields that you see in the data collection form; that is the questions of the form. If you skip some fields, then no information will be added for these fields. However, if a field is required in the data collection form, then it needs to be added in the spreadsheet.
Tip: If you have exporting permissions for this form you can export the headers from ActivityInfo. Navigate to the Table View of the data collection form and click on “Export”. Open the downloaded file and all the necessary headers can be found in the document. If the exported file contains data from other records, make sure you clear the cells before adding your data.
Then start adding the data under each header. Each row is one record. There are formatting rules for some fields that will make sure that what you import will be correctly added to ActivityInfo:
- Single & Multiple Selection fields, Reference fields: Add the answers in the exact same way as they appear in the data collection form.
- Geo points: Enter both a Latitude and a Longitude column. In the header of the first column type the name of the Geographic point field and next to it type “- Latitude”. In the second column, type the name of the Geographic point field and next to it type “- Longitude”. You need to add valid coordinates for both columns and to make sure that the format of the number is correct (i.e. 39,074,200 is not an accepted format, 52.0705° N is). Coordinates of latitude must specify a hemisphere (+/-/N/S). Coordinates of longitude must specify a hemisphere (+/-/E/W).
- Date fields: Use the international format "YYYY-MM-DD" to prevent a wrong format conversion. The same applies for Month (“YYYY-MM”), Fortnight and Week fields (“YYYYW and number of the week”).
- Quantity fields: Provide the values without a thousands separator and using a period ('.') as the decimal sign. A common European format such as “.100,50” will not be accepted. Instead “1100.50” can be used.
- Attachment fields: Attachments cannot be imported using the importer. To import attachments to a record, edit the record after it’s imported, find the Attachment field and add the file using the ‘Browse’ button.
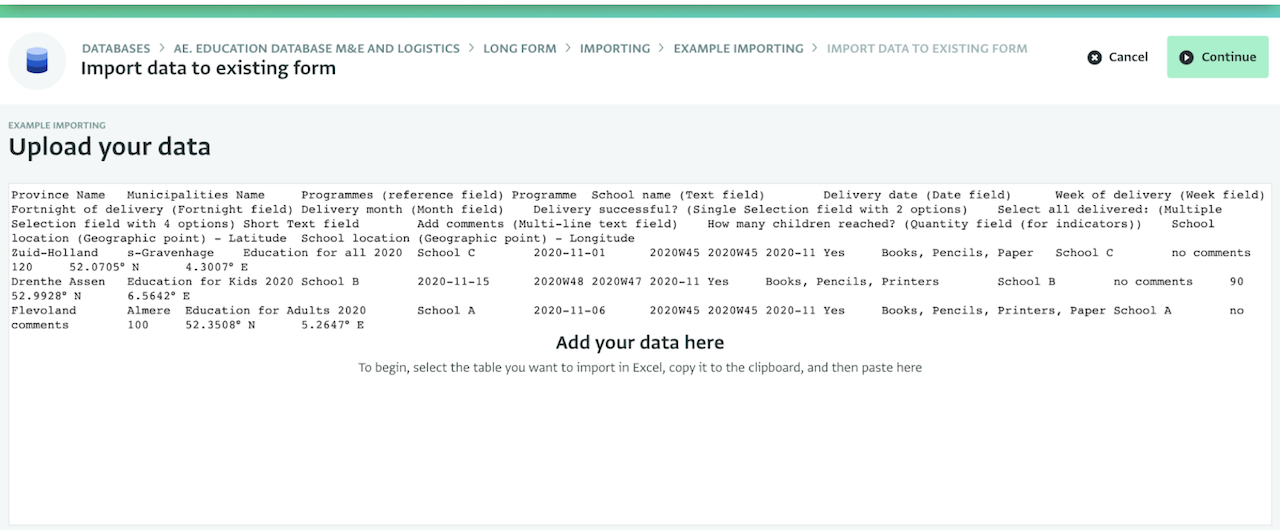
Take a look at the example below which includes all field types and the way we added them in the spreadsheet. In the parenthesis of each header you can view what type of field the column refers to.
| Spreadsheet preparation for importing | |||||||||||||
|---|---|---|---|---|---|---|---|---|---|---|---|---|---|
| Province Name | Municipalities Name | Programmes (reference field) Programme | School name (Text field) | Delivery date (Date field) | Week of delivery (Week field) | Fortnight of delivery (Fortnight field) | Delivery month (Month field) | Delivery successful? (Single Selection field with 2 options) | Select all delivered: (Multiple Selection field with 4 options) | Add comments (Multi-line text field) | How many children reached? (Quantity field (for indicators)) | School location (Geographic point) - Latitude | School location (Geographic point) - Longitude |
| Zuid-Holland | s-Gravenhage | Education for all 2020 | School C | 2020-11-01 | 2020W45 | 2020W45 | 2020-11 | Yes | Books, Pencils, Paper | no comments | 120 | 52.0705° N | 4.3007° E |
| Drenthe | Assen | Education for Kids 2020 | School B | 2020-11-15 | 2020W48 | 2020W47 | 2020-11 | Yes | Books, Pencils, Printers | no comments | 90 | 52.9928° N | 6.5642° E |
| Flevoland | Almere | Education for Adults 2020 | School A | 2020-11-06 | 2020W45 | 2020W45 | 2020-11 | Yes | Books, Pencils, Printers, Paper | no comments | 100 | 52.3508° N | 5.2647° E |
At this point you can also use the spreadsheet to update records that have already been added to the form and are visible in the Table View of that form. As discussed in the section ‘Step 2: Are there Keys in this form?’, to be able to update an existing record you need to know the key field(s) of the form. Then, in the spreadsheet, under the header(s) that correspond(s) to the key field(s) add the same answer(s) as the answer(s) that has been given to the record you want to update and fill in the rest of the columns with the updated data.
Step 5: Importing and reviewing the data
To import the data navigate to the Table View of the Form to which you want to add it and click on “Import”. If you want to add data to a subform, navigate to the Table View of the subform instead.
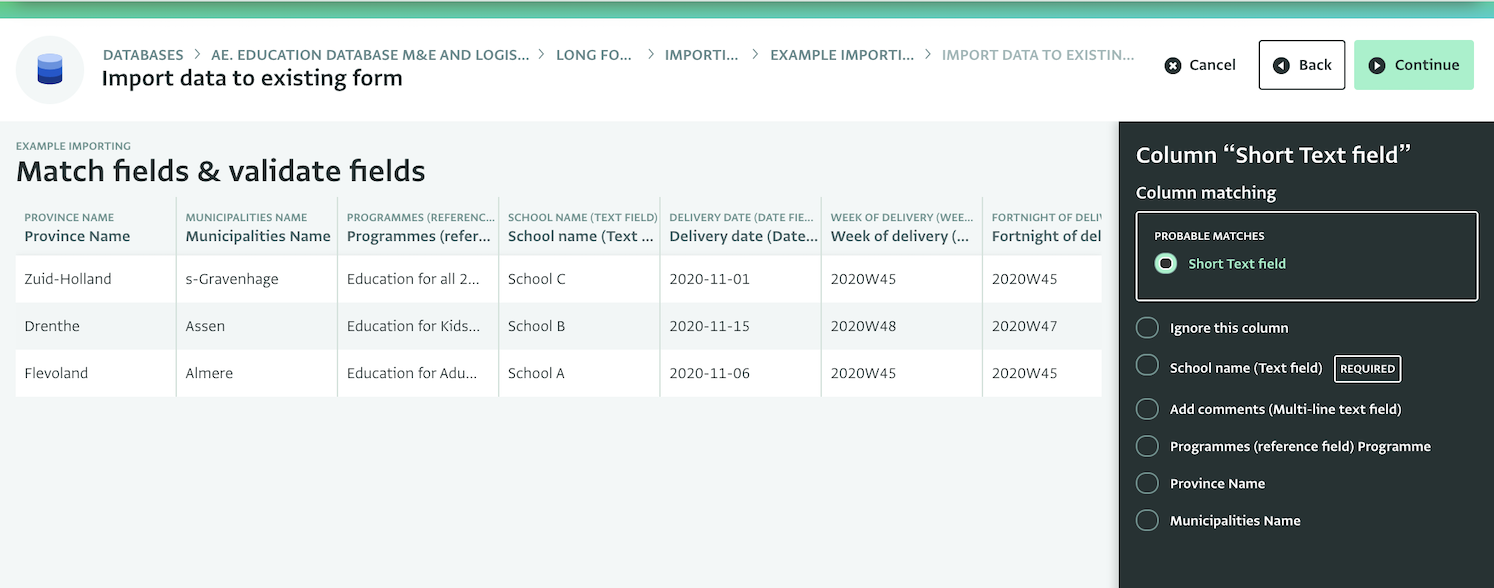
Copy all the data from the spreadsheet along with the headers, paste them in the importer and click on “Continue”. In the next page take a look at all the headers and make sure they have been correctly matched to the data collection form fields that appear in the panel. Clicking on “Continue” to reach the Review page.
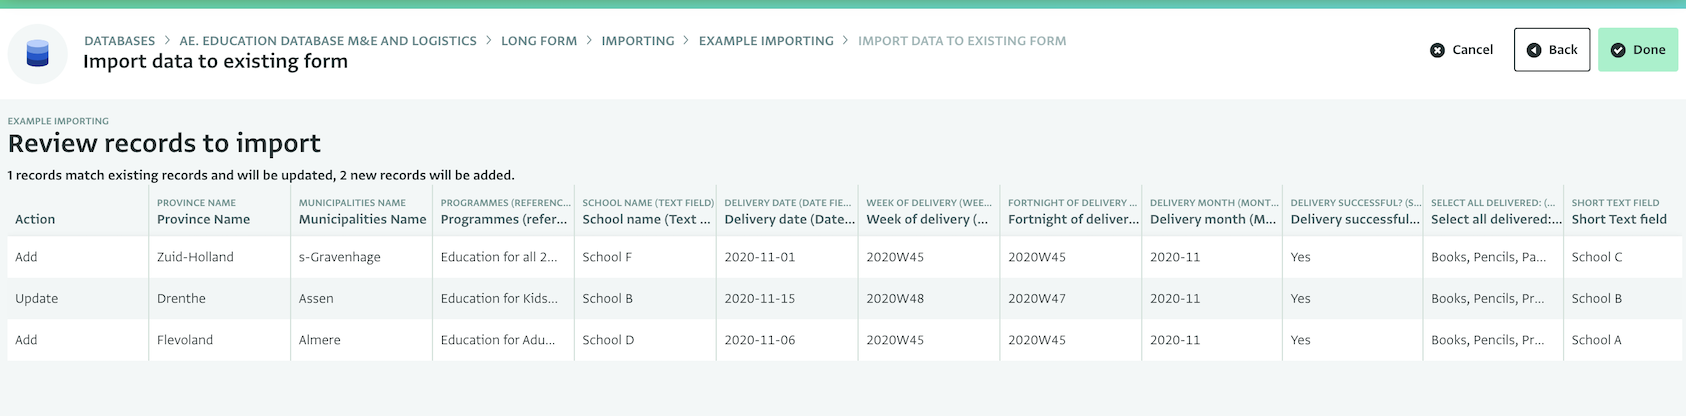
In the Review section you can view what kind of action will take place with the data you are importing. The rows will be either added as new records or update existing records.
Important note:
If the form doesn’t use any key field, then there is no way to update a record and you will always see in the Action column only the ‘Add’ action available. If the form uses keys and your imported data refers to an existing key then the Action column will show the ‘Update’ action for that record’.
Troubleshooting
In some cases you might encounter an issue in the importing process. Take a look at the list below and try to fix the issue.
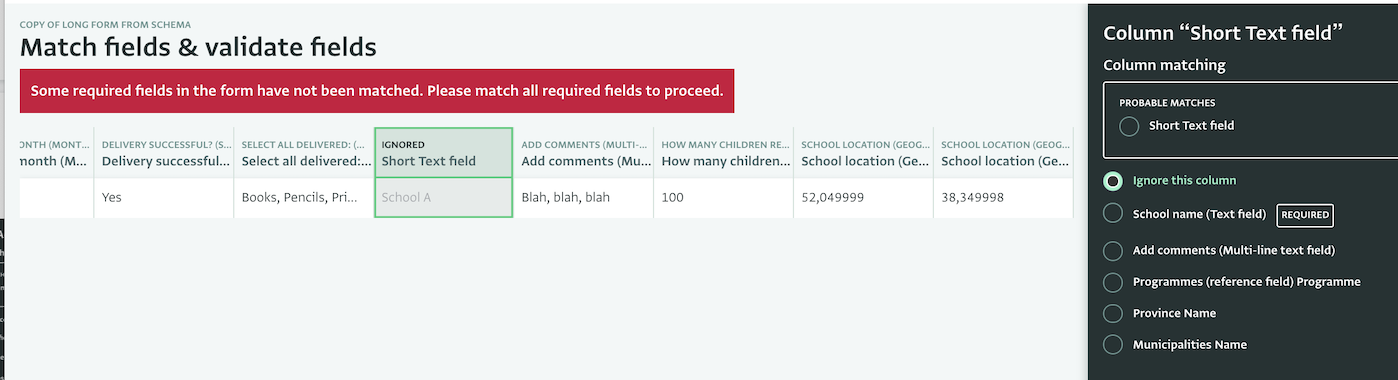
Matching and ignoring columns
If there is a misspelled header or a header that doesn’t match a field in the form, the importer will not be able to recognize the field that your column refers to but will suggest a probable match. In that case, you can match a header with a form field by clicking on the header and then clicking on the form field name in the side panel.
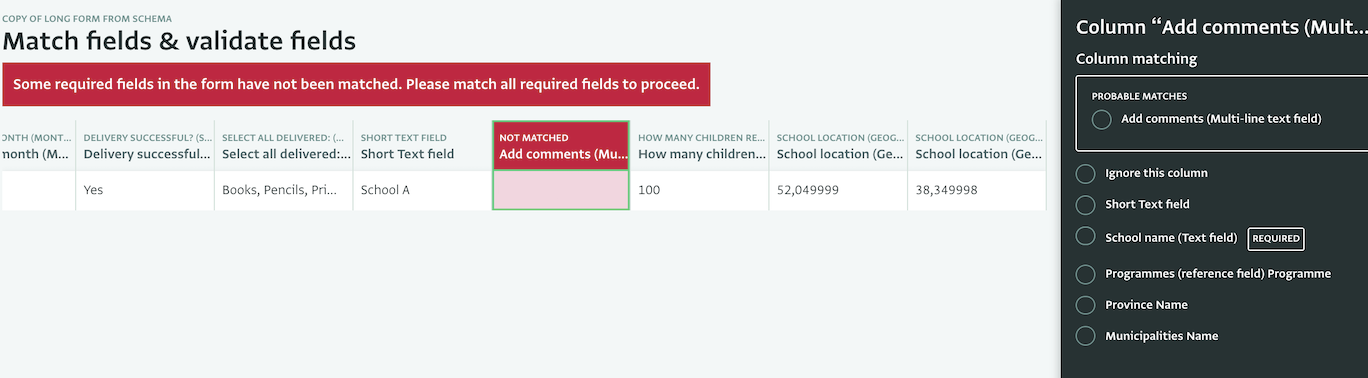
You can also select to completely ignore a whole column. If you do that, the data of this column won’t be imported.
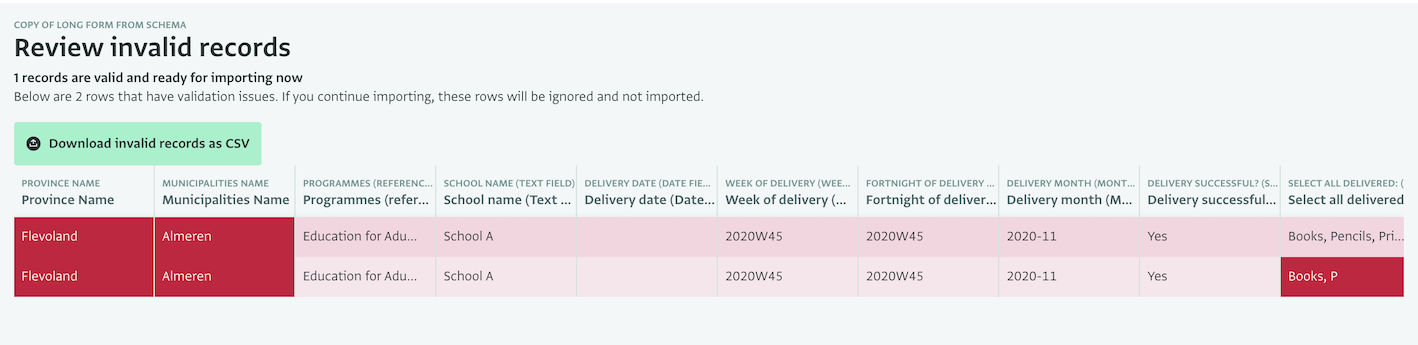
Dealing with invalid records
If the data you are importing is not following the rules of the importer, you will be notified and you won’t be able to import it. You can either go back to the spreadsheet and correct all the data that has mistakes or download the invalid rows and work only with this data instead. Then, you can import these rows following the same process.
Miscellaneous issues
The “Continue” button is grayed out: Make sure the data you added are in the format required. Try different columns to detect which column has data that create the issue.
Some required fields in the form have not been matched: This error appears when the data you pasted from the spreadsheet doesn’t include a column with a header that corresponds to a required field in the form. Go back to the data collection form, find all the fields marked as required and ensure the spreadsheet has a column for these fields. Required fields are marked with “Required” and an asterisk in the form in the data entry page.
From December 2022 onwards:
- Validation and relevance rules: If a field doesn't match a validation or relevance rule, you will be notified and you will need to correct the field before importing it or ignore the column. Click on the 'i' icon to get more information. Also, when using relevance or validation rules for a field, makes sure that the fields on which these rules are based are also imported.
We hope you find this guide useful and that the importer will save precious time for you and your colleagues. Happy importing!