Data quality and data analysis tips with formulas in ActivityInfo
ActivityInfo is designed to be a very simple and easy to use platform for your information management needs. However, complicated situations sometimes create challenging data collection and data analysis needs. With formulas you can address such challenges and monitor and analyze data more efficiently.
In this blog post, we take a deep dive in the ActivityInfo formulas, using real-life examples for Emergency NFI Distributions and Household Vulnerability Assessments. We take a look at how you can use formulas to ensure data quality. We also explore the ways formulas can be used in data analysis. Finally, we take a look at various formulas that use basic math operations, boolean rules, functions and function applications. We work with practical examples such as calculating age based on birth date, date differences, vulnerability assessments scores, and many more.
You can follow the full Webinar “The secret power of ActivityInfo Formulas” and practice along. You can access all available formulas in our Documentation.
Controlling data entry with formulas
Data Validation rules
Validation rules define rules for the validity of Records. Data entry users won't be able to save a Record that does not follow the Validation rules. Let’s take the example of a simple Emergency NFI Distribution Form which is used to make sure that Basic Non-Food Items are distributed immediately when people are affected or displaced by a disaster.
Data Validation for dates
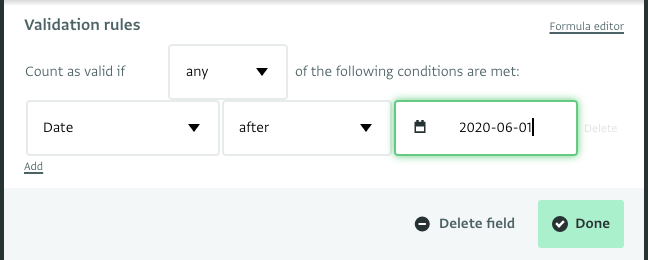
The Form uses two Date fields, one for the date of the alert and one for the date of the distribution. To simplify your formulas, it is always recommended to use Codes, which are essentially a shorter version of the field’s name. Here we will use DATE_DIST for the 'Distribution Date' and DATE_ALERT for the 'Alert Date'.
You can set Validation rules to ensure that:
-
- The 'Alert Date' is always after the date that your programme started This can be done with a simple Validation rule, there is not need for a formula
-
- The Distribution Date is always after or on the date of the 'Alert Date'.
Formula: DATE_DIST >= DATE_ALERT
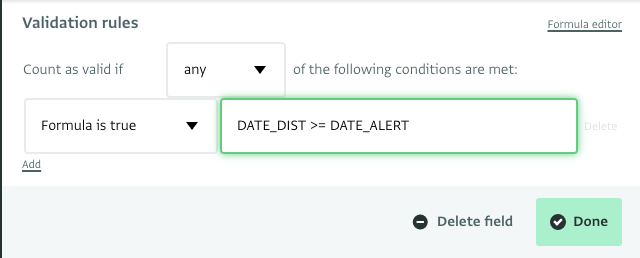
In this example, data entry won’t allow dates before 2020-06-01 in the 'Alert Date' field. Also, it won’t allow dates before the 'Alert Date' in the 'Distribution Date' field.
Data Validation for decimal values
You might want to prevent users from adding a decimal value in a Quantity field, such as the ‘Kits distributed’. You can use the FLOOR() function to achieve this.The FLOOR() function is used to round a value downwards to the nearest whole number. Here the Quantity field ‘Kits Distributed’ has the Code NUM_KITS.
Formula: NUM_KITS == FLOOR(NUM_KITS)

In this example, data entry won’t allow decimal numbers such 5.5 in the ‘Kits Distributed’ field.
Relevance rules
Relevance rules define when a field will appear in data entry. Using Relevance rules simplifies the data collection process for your users.
In the same example of the Emergency NFI Distribution Form, we use Quantity fields to collect the number of women and men who received a kit during the NFI Distribution. We want to address gender imbalances and to discover any potential impediments.
To do that we add an additional question, as a Multi-line Text field, to ask for further information on women under-representation in the distribution. To simplify data entry, we add a Relevance rule with a formula to this field so that it only appears when there is a high imbalance.
We will give the Codes ‘MEN’ and ‘WOMEN’ to the respective Quantity fields and we will decide on a ratio under which, if the ratio or women to men falls, the question should appear.
Formula: WOMEN/MEN < 0.85
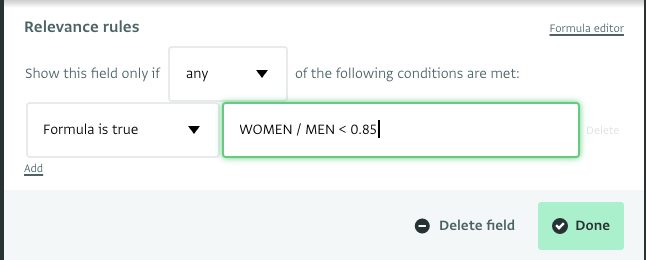
In this example, the additional question will appear if the ratio of women receiving a kit in comparison to men receiving a kit is under 0.85.
Validation and Relevance rules with Reference Forms
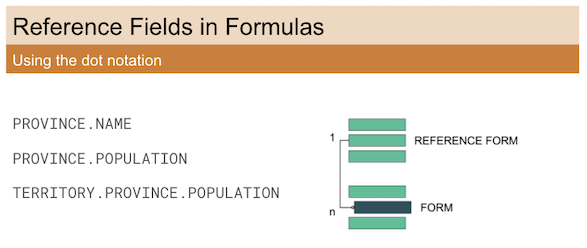
You can use the fields of other Forms in your Validation and Relevance rules. To do this you simply need to reference the Form and use its name and the field name with a dot (.) notation in between. Let’s take the example of two Forms:
- The Form 'Provinces' collects the amount of total population per province with a Quantity field with Code ‘POPULATION’.
- The Form 'Access to water' collects the amount of population with access to water with a Quantity field with Code ‘ACCESS_WATER’ and references the Form named 'Provinces'.
You can use a Validation rule with a formula to ensure that the amount of population with access to water never exceeds the number of total population and is always above 0.
Formula: ACCESS_WATER >= 0 && ACCESS_WATER <= Province.POPULATION
Data analysis: Table View, Pivot Tables, Form Designer
Table View: You can do quick calculations on the Records of a Form using the Table View and the Select Columns menu of a Form. You can quickly get totals, ratios and more on new columns. Read more in our User Manual.
Pivot Tables: You can also use formulas and calculated fields on Pivot Tables to make calculations and to share your results with your colleagues or publish dashboards to the public. Pivot Tables also allow you to work with Average, Median and more statistics and the Quantity or Calculated fields of your Forms. Read more in our User Manual.
Form Design: Another way to quickly do data analysis is to use Calculated fields in your Forms. Calculated fields allow you to work quicker on data analysis as the Records are added. They don’t appear in data entry so users working on data collection won’t get confused by them.
You can use Calculated fields in other Calculated fields. For example you can create a Calculated field with the Code ‘TOTAL’, summing up men and women beneficiaries (MEN + WOMEN) and then use the ’TOTAL’ Code in other calculations so as to build more complicated formulas.
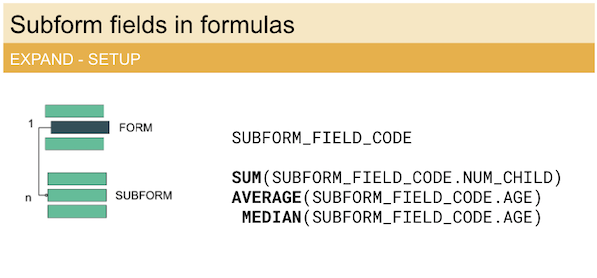
Subforms: You can also add Calculated fields and formulas in your Subforms and do calculations in the Subform level. However, if you want to base the calculations of the Parent Form on the Records added to the Subform of that Form, you can only do so by using the fields of the Subform as part of an aggregate or statistic function, such as SUM, AVERAGE, MEDIAN, etc. You can also give a Code to the Subform and use that in a Calculated field in your Parent Form to get the total number the Records entered in that Subform.
More useful formulas
Summing up Records added to a Subform
Let’s take the example of a Household Vulnerability Assessment Form, a Form that registers people affected by a disaster or parts of a vulnerable population and gives a score to each household to assist in prioritization, and needs identification. In this example, we use a Subform in the Form with the Code ‘MEMBERS’ to collect additional information about each household member.
You can quickly count how many household members exist in a household by adding a Calculated field to the Parent Form and simply use ‘MEMBERS’ in the formula.
Formula in the Parent Form: MEMBERS
Calculating percentages
In the example of the Emergency NFI Distributions Form we can quickly calculate the women beneficiaries as a percentage of the total beneficiaries. We use WOMEN and MEN as Codes for the respective Quantity fields.
Formula: WOMEN / (WOMEN + MEN) * 100
In the section ‘Validation and Relevance rules with Reference Forms’ we talked about a Form referencing another Form where we check if the amount of people with access to water in a province is below the total amount of population of the province.
We can also calculate the percentage of the population with access to clean water.
Formula: ACCESS_WATER/Province.POPULATION * 100
Note the 'Province.Population' part of the formula which shows that the field comes from a referenced Form.
Calculating date differences
In the example of the Emergency NFI Distribution Form you can use the Date fields to calculate the time between the 'Alert Date' and the 'Distribution Date' as a fraction of the year using the YEARFRAC() function.
Formula: YEARFRAC(DATE_ALERT, DATE_DIST)
You can also get the days between the 'Alert Date' and the 'Distribution Date' using the DAYS() function. Please note that the end date must come before the start date in this case.
Formula: DAYS(date_dist, date_alert)
As a next step, you could use this field as a Measure in a Pivot Table to get the median and average response times.
Calculating age
In the example of the Household Vulnerability Assessment Form, we collect information about household members so as to assess their vulnerability.
This is a Form that assigns scores to households based on some conditions, such as household members’ gender, age, disability status, number of children, working children etc.
One thing we could do is to calculate the age of the head household member so as to assign a respective vulnerability score to the member.
To calculate age we use a Date field to collect the 'Date of Birth' of the household member and give it the Code ‘DOB’. Then, with a Calculated field we get the age using the YEARFRAC() and TODAY() functions.
Formula: YEARFRAC(DOB, TODAY())
IF functions
Another thing we could do for the Household Vulnerability Assessment Form is to check if the head household member is a minor or adult, based on the member’s age.
The IF function takes three arguments:
- The condition which can be true or false
- The result we should get if the condition is true
- The result we should get if the condition is false
To do this we need to:
- calculate the Age of the household member with a calculated field, as shown in the previous step
- categorize the member as minor or adult with an IF function that checks the condition of age
Formula: IF(AGE < 18, “Minor”, “Adult”)
Formula arguments can also use functions, if for example we wanted to create more categories for the household member we would use the following formula.
Formula: IF (AGE > 18, “Minor”, IF(AGE < 70, “Adult(18-70)”, “Elderly”))
Assigning scores for a vulnerability index
In the example of the Household Vulnerability Assessment Form, we could assign a total score to a household member based on a series of conditions and IF statements.
If we wanted to assign a score based on the option selected in a Selection field, we would need to use the Code of the field and the Option name with a dot (.) notation in between.
So if the Single Selection field ‘Select gender’ with Code ‘GENDER’ has the options ‘Male’, ‘Female’, we would use the following formula to assign a value of 5 for Female and 0 for male.
Formula: IF(GENDER.Female, 5, 0)
Finally, this is how a longer formula assigning scores based on various criteria would look:
Formula: IF(AGE <18, 5, 0) + IF(AGE> 65, 3, 0) + IF(GENDER.Female, 5, 0) + IF(DISABLED.Temporarily, 3, 0) + IF(DISABLED.Permanently, 5, 0) + IF(NUM_CHILDREN > 10, 10, 0)
What do you think about the power of formulas in ActivityInfo? Will you be using them more often?